Hardsubbing Tutorial
Background on Hardsubs:
Fansub teams release softsubs for people to use along with a video that it is timed to match. In my opinion, the reason why there are quite a bit of softsubs out there is because of the time it takes to hardsub and the fansub teams find it unnecessary and time consuming to provide Hardsubs and softsubs. This is of course my opinion, I’m not part of any sub teams so I don’t know their rationalizations behind but it really doesn’t matter. I love them for doing all that they do be it softsubs or hardsubs.
For my computer system, however long a video is usually means that is how long it will take to hardsub. This does not mean that for your system it will be the same but for me, that’s how it works. When I hardsub, I can do absolutely NOTHING on my computer. Except use the calculator…or point and click various places with my mouse and watch nothing happen. So I usually hardsub when I’m eating dinner, watching Moonlight or Torchwood or other shows with my parents and while I’m sleeping. Your system could be different, I’ve only ever hardsubbed on my parents computer so I don’t know if its universal or not.
The entire process for hardsubbing only takes me about 3 minutes to do the settings and anywhere from 45mins-4 hours to hardsub depending again on the size of the original video file. When I first started, it took me about 15 minutes but you’ll get used to it. I could probably do hardsubbing with my eyes closed I do it so much.
Hardsub Tools .zip .rar
Steps for Hard Subs:
The first step in hard subbing is to download zip file (also in .rar format) it includes the following programs vital to hardsubbing from softsubs. Each program just sits on your computer and isn’t actually installed which is always a plus for some of us with tons of programs that like to fight for control.
o Media Sub
o VirtualDub
o Codec All in 1 (if you already have the XviD codec you can just delete this)
Once it is downloaded and unzipped, you will see that I have already put the Subtitler.vdf file in the plug-ins folder. Which is necessary for this whole process to work. (Please note that the zip titled Subtitler has the Subtitler.vdf file necessary for the subs so if you ever have problems its there for you.)
The next step is to style the softsubs. For this demonstration, I will be using the subs for the Kmovie ‘My Tutor Friend 2’ (an awesome movie if you haven’t seen it, I will upload it one of these days)
Open Media Subtitler File>Open Text or Subtitle. From there, you will get a File Report of the Subs.
It will look similar to this. [Opens in new window]
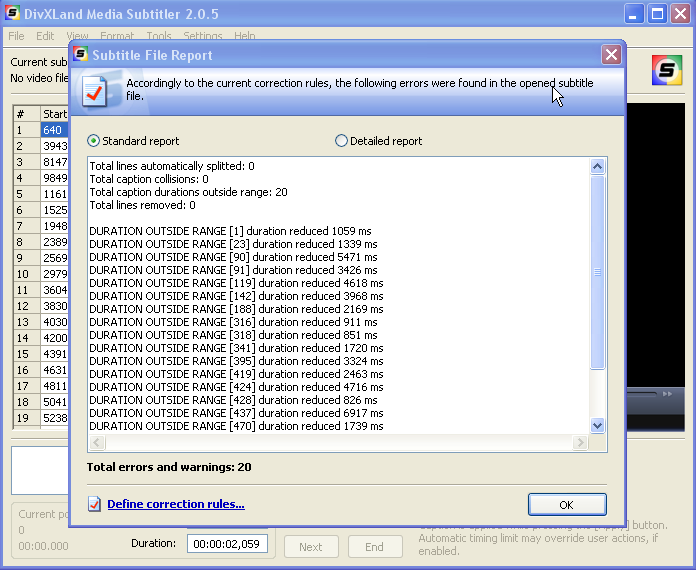
These errors or warnings are normal…very, very normal so have no worries there. Media Subtitler knows what it is doing. Trust the technology trust it.
Press ok.
Now that its been pulled up, go to Settings>Format Settings. Make sure to have SubStation Alpha selected. From there choose your font colors and sizes.
My font settings are always: Trebuchet MS Regular 26
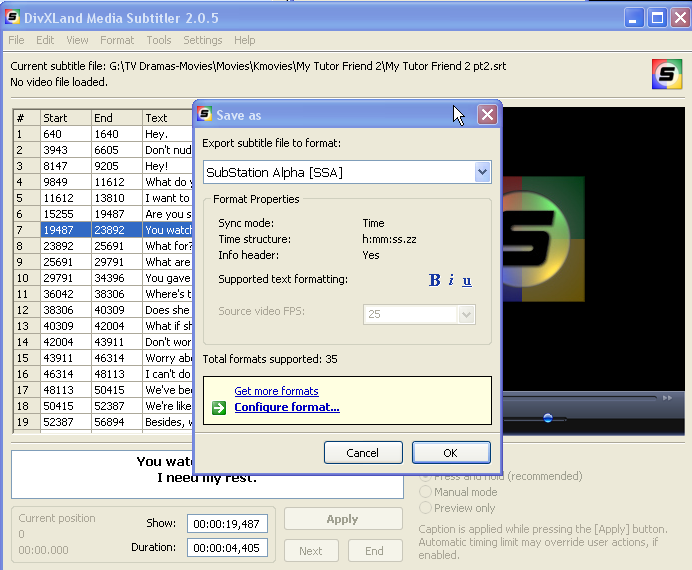
Go to File>Save as
IT HAS TO BE SSA, SubStation Alpha. [Opens in new window]
Press ok.
Save As is in your destination folder. Tip: I always make a new folder on my desktop so that I can make sure I know exactly where the file ends up.
We are now done with Media Subtitler. *throws confetti*
Next open VirtualDub
File>Open Video File
Open the RAW video file. It looks like nothing happened but trust me…you’ve opened the file.
Go to Video>Filters
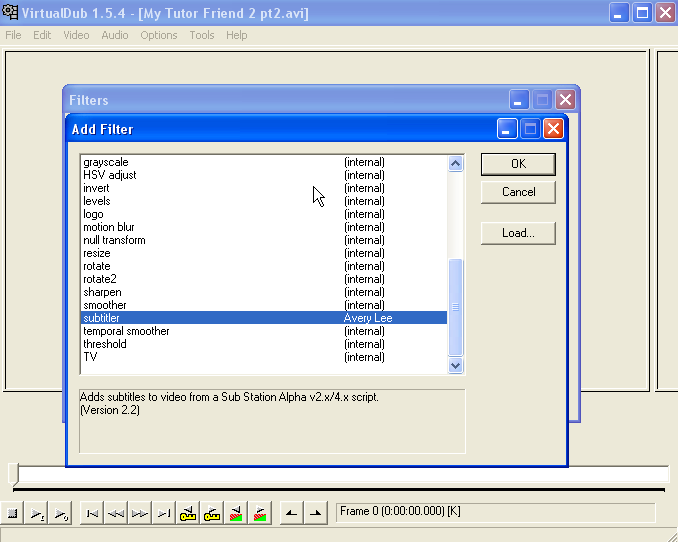
Click Add. Go down the list until you see subtitler Avery Lee. [Opens in new window]
It will have a list of various things relating to the subs, which is COMPELTELY unnecessary EXCEPT for the subtitler item. Click subtilter and add it. (If you don’t have subtitler in the list, the subtitler.vdf isn’t in the plug-in folder for some god-awful reason. Please check to make sure its still in the plug-ins folder]
Press ok.
It will bring up Subtitler Configuration. From here you will press the … and open the newly created .ssa file you were just fooling around with.
Make sure the ‘Enable advanced rasterizer’ is checked.
Also make sure the ‘Default word wrapping mode’ is the bottom one. ‘Smart word wrapping.’
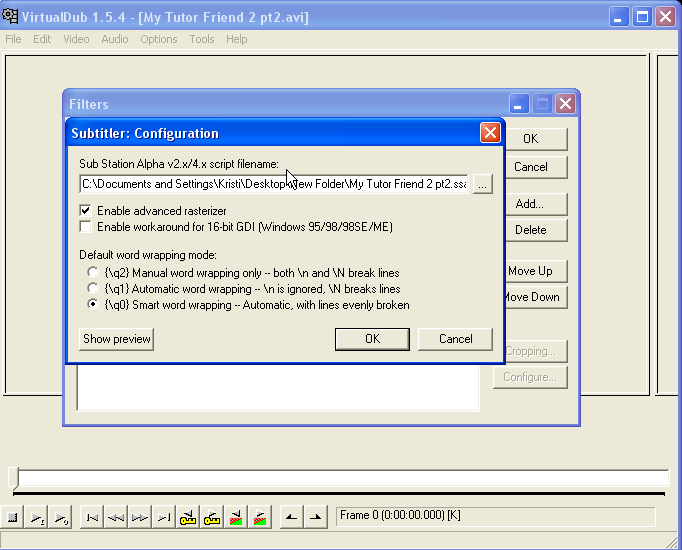
I highly recommend you push Show Preview. Note: if your show preview isn’t available for pushing its because you didn’t open the video file. Please go back, open the video file and do the steps over again.
Press ok.
Press ok again.
Now go to Video>Compression
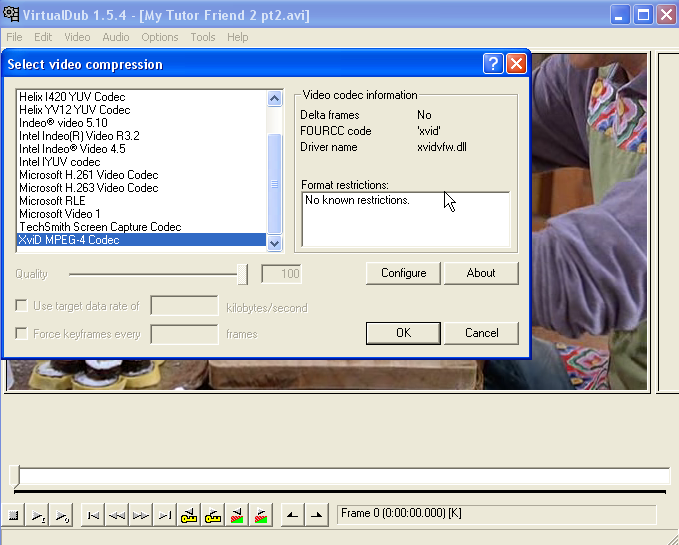
Make sure XviD MPEG-4 Codec is selected. If it doesn’t show up, you don’t have the codec on your computer. You can use the Codec All in 1 that I included in the HS Tools .zip/.rar or you can google XviD codec and find one there also.
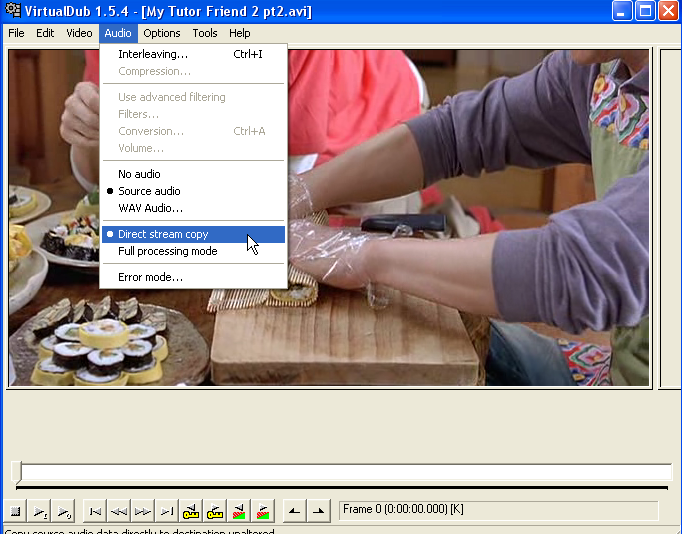
Next, make sure that Video>Full Processing Mode and Audio>Direct Stream Copy are bulleted.

The Last step
File>Save as AVI.
I always save it onto my Desktop so I know EXACTLY where it is. As soon as you push Save it will start the actual hardsub process. It will look something like this.
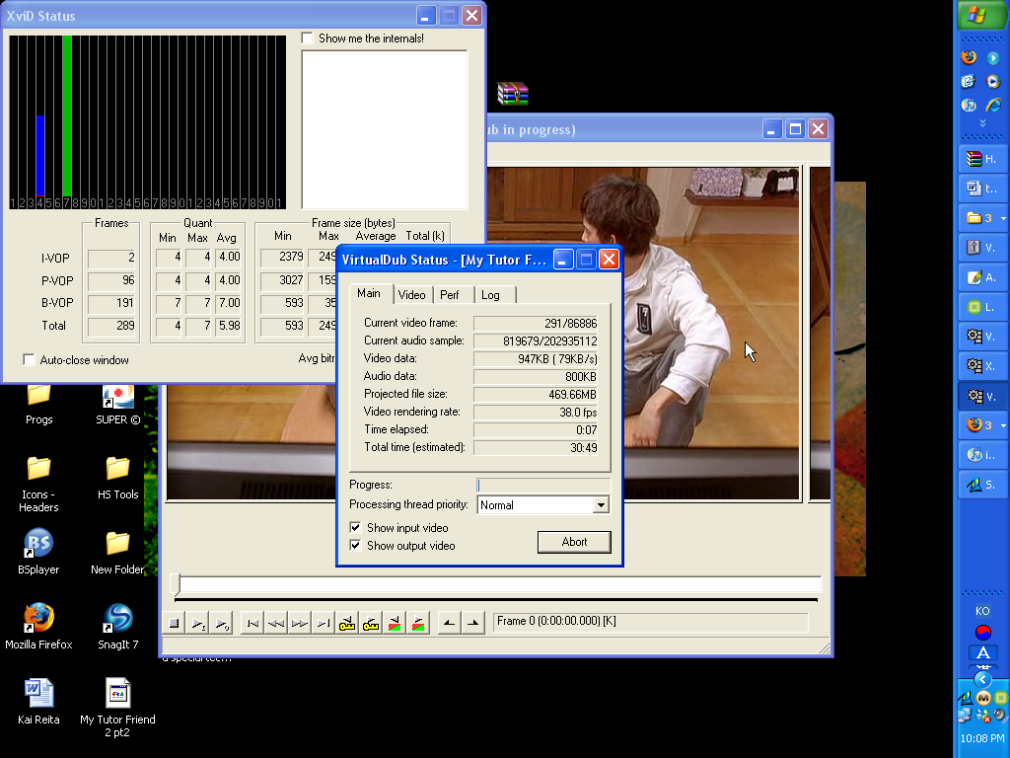
Now, go pop some popcorn, read a book, walk the dog….do something other than be on the computer because you'll get bored. If you're curious to see if it is working, just maximize the video window and you'll see the subs being put on the video on the right.
I'm not at all an expert on hardsubs and there could very well be a better way but this is the way I do it. Please ask a question if something doesn't work right. Make sure to read all the directions first and then ask me if you're stuck.
Fansub teams release softsubs for people to use along with a video that it is timed to match. In my opinion, the reason why there are quite a bit of softsubs out there is because of the time it takes to hardsub and the fansub teams find it unnecessary and time consuming to provide Hardsubs and softsubs. This is of course my opinion, I’m not part of any sub teams so I don’t know their rationalizations behind but it really doesn’t matter. I love them for doing all that they do be it softsubs or hardsubs.
For my computer system, however long a video is usually means that is how long it will take to hardsub. This does not mean that for your system it will be the same but for me, that’s how it works. When I hardsub, I can do absolutely NOTHING on my computer. Except use the calculator…or point and click various places with my mouse and watch nothing happen. So I usually hardsub when I’m eating dinner, watching Moonlight or Torchwood or other shows with my parents and while I’m sleeping. Your system could be different, I’ve only ever hardsubbed on my parents computer so I don’t know if its universal or not.
The entire process for hardsubbing only takes me about 3 minutes to do the settings and anywhere from 45mins-4 hours to hardsub depending again on the size of the original video file. When I first started, it took me about 15 minutes but you’ll get used to it. I could probably do hardsubbing with my eyes closed I do it so much.
Hardsub Tools .zip .rar
Steps for Hard Subs:
The first step in hard subbing is to download zip file (also in .rar format) it includes the following programs vital to hardsubbing from softsubs. Each program just sits on your computer and isn’t actually installed which is always a plus for some of us with tons of programs that like to fight for control.
o Media Sub
o VirtualDub
o Codec All in 1 (if you already have the XviD codec you can just delete this)
Once it is downloaded and unzipped, you will see that I have already put the Subtitler.vdf file in the plug-ins folder. Which is necessary for this whole process to work. (Please note that the zip titled Subtitler has the Subtitler.vdf file necessary for the subs so if you ever have problems its there for you.)
The next step is to style the softsubs. For this demonstration, I will be using the subs for the Kmovie ‘My Tutor Friend 2’ (an awesome movie if you haven’t seen it, I will upload it one of these days)
Open Media Subtitler File>Open Text or Subtitle. From there, you will get a File Report of the Subs.
It will look similar to this. [Opens in new window]

These errors or warnings are normal…very, very normal so have no worries there. Media Subtitler knows what it is doing. Trust the technology trust it.
Press ok.
Now that its been pulled up, go to Settings>Format Settings. Make sure to have SubStation Alpha selected. From there choose your font colors and sizes.
My font settings are always: Trebuchet MS Regular 26
Go to File>Save as
IT HAS TO BE SSA, SubStation Alpha. [Opens in new window]

Press ok.
Save As is in your destination folder. Tip: I always make a new folder on my desktop so that I can make sure I know exactly where the file ends up.
We are now done with Media Subtitler. *throws confetti*
Next open VirtualDub
File>Open Video File
Open the RAW video file. It looks like nothing happened but trust me…you’ve opened the file.
Go to Video>Filters
Click Add. Go down the list until you see subtitler Avery Lee. [Opens in new window]
It will have a list of various things relating to the subs, which is COMPELTELY unnecessary EXCEPT for the subtitler item. Click subtilter and add it. (If you don’t have subtitler in the list, the subtitler.vdf isn’t in the plug-in folder for some god-awful reason. Please check to make sure its still in the plug-ins folder]

Press ok.
It will bring up Subtitler Configuration. From here you will press the … and open the newly created .ssa file you were just fooling around with.
Make sure the ‘Enable advanced rasterizer’ is checked.
Also make sure the ‘Default word wrapping mode’ is the bottom one. ‘Smart word wrapping.’

I highly recommend you push Show Preview. Note: if your show preview isn’t available for pushing its because you didn’t open the video file. Please go back, open the video file and do the steps over again.
Press ok.
Press ok again.
Now go to Video>Compression
Make sure XviD MPEG-4 Codec is selected. If it doesn’t show up, you don’t have the codec on your computer. You can use the Codec All in 1 that I included in the HS Tools .zip/.rar or you can google XviD codec and find one there also.

Next, make sure that Video>Full Processing Mode and Audio>Direct Stream Copy are bulleted.


The Last step
File>Save as AVI.
I always save it onto my Desktop so I know EXACTLY where it is. As soon as you push Save it will start the actual hardsub process. It will look something like this.

Now, go pop some popcorn, read a book, walk the dog….do something other than be on the computer because you'll get bored. If you're curious to see if it is working, just maximize the video window and you'll see the subs being put on the video on the right.
I'm not at all an expert on hardsubs and there could very well be a better way but this is the way I do it. Please ask a question if something doesn't work right. Make sure to read all the directions first and then ask me if you're stuck.