Silent Hill Tutorial
Hey guys! I was so psyched about Silent Hill this weekend, I decided to do a tutorial. This is my second ever tutorial, so I hope it's easy to understand...
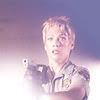
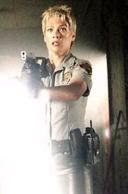
So we’ll be going from This to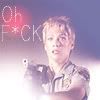
Step 1 - Crop! so it’s a 100x100 square.

Step 2 - Next, we’re going to duplicate the base layer (Layer-duplicate layer or Right-click the base layer and click “duplicate layer”) Then, desaturate the layer (shift+Ctrl +U or Image-Adjustments-desaturate) Now, we’re going to add a gaussian blur (filters - blur- gaussian blur.) Set it at about 7 or 8 pixles. You should get this:

Set the blend mode to Overlay
Step 3 - gradient time! Create a new layer. We’re going to be using this one:

(found at icongradients I forget the original author…if you made it, let me know and I’ll gladly credit.) Set the blend mode to soft light.
You should have this so far -

Step 4 - New layer again. We’ll be using another gradient:

Set the blend mode to Screen
This is what you'll get:
Nice right?
Step 5 - new layer! Add this gradient:
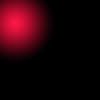
(made by me. Feel free to use it.) and set the blend mode to Lighten.
Step 6 - Next add whatever font you want (I used the font Print Clearly Dashed) and tada! You’re done ^_^
Happy icon making ^_^
So we’ll be going from This to
Step 1 - Crop! so it’s a 100x100 square.
Step 2 - Next, we’re going to duplicate the base layer (Layer-duplicate layer or Right-click the base layer and click “duplicate layer”) Then, desaturate the layer (shift+Ctrl +U or Image-Adjustments-desaturate) Now, we’re going to add a gaussian blur (filters - blur- gaussian blur.) Set it at about 7 or 8 pixles. You should get this:
Set the blend mode to Overlay
Step 3 - gradient time! Create a new layer. We’re going to be using this one:
(found at icongradients I forget the original author…if you made it, let me know and I’ll gladly credit.) Set the blend mode to soft light.
You should have this so far -
Step 4 - New layer again. We’ll be using another gradient:
Set the blend mode to Screen
This is what you'll get:
Nice right?
Step 5 - new layer! Add this gradient:
(made by me. Feel free to use it.) and set the blend mode to Lighten.
Step 6 - Next add whatever font you want (I used the font Print Clearly Dashed) and tada! You’re done ^_^
Happy icon making ^_^