Lucky Star Icon Coloring
After making a batch of Lucky Star icons, a few friends asked for a tut. I decided to share this with you, as well. This one is a simple, 3-step process. I use Paint Shop Pro, but it can be done in Photoshop also.
Samples:


Step one! Find your base. ^___^ I used screencaps from DesertMoon.org. We'll start with this:
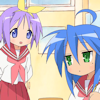
If the image needs sharpened, do so. I didn't sharpen mine. The next step is to add a dark blue exclusion layer. I used #0a0a30, set to Exclusion at 100%. Now we have this!

Next, I brightened the icon with a beautiful coral pink (#e76c79) and set that layer to Overlay at 100%.

Last but not least, to tone down the hue, I added one last layer of blue, #b8dff4, and set it to Multiply at 40%.

TA-DA!
Samples:
Step one! Find your base. ^___^ I used screencaps from DesertMoon.org. We'll start with this:
If the image needs sharpened, do so. I didn't sharpen mine. The next step is to add a dark blue exclusion layer. I used #0a0a30, set to Exclusion at 100%. Now we have this!
Next, I brightened the icon with a beautiful coral pink (#e76c79) and set that layer to Overlay at 100%.
Last but not least, to tone down the hue, I added one last layer of blue, #b8dff4, and set it to Multiply at 40%.
TA-DA!