Tutorials: Creating/Saving Gradients in the Materials Palette (PSP8)
In this tutorial, I will be teaching you how to create & save gradients in the Materials Palette using PSP8.
Step 1:
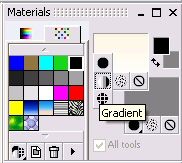
Go & click on the small gradient symbol located on your Materials Palette.
Step 2:
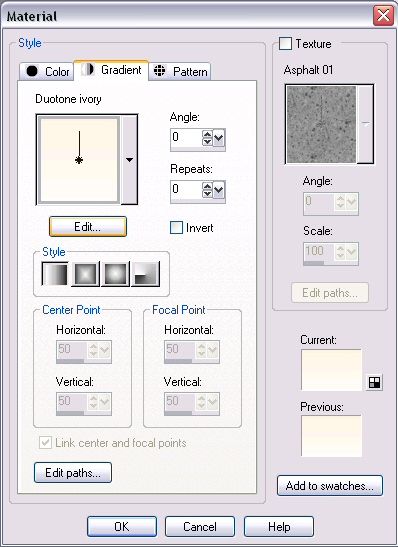
Click on the gradient shown. The gradients box will pop up.
Step 3:
Underneath the gradient currently shown is the Edit button. Click on it.
Step 4:
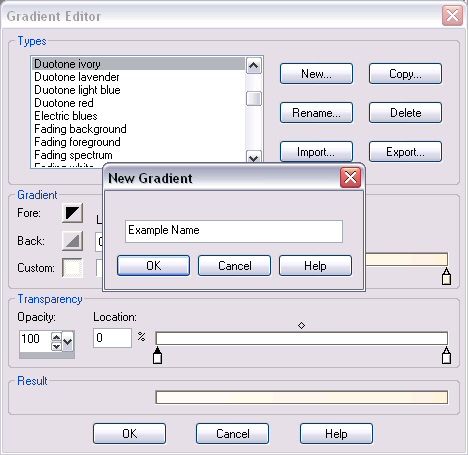
The Gradient Editor box will pop up. Click on New, enter your gradient's name, & click OK.
Step 5:
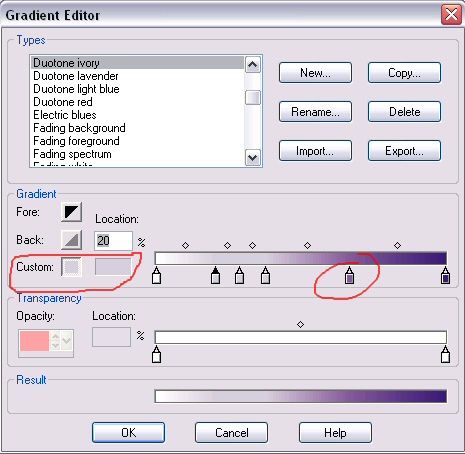
We'll be working under the Gradient section alone. Underneath the gradient are little boxes with triangles on top of them. Those determine the new colour points in your gradient. Click on the box to the very right to select that point.
Step 6:
Look to the left & find the part that says Custom. Click on the rectangle box. Choose your starting colour from the colour palette & click OK. (Look at above image again.)
Step 7:
You have now made one colour point on your gradient! Now repeat steps 5 & 6 for the remaining colour points. If you wish to add more colour points, click to the left or right of the existing points.
Step 8:
Once you are satisfied with your gradient, click OK. Now when you select the gradients, yours will be displayed.
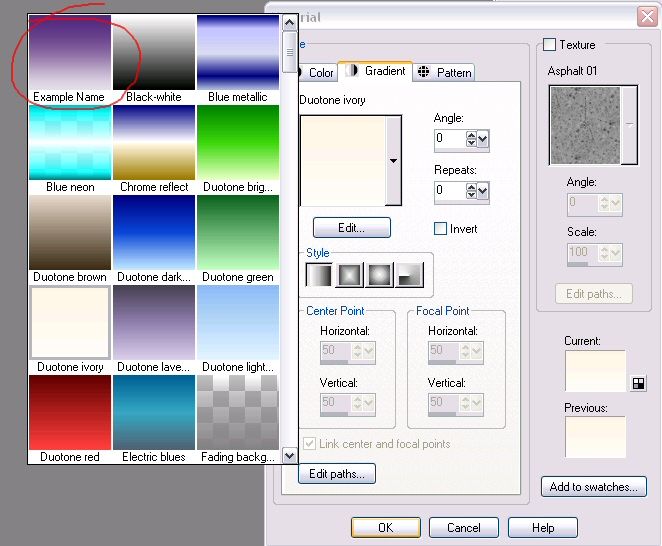
Note: If you wish to add transparency to your gradient, look under the Transparency section. Simply change the numbers under Opacity & Location.
Step 1:
Go & click on the small gradient symbol located on your Materials Palette.

Step 2:
Click on the gradient shown. The gradients box will pop up.
Step 3:
Underneath the gradient currently shown is the Edit button. Click on it.

Step 4:
The Gradient Editor box will pop up. Click on New, enter your gradient's name, & click OK.

Step 5:
We'll be working under the Gradient section alone. Underneath the gradient are little boxes with triangles on top of them. Those determine the new colour points in your gradient. Click on the box to the very right to select that point.

Step 6:
Look to the left & find the part that says Custom. Click on the rectangle box. Choose your starting colour from the colour palette & click OK. (Look at above image again.)
Step 7:
You have now made one colour point on your gradient! Now repeat steps 5 & 6 for the remaining colour points. If you wish to add more colour points, click to the left or right of the existing points.
Step 8:
Once you are satisfied with your gradient, click OK. Now when you select the gradients, yours will be displayed.

Note: If you wish to add transparency to your gradient, look under the Transparency section. Simply change the numbers under Opacity & Location.