Color With Curves - PS7
Today, we're going to have some insight into coloring with curves! Go from...
to
Alright, do the usual. Rotate, crop, resize, sharpen, smudge skin, etc. We have this:

I choose to up the Brightness/Contrast a little bit to give it some more dimension. You can do this by going to Image > Adjustments > Brightness/Contrast or by clicking the little half light, half dark circle on the bottom row of your layers palette. Now we have this:

Now we're going to have some fun with curves! Here's my disclaimer: Curves beg to be played with. No method will give the perfect results for every icon... the colors largely depend on the original color content of the icon! At the top, you'll see the label RGB. Go under that, and you'll see Red, Green, and Blue. Those are the curves we're going to play with. Subtle movements of the line can create big differences, so tinker with them a bit to see what you like. This is what I did with my curves:


I press okay, and I get this:

+ Curves =
Much nicer, isn't it? But we aren't finished yet! Create a new layer (SHFT + CTRL + N), and flood fill it with DAF7FE, or some other nice blue color. Set it to Color Burn, 100%. A nice subtle blue hint.
Now we're going to play with curves again! Remember, experiment! This is what I used:


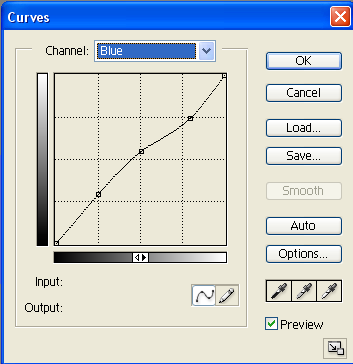
Now the icon looks like this:
Time for another of my favorite little tools, gradient maps! Select a nice, light sea green color like B6F8DC, and then hit the half dark, half light circle at the bottom of the layers palette and select "Gradient Map". It should pop up with your slected color fading to white. Hit okay, then set the gradient map layer to Color Burn, 100%.
I decided that I didn't like the fact that Ayu's dress was so grainy. So, I selected the entire icon and hit SHIFT + CONTROL + C. This allows you to copy what the icon currently looks like flattened, without flattening the layers! Very useful. Now hit CTRL + V and paste it on top. I then used a gaussian blur the blur it only as much as I wanted the dress to be blurred.
Now we're going to use a layer mask to erase everything except the dress. Hit the little circle inside of a rectangle at the bottom of the layers palette. This will create your layer mask - the blank white square on that layer next to the thumbnail. Click on it if it's not already selected. Now, a quick rundown of how masking works: You can paint on it in blakc or white only. Black "erases" the parts of the layer that it covers, and the white reveals it. So if you paint over something in black, but later decide you want to reveal it in that layer, just repaint over it in white! Anyway, we're going to paint in black on every part of the layer except the dress. You should be able to tell rather easily due to the sharpness of the layer underneath.
Only the dress should be visible. I messed around with the blending modes a little bit, and decided I liked Multiply, 45%. Here's a visual:

I decided that the dress was a bit too red for my tastes. So I created a new layer and hit CTRL + G, which is group with previous. Group with previous basically allows whatever is on that layer to be associated only with the layer above it. So, whatever we put on our new grouped layer will ONLY effect Ayu's dress! In my case, I flood fill the grouped layer with black, and put it on blend mode Color, 40%. This is an excellent way to turn things black and white, or mute colors without increasing the contrast. And so we end up with this:
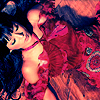
Hmm. I think we're done coloring! Because I love light textures, I use this one by dawn_icons on set it to Lighten, 80%.

--->
You can either keep the icon as it is, or you can add textures, brushes, text or whatever! Here's how my layer palette looked when I finished:

Feel free to post questions, comments, and any results you might get from using this tutorial or messing with curves. I'd love to see what you come up with!

to

Alright, do the usual. Rotate, crop, resize, sharpen, smudge skin, etc. We have this:

I choose to up the Brightness/Contrast a little bit to give it some more dimension. You can do this by going to Image > Adjustments > Brightness/Contrast or by clicking the little half light, half dark circle on the bottom row of your layers palette. Now we have this:

Now we're going to have some fun with curves! Here's my disclaimer: Curves beg to be played with. No method will give the perfect results for every icon... the colors largely depend on the original color content of the icon! At the top, you'll see the label RGB. Go under that, and you'll see Red, Green, and Blue. Those are the curves we're going to play with. Subtle movements of the line can create big differences, so tinker with them a bit to see what you like. This is what I did with my curves:


I press okay, and I get this:

+ Curves =

Much nicer, isn't it? But we aren't finished yet! Create a new layer (SHFT + CTRL + N), and flood fill it with DAF7FE, or some other nice blue color. Set it to Color Burn, 100%. A nice subtle blue hint.
Now we're going to play with curves again! Remember, experiment! This is what I used:


Now the icon looks like this:

Time for another of my favorite little tools, gradient maps! Select a nice, light sea green color like B6F8DC, and then hit the half dark, half light circle at the bottom of the layers palette and select "Gradient Map". It should pop up with your slected color fading to white. Hit okay, then set the gradient map layer to Color Burn, 100%.
I decided that I didn't like the fact that Ayu's dress was so grainy. So, I selected the entire icon and hit SHIFT + CONTROL + C. This allows you to copy what the icon currently looks like flattened, without flattening the layers! Very useful. Now hit CTRL + V and paste it on top. I then used a gaussian blur the blur it only as much as I wanted the dress to be blurred.
Now we're going to use a layer mask to erase everything except the dress. Hit the little circle inside of a rectangle at the bottom of the layers palette. This will create your layer mask - the blank white square on that layer next to the thumbnail. Click on it if it's not already selected. Now, a quick rundown of how masking works: You can paint on it in blakc or white only. Black "erases" the parts of the layer that it covers, and the white reveals it. So if you paint over something in black, but later decide you want to reveal it in that layer, just repaint over it in white! Anyway, we're going to paint in black on every part of the layer except the dress. You should be able to tell rather easily due to the sharpness of the layer underneath.
Only the dress should be visible. I messed around with the blending modes a little bit, and decided I liked Multiply, 45%. Here's a visual:

I decided that the dress was a bit too red for my tastes. So I created a new layer and hit CTRL + G, which is group with previous. Group with previous basically allows whatever is on that layer to be associated only with the layer above it. So, whatever we put on our new grouped layer will ONLY effect Ayu's dress! In my case, I flood fill the grouped layer with black, and put it on blend mode Color, 40%. This is an excellent way to turn things black and white, or mute colors without increasing the contrast. And so we end up with this:

Hmm. I think we're done coloring! Because I love light textures, I use this one by dawn_icons on set it to Lighten, 80%.
--->

You can either keep the icon as it is, or you can add textures, brushes, text or whatever! Here's how my layer palette looked when I finished:

Feel free to post questions, comments, and any results you might get from using this tutorial or messing with curves. I'd love to see what you come up with!