Cheap Scaffolding
Everyone who's done siding or roofing work knows the conundrum: one must be able to move not only on an elevated plane, but also be able to either move laterally across that elevation . . . or move a lot of ladders. Furthermore, some areas are less amenable to safe ladder placement than others. Today's project was one such ladder-resistant locale, with a hillside and uneven base providing absolutely no way to safely raise a ladder.
I've found a cheap way around this problem, at least in a fairly limited circumstance where the object to be roofed is supported by wooden posts. The key lies not in screws, but in the little sharp tips they have.
Here's my scaffold.
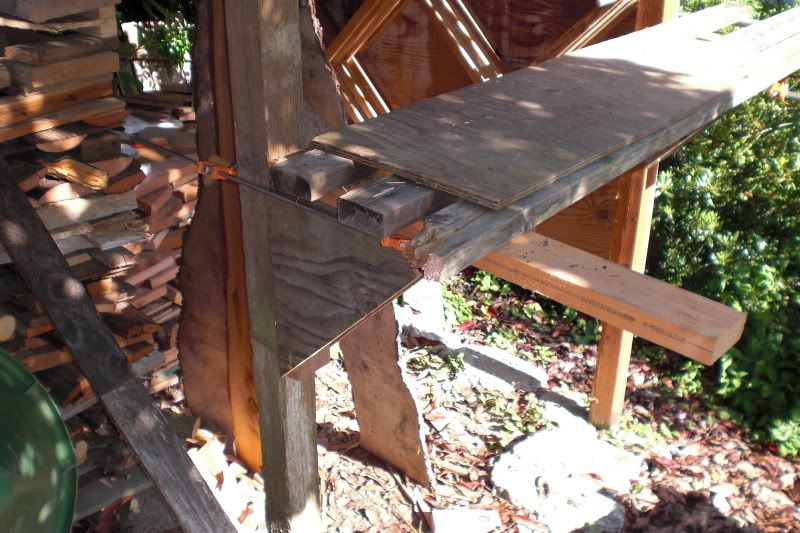
As you can see, it's just a few 2x4s across a wooden assembly with a couple of bar clamps. I can tell you from personal experience that without using bolts through the posts this arrangement can hold well over 300 lbs. How? Let's look more closely at the support assembly:
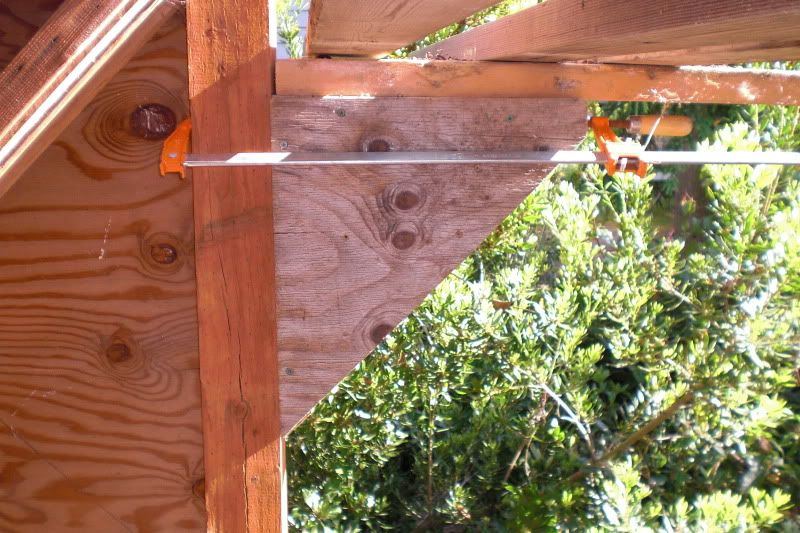
What you aren't seeing are of the most importance. Under that triangular piece of plywood, two 2x4s run on the vertical and horizontal top and side. The horizontal piece is clamped firmly to the post; the vertical piece is run through with wood screws driven partially through the wood at a 45° angle. The triangular plywood pieces, one on either side, keep the two dynamic pieces together, aiming the force into the post. I've prepared a quickie pic to illustrate the concept, one without the hiding plywood and with the screws, as if in cross-section:
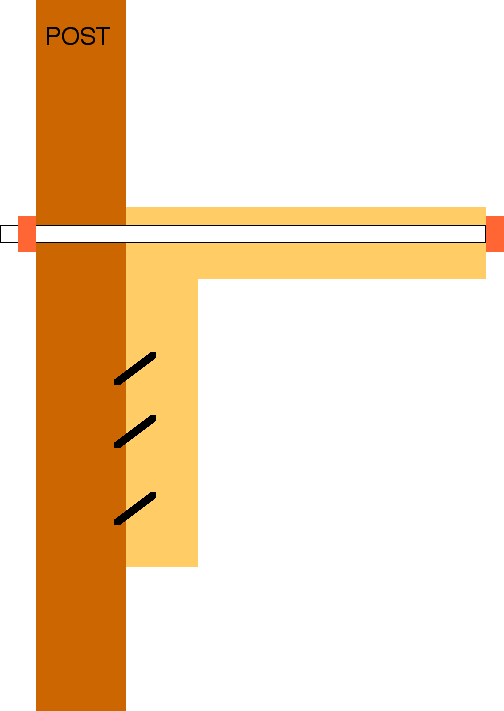
Those black bars represent the screws. As pressure - the weight of my butt, tools, and material being applied - is added to the horizontal board, the entire assembly will be forced downward. The clamp prevents any movement outward. Therefore, all the force drives the partially exposed screw tips into the post. The greater the weight, the more deeply those tips are driven. (Not pictured in the above illustration is the extension to the assembly visible in the pictures; this is carriage bolted and wood-glued to the top of the horizontal piece to provide added scaffold area.)
And all for the cost of a few scraps of wood, some screws, and the temporary use of some bar clamps.
I will add this caveat, though; anyone, including myself, who actually uses this arrangement to support him- or herself has only him- or herself to blame if something goes horribly wrong. I offer no guarantees of the above arrangement. Heck, it makes me nervous using it, and I've used it now for many hours of sturdy successful support. I might just break down and one day add a railing, just in case.
I've found a cheap way around this problem, at least in a fairly limited circumstance where the object to be roofed is supported by wooden posts. The key lies not in screws, but in the little sharp tips they have.
Here's my scaffold.
As you can see, it's just a few 2x4s across a wooden assembly with a couple of bar clamps. I can tell you from personal experience that without using bolts through the posts this arrangement can hold well over 300 lbs. How? Let's look more closely at the support assembly:
What you aren't seeing are of the most importance. Under that triangular piece of plywood, two 2x4s run on the vertical and horizontal top and side. The horizontal piece is clamped firmly to the post; the vertical piece is run through with wood screws driven partially through the wood at a 45° angle. The triangular plywood pieces, one on either side, keep the two dynamic pieces together, aiming the force into the post. I've prepared a quickie pic to illustrate the concept, one without the hiding plywood and with the screws, as if in cross-section:
Those black bars represent the screws. As pressure - the weight of my butt, tools, and material being applied - is added to the horizontal board, the entire assembly will be forced downward. The clamp prevents any movement outward. Therefore, all the force drives the partially exposed screw tips into the post. The greater the weight, the more deeply those tips are driven. (Not pictured in the above illustration is the extension to the assembly visible in the pictures; this is carriage bolted and wood-glued to the top of the horizontal piece to provide added scaffold area.)
And all for the cost of a few scraps of wood, some screws, and the temporary use of some bar clamps.
I will add this caveat, though; anyone, including myself, who actually uses this arrangement to support him- or herself has only him- or herself to blame if something goes horribly wrong. I offer no guarantees of the above arrangement. Heck, it makes me nervous using it, and I've used it now for many hours of sturdy successful support. I might just break down and one day add a railing, just in case.