Making Cheap Tools
I have for years been more interested in making tools than actually using them. Why? Whenever I use a tool, I over time (sometimes seconds, sometimes years) discover an irritant, a draw-back inherent in the tool's design, its use, or both. Sometimes these drawbacks are merely me bitching. Sometimes they reflect a limitation that restricts what I had planned to do with the darned thing.
Sometimes, I put the tool aside and move onto another project, preferably one that doesn't require its use. Sometimes, I try to engineer a solution to the perceived problem. Often that solution simply involves an attachment, an add-on, a doo-hickey readily available at my local tooly depot . . . but that involves money. Worse, it involves me parting with my money. Sometimes I break down and splurge, but often I actually fix the problem by building something myself. Why? Why should I spend hours and hours working on a problem fixed with the wages I would earn in half that time?
For me, that's the wrong question. For me, it's more important to solve a problem on my own than rely on the so-called "tried and true" solutions those with deep pockets choose.
(Actually, I, too, have pretty deep pockets. I also have very short arms.)
I've been doing this so long I don't even think about it, until I meet someone else who doesn't think that way. Then I'm reminded that I'm either a genius or a moron. I've decided to let you be the judge, showing you a tool I built a year or so ago. So, tell me, is this contraption a work of genius or a very real and clinical sign that I need serious professional help?
Here's the problem, for those who have never operated either a table saw or a chop saw. Cutting wood with saws makes dust. Lots and lots of dust. After I got my table and chop saws (the table saw a hand-me-down from my sister, the chop saw an Xmas gift), I found myself choking on and wading through more dust than I cared to constantly clean. Since I didn't care to constantly clean any amount, this proved a very real limitation for both tools, as way cool as they are. A solution was required.
One can buy shop vacuum systems just about anywhere. Both tools have handy holes that receive optional suction hoses. You can, for real fast dust collection, just slap that shop vac in the corner to the tool and problem solved. Solved, that is, until you realized what a major pain it is to change filters. Add to that the tendency for saw dust to be as fine a dust as one can create in the shop without cutting wall board or fiberglass, and you see the problem. Shop vacs are great for sucking up nails, rough shavings, spiders and the like; the filters clog with saw dust about as soon as you turn on the tool power, greatly reducing the efficiency of the damned thing.
Oh, and if you should bump the vac when it's sucking away, the filter can fall from its housing. Without notice or warning. The next time you run a board through the cutting process, the dust simply shoots through the vac and blows quite evenly all over the place. Dust shot through the blower takes about five to ten times longer to settle than dust merely dropped from the saw.
If one splurges, one can plumb plastic pipes all over the shop that delivers the output of the tool's dust vent to a dedicated dust collection system. Instead of just the disposable cheap paper or foam filter you find in a shop vac, these systems use a bag more like a home vac, one far more easily emptied and cleaned. To get one of these systems, all you need to do is install a different vacuum . . . one directed into your bank account. Seriously, these designers suckers start at US$300, and that doesn't include the hosing. I've seen systems that cost more than all the tools in my garage combined.
With this in mind, I started brainstorming solutions using found objects and junk. Hey, it's what I do.
What is a dust collection system, I reasoned, but a regular vacuum attached to a robust bag filter? And what is a bag filter, really? It's just a simple woven cloth bag without an impermeable liner. You know, like a pillow case. All I need to do is insert the pillow case into a container of some sort, route the dust into the open end, and suck air through the container.
For a container, I had a concrete form tube (US$10) lying around. I was going to make a kitty condo out of it, but sadly, that didn't work out. The only problem with the tube was its diameter. A pillow case when puffed up is far wider than the tube. For efficiency, the filter bag should be completely surrounded by the suction, maximizing the bag's surface area; otherwise, the only area affected by the suction would be the base of the bag . . . which is also the first part to get clogged with dust. Therefore, the bag should not be able to touch the tube wall when puffed by moving air. Solution: I would have my neighbor with the sewing machine take the pillow case, un-stitch it, and make two narrower filter bags out of it. That meant a trip to the thrift store for a pillow case I could destroy without angering The Wife.
Y'know, sometimes things really work out. For the same price as plain ol' white or simply colored -- $.79, plus tax -- I got this beauty!

Dust worries? Hakuna Matada!
This half of the case had already been sewn before I decided to take the pic (duh). We see the young cubs from The Lion King and the annoying bird voiced by Rowen Atkinson (out of the shot, below the cubs). The other half, one I haven't used yet, has Poomba and the Nathan Lane character.
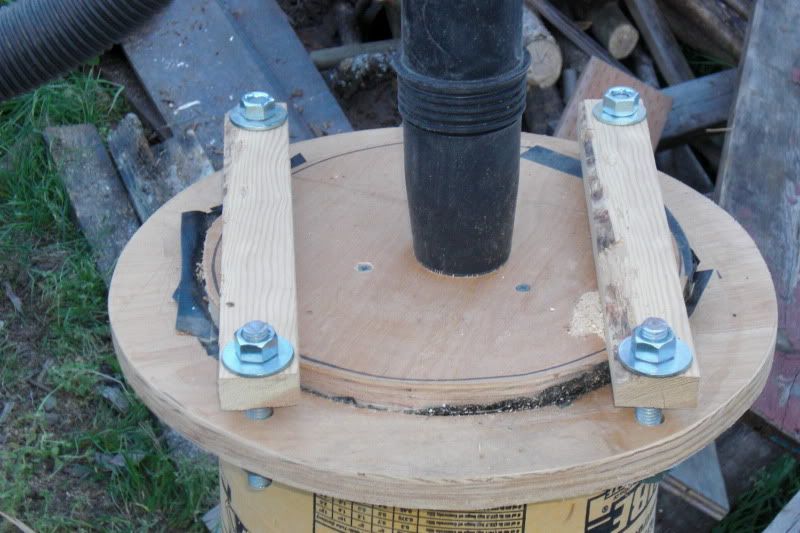
Next, I mounted that bag to a piece of round plywood. This mounted to another piece of round ply screwed to the top of the concrete tube. Four lengths of threaded rod compress two lengths of scrap wood, holding the bag mount to the tube mount with enough force to prevent major air leaks. A hole in the first round ply piece accepts the hose from the saws.
The dust goes in the top,
getting stuck in the bag.
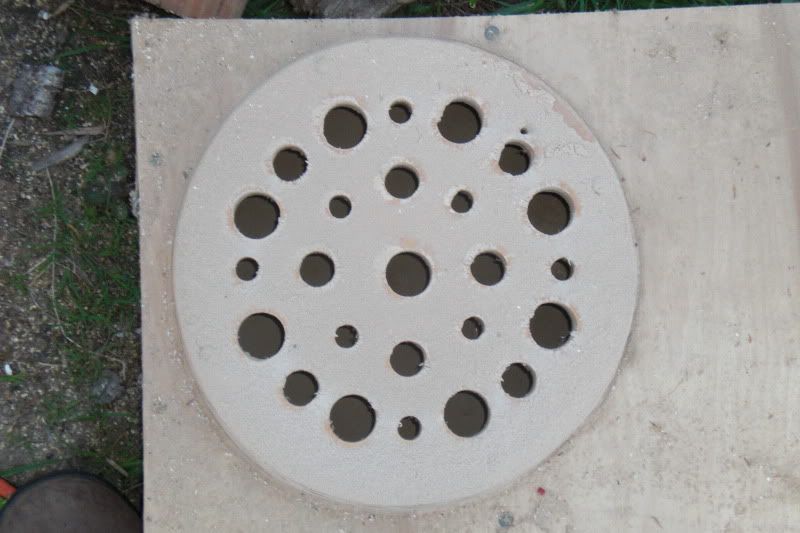
The vacuumed air gets drawn through this thingy . . .

. . . and continues through that hose
to the shop vac.
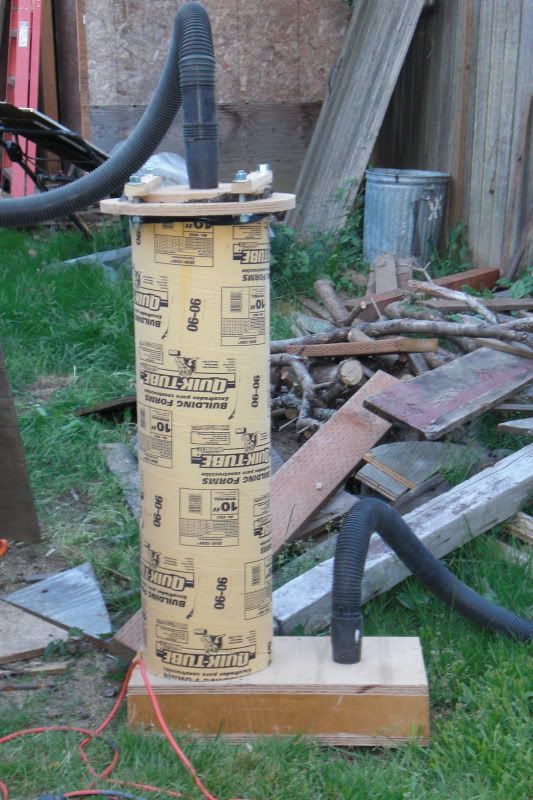
Fully assembled, it looks like this!
Like I mentioned, I've been using it for just over a year now. It works wonderfully. Furthermore, I find it more useful than an installed shop system, simply because it's light enough to move (as the pictures suggest) to the back yard to cut stuff al fresco. Let's see, other than the less-than-a-buck bag with the frolicking cubs, what did I need to buy? Considering that the plywood, tube, threaded rod and bolts I had lying around from other abandoned projects, and that I found the shop vac on the sidewalk with a FREE sign on it, I needed only wood screws, electrical tape (as a gasket for the compressed mounts) and some wood glue to seal the base plenum box.
Yes, it's ugly with a capital WTF-is-that. I don't care. It's a tool, one I built. And it's surrounded by other tools, many of them I also built. And it's used by another cheap tool: Me.
So, what's the verdict? Am I a bit too much on the Holy Crap, He's Cheap! side, or are tools like this well worth all the effort I (and perhaps others) care to invest? I'm honestly curious to hear the opinions of those to whom I'm neither related nor have loaned money.
Sometimes, I put the tool aside and move onto another project, preferably one that doesn't require its use. Sometimes, I try to engineer a solution to the perceived problem. Often that solution simply involves an attachment, an add-on, a doo-hickey readily available at my local tooly depot . . . but that involves money. Worse, it involves me parting with my money. Sometimes I break down and splurge, but often I actually fix the problem by building something myself. Why? Why should I spend hours and hours working on a problem fixed with the wages I would earn in half that time?
For me, that's the wrong question. For me, it's more important to solve a problem on my own than rely on the so-called "tried and true" solutions those with deep pockets choose.
(Actually, I, too, have pretty deep pockets. I also have very short arms.)
I've been doing this so long I don't even think about it, until I meet someone else who doesn't think that way. Then I'm reminded that I'm either a genius or a moron. I've decided to let you be the judge, showing you a tool I built a year or so ago. So, tell me, is this contraption a work of genius or a very real and clinical sign that I need serious professional help?
Here's the problem, for those who have never operated either a table saw or a chop saw. Cutting wood with saws makes dust. Lots and lots of dust. After I got my table and chop saws (the table saw a hand-me-down from my sister, the chop saw an Xmas gift), I found myself choking on and wading through more dust than I cared to constantly clean. Since I didn't care to constantly clean any amount, this proved a very real limitation for both tools, as way cool as they are. A solution was required.
One can buy shop vacuum systems just about anywhere. Both tools have handy holes that receive optional suction hoses. You can, for real fast dust collection, just slap that shop vac in the corner to the tool and problem solved. Solved, that is, until you realized what a major pain it is to change filters. Add to that the tendency for saw dust to be as fine a dust as one can create in the shop without cutting wall board or fiberglass, and you see the problem. Shop vacs are great for sucking up nails, rough shavings, spiders and the like; the filters clog with saw dust about as soon as you turn on the tool power, greatly reducing the efficiency of the damned thing.
Oh, and if you should bump the vac when it's sucking away, the filter can fall from its housing. Without notice or warning. The next time you run a board through the cutting process, the dust simply shoots through the vac and blows quite evenly all over the place. Dust shot through the blower takes about five to ten times longer to settle than dust merely dropped from the saw.
If one splurges, one can plumb plastic pipes all over the shop that delivers the output of the tool's dust vent to a dedicated dust collection system. Instead of just the disposable cheap paper or foam filter you find in a shop vac, these systems use a bag more like a home vac, one far more easily emptied and cleaned. To get one of these systems, all you need to do is install a different vacuum . . . one directed into your bank account. Seriously, these designers suckers start at US$300, and that doesn't include the hosing. I've seen systems that cost more than all the tools in my garage combined.
With this in mind, I started brainstorming solutions using found objects and junk. Hey, it's what I do.
What is a dust collection system, I reasoned, but a regular vacuum attached to a robust bag filter? And what is a bag filter, really? It's just a simple woven cloth bag without an impermeable liner. You know, like a pillow case. All I need to do is insert the pillow case into a container of some sort, route the dust into the open end, and suck air through the container.
For a container, I had a concrete form tube (US$10) lying around. I was going to make a kitty condo out of it, but sadly, that didn't work out. The only problem with the tube was its diameter. A pillow case when puffed up is far wider than the tube. For efficiency, the filter bag should be completely surrounded by the suction, maximizing the bag's surface area; otherwise, the only area affected by the suction would be the base of the bag . . . which is also the first part to get clogged with dust. Therefore, the bag should not be able to touch the tube wall when puffed by moving air. Solution: I would have my neighbor with the sewing machine take the pillow case, un-stitch it, and make two narrower filter bags out of it. That meant a trip to the thrift store for a pillow case I could destroy without angering The Wife.
Y'know, sometimes things really work out. For the same price as plain ol' white or simply colored -- $.79, plus tax -- I got this beauty!
Dust worries? Hakuna Matada!
This half of the case had already been sewn before I decided to take the pic (duh). We see the young cubs from The Lion King and the annoying bird voiced by Rowen Atkinson (out of the shot, below the cubs). The other half, one I haven't used yet, has Poomba and the Nathan Lane character.
Next, I mounted that bag to a piece of round plywood. This mounted to another piece of round ply screwed to the top of the concrete tube. Four lengths of threaded rod compress two lengths of scrap wood, holding the bag mount to the tube mount with enough force to prevent major air leaks. A hole in the first round ply piece accepts the hose from the saws.
The dust goes in the top,
getting stuck in the bag.
The vacuumed air gets drawn through this thingy . . .
. . . and continues through that hose
to the shop vac.
Fully assembled, it looks like this!
Like I mentioned, I've been using it for just over a year now. It works wonderfully. Furthermore, I find it more useful than an installed shop system, simply because it's light enough to move (as the pictures suggest) to the back yard to cut stuff al fresco. Let's see, other than the less-than-a-buck bag with the frolicking cubs, what did I need to buy? Considering that the plywood, tube, threaded rod and bolts I had lying around from other abandoned projects, and that I found the shop vac on the sidewalk with a FREE sign on it, I needed only wood screws, electrical tape (as a gasket for the compressed mounts) and some wood glue to seal the base plenum box.
Yes, it's ugly with a capital WTF-is-that. I don't care. It's a tool, one I built. And it's surrounded by other tools, many of them I also built. And it's used by another cheap tool: Me.
So, what's the verdict? Am I a bit too much on the Holy Crap, He's Cheap! side, or are tools like this well worth all the effort I (and perhaps others) care to invest? I'm honestly curious to hear the opinions of those to whom I'm neither related nor have loaned money.