Creating a Header using GIMP
OK, someone wanted to learn how to make a header and I told her in a confusing way (as I'm known to do), but when she said she uses GIMP, I decided to create a tutorial on how to create a header using GIMP.
Normally, to understand how to do something, I need to use the same tools that's being taught with. So, here is the image that I used for this tutorial.
NOTE: Since the person was part of a Kis-My-Ft2 community on LJ, I used a Tamamori picture.
Click here for the image <- credit to shatteredtenshi
Now that you have the image saved, we are ready to begin the tutorial...
1. Select an image you would like to edit into a header. Any image is fine, but the bigger the image is, the easier it is to manipulate it. The image I chose is 1480 pixels X 1048 pixels. It's big and resizeable!
NOTE: Landscape pictures have a higher width than height (i.e. 1000x500) and Portrait pictures have a higher height than width (i.e. 500x1000)! However, headers are usually a landscape picture and not a portrait picture.
LANDSCAPE:
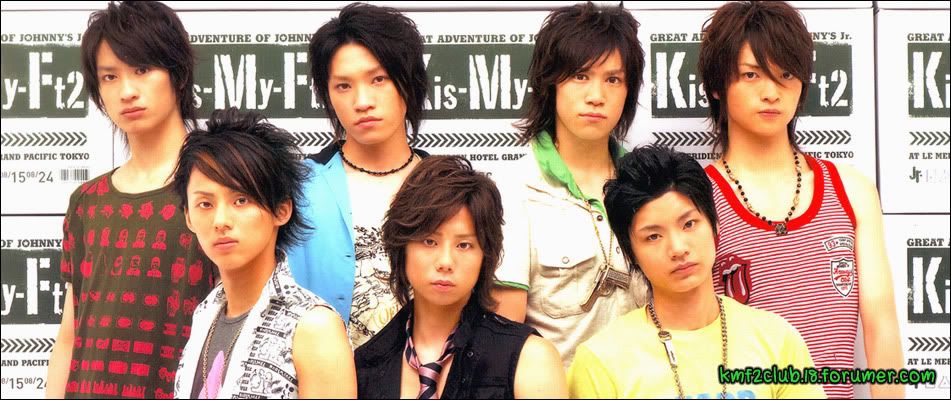
PORTRAIT:

2. Open your image in GIMP. I happen to be using the GIMP 2.4.5.

3. First you want to crop your image and remove the unwanted areas. In the case of this image, I don't want the text in the bottom right corner to be on the image. However, I like where the original cropping on the bottom of the image is. so I'll make it a little shorter in the width.
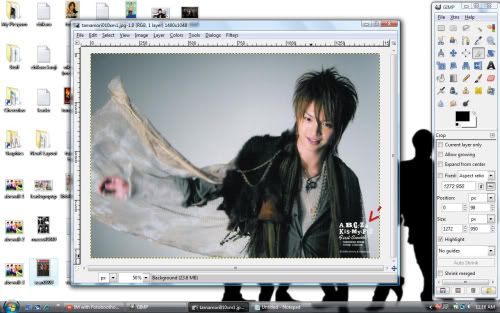
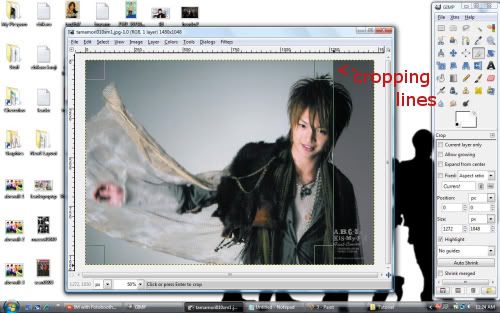
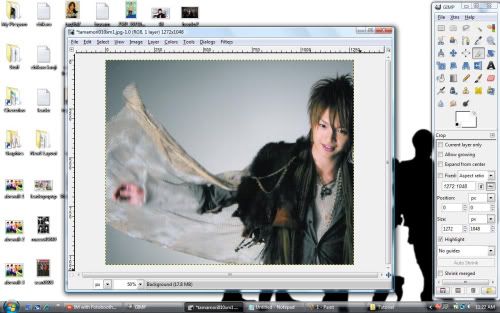
Once you have the desired cropping done, you are ready for the next step.
NOTE: I also cropped a bit off the height from taking some off the top part of the image but not the bottom since I liked the original cropping on the bottom of the image.
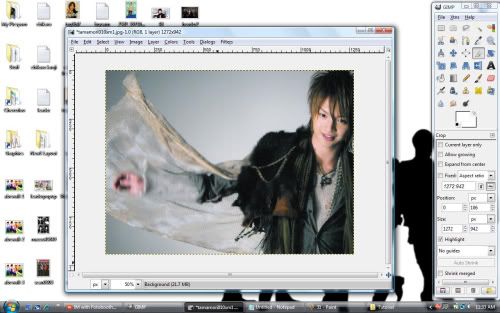
4. Next, you want to scale your image to the desired size. I will use a common size that I use for headers when I make layouts 700 pixels wide.
First, you want to view your image at 100%. You do that by going to View > Zoom > 1:1 (100%).
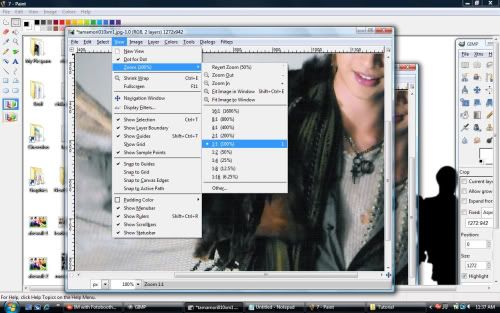
^^Sorry about the image also in the background. I had my Paint program open since I was capping the progress.
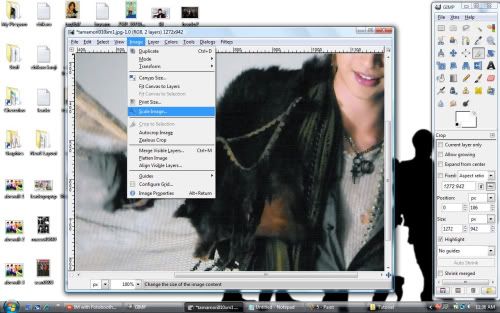
Next you go to Image > Scale Image.
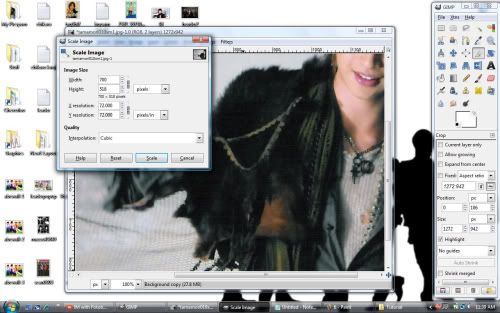
Then you type in the width you want the image to be. The height will automatically change once you hit tab after you insert the desired width.
5. Next you want to create a duplicate layer of the current image. Go to Layer > Duplicate Layer.
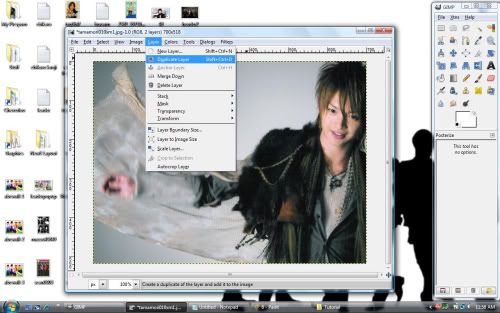
Then open your layers window by holding down the Ctrl and pressing L.
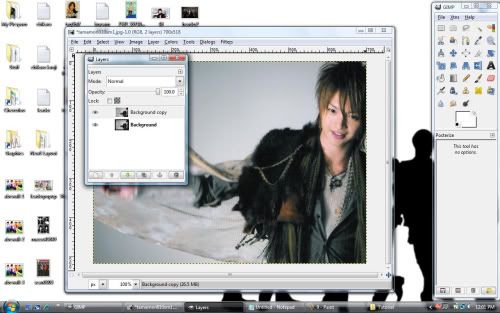
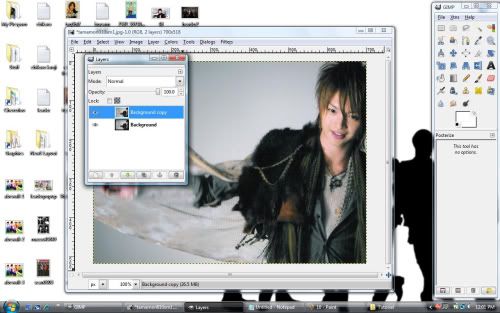
While your layer window is open, select the layer Background Copy by clicking it once with your mouse.
Then, to make the image brighter, select the option Overlay from the dropdown Mode: box.
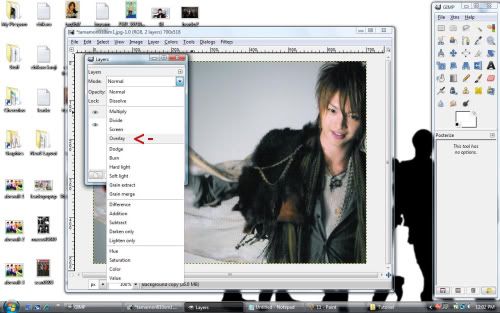
NOTE: Opacity: may be changed to change the transparency of the selected layer. The lower the percentage, the less the layer will be visible.
Your image should now look like this before the opacity of the layer is changed to something less than 100%:
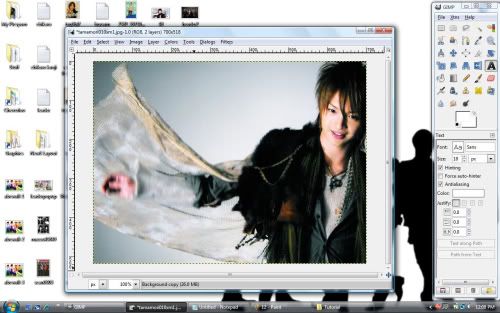
You can close the Layers window by hitting the X at the top corner of that window.
6. Once you have the image layers to do what you want it to do, merge the layers by going to Image > Merge Visible Layers
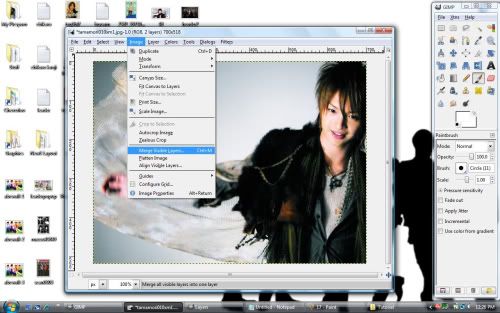
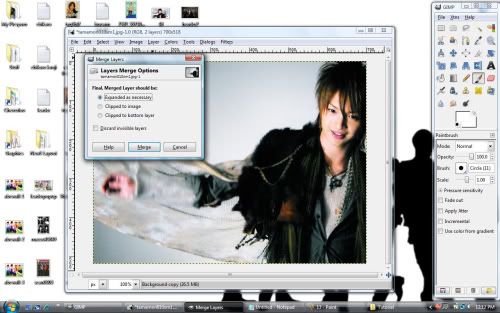
Make sure Expanded a necessary is selected from the window that pops up and click Merge.
7. Now you can customize the image with any brushes that you want or text. The possibilities are endless once you get to this step.
Only as a suggestion, I would create a new transparent layer by going to Layer > New Layer....
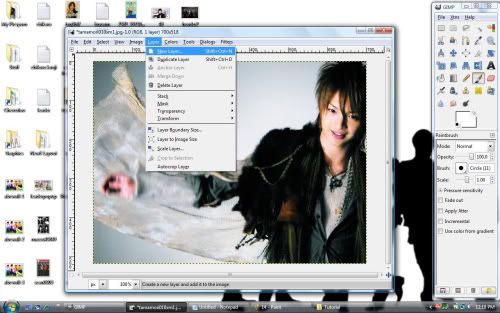
When a window pops up, make sure Transparency is selected as the Layer Fill Type: and select OK.
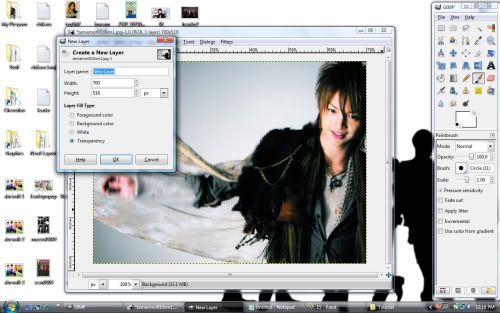
Open your Layers window by holding in Ctrl and pressing L and make sure New Layer is selected by clicking it once with your mouse.
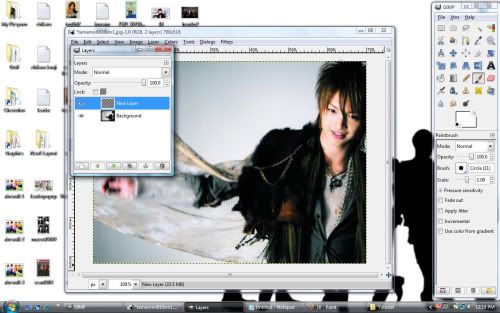
I suggest using a new layer for using brushes because you can change the opacity and mode for the layer and it will change how the coloring of the brush looks on the image. Experiment with the different modes after you added brush designs by going to your Layers window and changing it from Normal to whatever else is on the list.
You can create as many layers as you want!
Once you are finished with adding brushes and text to your image, merge the visible layers by repeating step 6 above.
8. Once your image has only one layer, save your image.
Only as a suggestion, I save my headers as .png files. PNG files allow transparency and are a higher quality file type. Sometimes if I save an image as .jpg they become smudged and look horrible.
Once your image is saved, you are done!
Originally posted at my old graphics LJ, greenberryhair.
Normally, to understand how to do something, I need to use the same tools that's being taught with. So, here is the image that I used for this tutorial.
NOTE: Since the person was part of a Kis-My-Ft2 community on LJ, I used a Tamamori picture.
Click here for the image <- credit to shatteredtenshi
Now that you have the image saved, we are ready to begin the tutorial...
1. Select an image you would like to edit into a header. Any image is fine, but the bigger the image is, the easier it is to manipulate it. The image I chose is 1480 pixels X 1048 pixels. It's big and resizeable!
NOTE: Landscape pictures have a higher width than height (i.e. 1000x500) and Portrait pictures have a higher height than width (i.e. 500x1000)! However, headers are usually a landscape picture and not a portrait picture.
LANDSCAPE:

PORTRAIT:

2. Open your image in GIMP. I happen to be using the GIMP 2.4.5.

3. First you want to crop your image and remove the unwanted areas. In the case of this image, I don't want the text in the bottom right corner to be on the image. However, I like where the original cropping on the bottom of the image is. so I'll make it a little shorter in the width.


Once you have the desired cropping done, you are ready for the next step.
NOTE: I also cropped a bit off the height from taking some off the top part of the image but not the bottom since I liked the original cropping on the bottom of the image.

4. Next, you want to scale your image to the desired size. I will use a common size that I use for headers when I make layouts 700 pixels wide.
First, you want to view your image at 100%. You do that by going to View > Zoom > 1:1 (100%).

^^Sorry about the image also in the background. I had my Paint program open since I was capping the progress.
Next you go to Image > Scale Image.

Then you type in the width you want the image to be. The height will automatically change once you hit tab after you insert the desired width.

5. Next you want to create a duplicate layer of the current image. Go to Layer > Duplicate Layer.

Then open your layers window by holding down the Ctrl and pressing L.

While your layer window is open, select the layer Background Copy by clicking it once with your mouse.

Then, to make the image brighter, select the option Overlay from the dropdown Mode: box.

NOTE: Opacity: may be changed to change the transparency of the selected layer. The lower the percentage, the less the layer will be visible.
Your image should now look like this before the opacity of the layer is changed to something less than 100%:

You can close the Layers window by hitting the X at the top corner of that window.
6. Once you have the image layers to do what you want it to do, merge the layers by going to Image > Merge Visible Layers

Make sure Expanded a necessary is selected from the window that pops up and click Merge.

7. Now you can customize the image with any brushes that you want or text. The possibilities are endless once you get to this step.
Only as a suggestion, I would create a new transparent layer by going to Layer > New Layer....

When a window pops up, make sure Transparency is selected as the Layer Fill Type: and select OK.

Open your Layers window by holding in Ctrl and pressing L and make sure New Layer is selected by clicking it once with your mouse.

I suggest using a new layer for using brushes because you can change the opacity and mode for the layer and it will change how the coloring of the brush looks on the image. Experiment with the different modes after you added brush designs by going to your Layers window and changing it from Normal to whatever else is on the list.
You can create as many layers as you want!
Once you are finished with adding brushes and text to your image, merge the visible layers by repeating step 6 above.
8. Once your image has only one layer, save your image.
Only as a suggestion, I save my headers as .png files. PNG files allow transparency and are a higher quality file type. Sometimes if I save an image as .jpg they become smudged and look horrible.
Once your image is saved, you are done!
Originally posted at my old graphics LJ, greenberryhair.