015
Go from 
to
by using Photoshop 6.0, however I'm sure that it's translatable to other programs.
I start off with this base
Sharpen, play with your settings. I'm pretty sure that all I did was sharpen mine.
Copy and set image to screen. You should have something like
New layer. Fill with
(#000B29). Set to Exculsion at 100%. You should now have something like
Duplicate your base, and drag it to the top. Set to desaturate, change your settings to Overlay at 73%. You should have something like this
.
Create new layer. Fill with
(#F9FBFF). Set to Color Burn at 100%. Copy twice, so you should now have three of them with that color. You should now have something like
.
Copy the base, and drag it up to the top. Set to Screen at 29%. You should now have something like
.
Select your your Rectangular Marquee tool (
). Select however much of your icon as you'd like, like this
. Fill in with white (#FFFFFF).
And you should come out with something like
.
Your layers should look something like this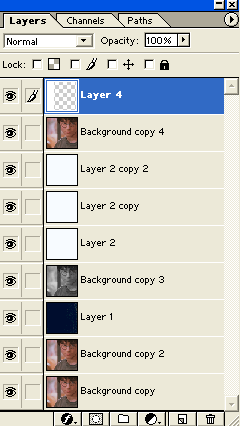
.
Original-
New-
Please do not copy this tutorial word for word, make it your own! I would love to see the results that you got from this tutorial!
Memories, Resources, FAQ, Join, Suggestions, Requests, etc.

to

by using Photoshop 6.0, however I'm sure that it's translatable to other programs.
I start off with this base

Sharpen, play with your settings. I'm pretty sure that all I did was sharpen mine.
Copy and set image to screen. You should have something like

New layer. Fill with

(#000B29). Set to Exculsion at 100%. You should now have something like

Duplicate your base, and drag it to the top. Set to desaturate, change your settings to Overlay at 73%. You should have something like this

.
Create new layer. Fill with

(#F9FBFF). Set to Color Burn at 100%. Copy twice, so you should now have three of them with that color. You should now have something like

.
Copy the base, and drag it up to the top. Set to Screen at 29%. You should now have something like

.
Select your your Rectangular Marquee tool (

). Select however much of your icon as you'd like, like this

. Fill in with white (#FFFFFF).
And you should come out with something like

.
Your layers should look something like this

.
Original-

New-

Please do not copy this tutorial word for word, make it your own! I would love to see the results that you got from this tutorial!
Memories, Resources, FAQ, Join, Suggestions, Requests, etc.