The Driving Test - Kumamoto-ken
This entry was created in August 2005, and was accurate as of July 2005. It was last edited July 2007. I can't vouch for any changes there may have been in the Kumamoto Driving Test, but feel free to leave a comment if something is different or has changed.
Sorry for the hiatus. The following is my account of my experience at the Unten Menkyo Center (the Driver's License Center) in Kumamoto. There's a lot of good information for foreigners about taking the driving test in Japan, but I haven't found anything specific to Kumamoto Prefecture online yet, so I thought I would write this up. During my two attempts at this driving test (first time in manual, failed; second time in automatic, passed), I picked up a lot of info, and I hope you find it useful.
Even if you don't have to worry about this for a long while, you might want to know what documents to bring before you leave Japan so you can save yourself the hassle later.
General information
In Japan most foreigners can drive with their home country license and an IDP, an International Driver's Permit, for only up to 1 year from the date of their visa. After that you must get a Japanese menkyo, license. Many foreigners (such as Brits and Canadians) only need to fill out the paperwork and such to change the license (you can find this information elsewhere online). Us Americans, unfortunately, need to pass the driving test. You can take the test in either automatic or manual (aka stick shift), but if you take the test in automatic you cannot drive in manual. (I heard through the grapevine that the fine for driving manual with an automatic license is about 50,000 yen, or roughly $500 US.)
The paperwork needed to change your license includes: a certificate from your town/city's municipal office stating that you do live your prefecture; your gaijin card; a translation of your home license (the information for that can be found at the JAF website; however, their link for the translation application doesn't seem to work); your home licenses (bring previous licenses if you have them - they might be useful); your passport (bring previous passports too); your IDP; and your inkan, your personal seal. Plus money to pay for all the fees (in Kumamoto, 2400 yen each time you take the test, 1650 yen when you pass and actually get your license).
*If you do your translation application by mail, the JAF of Kumamoto says it takes 7 days from the day you mail it to receive your papers. However, me and a friend both received ours in about 4 days. The JAF isn't open on weekends.
*In Kumamoto, the information sheet technically does not mention school transcript as one of the documents you should bring; however, if you have a copy, be sure to bring it. You need to prove that you were in your home country for 3 months after you received your license. In some prefectures, the date of issue on the license is sufficient to prove this, but in Kumamoto neither the passport nor the license can be used to prove this, hence, bring your transcript if you can... If your license was issued less than a year (12 months) before you came to Japan, you might have to put a green and yellow "beginner driver's seals" on your car, even if you've been driving for years in your home country. (Bureaucracy and all.)
*You'll also need 2 ID photos, 3 cm by 2.4, but in Kumamoto you can get this done at the center for 700 yen.
Information specific to Kumamoto-ken
The Unten Menkyo Center is located in Kikuyou-machi, east/northeast of downtown Kumamoto. From the 57 Higashi Bypass, turn onto the 103 (a right at the giant Aoyama clothing store, if you're coming from the west/south - there's a sign for the center just before the turn), and drive about 8-9 km - you should pass the Red Cross Hospital. The center is next door to the giant stadium Park Dome (cannot miss it), and the center itself looks like an airport, both inside and out.
If you can't speak Japanese, chances are you will be referred to a lady at the center who can help you - she speaks English fairly well. If you REALLY can't speak Japanese, you might want to bring someone to interpret for you. Some of the driving testers are quite nice and friendly to foreigners, but there is at least one very rude and mean tester who is hostile to foreigners (and I got stuck with him on my second day).
Edit, 7/29/2007: I've heard from various people that, from 2007, Kumamoto Prefecture's license center does not allow foreigners to come by themselves. Foreigners must either be accompanied by a Japanese person who can translate, or must be fluent in Japanese, according to the rumors. Check with the menkyo center.
Many foreigners have to get their menkyo before the beginning of August, so the center can be busy with other foreigners in July. You might want to make an appointment for your driving test before heading out to the center.
The process can take pretty much all day and there's a lot of waiting. For me, I arrived at 10 AM to fill out the paperwork on the first day; after the paperwork comes the eye exams and the paper test (in English and pretty easy - you need at least 7 out of 10 answers correct to pass). Noon to 1 PM is lunchtime and the time designated for examinees to walk around the course - you can't walk the course at any other time. Driving exams start sometime after lunch; if you pass, you do more paperwork and get your picture taken, all with more waiting involved. The wait depends on how busy the center is that day. On my second day I arrived at 11:30 AM and was finished with everything by around 3:10 in the afternoon, although the previous day was a lot longer.
The actual driving test takes up only about 10-20 minutes of the entire process. Be sure to walk the course during lunchtime! It's especially useful if you walk it with someone who's taken the test already (in other words, failed) and can point out the areas to look out for. (There are umbrellas for anyone to use by the exit leading out to the course. It's a good idea to grab one on a hot and sunny day.) There are 2 routes (maps posted below), find out which one is being used that day.
The Driving Test
Here are some general pointers about the driving test in Kumamoto:
*Exaggerate being cautious. Even if it feels stupid.
*You don't have to do parking on the test (no parallel, no backward-in parking) - you just need to be able to park the car by pulling up to one of the parking lanes.
*Don't wear sandals or high heels when you take the test.
*The testers may take you around the course once in the car (although the testers have been known to make mistakes and forget where to stay on the course). Also, you might have other examinees in the car with you who will take their turns after or before you. It might be a good idea to pay attention to the other drivers' techniques before your turn. Talking to other examinees is not allowed.
*You're graded from when you enter and sit in the driver's seat until you turn off the car and exit.
*Once you're in the driver's seat, check the mirrors, your seat, the emergency brake, everything before you turn the engine on. Make sure everyone else has their seatbelts. Don't start until the driver says so (or ask if it's okay to start).
*You're not penalized for taking it slow, so don't worry about not going fast enough.Edit, 7/29/2007: This may or may not be true anymore - check with the menkyo center.
*Going over a curb is an automatic fail, but if you HIT a curb you can still save yourself. If you find yourself hitting a curb (on TOP of the curb), stop, back up, and try again. If you go completely over it you fail.
*Hitting the yellow poles on tight turns is also an automatic fail (something I didn't know the first time I took the test - and thank goodness I didn't know!).
*If there's a stop sign, a stop light, or a stop bar, then stop obviously, but if there's NO indication to stop and you checked the roads are clear (like, at a turn), then don't make a complete stop. I don't think you get penalized for making a full stop in these areas, but I kept getting scolded for stopping when I didn't need to.
*When you do stop, stop with your front bumper behind the stop bar. If you are not close enough to the stop bar when you stop, and then you continue again, the tester might consider that running a stop sign. (If you do stop too soon, stop again at the proper location - bumper behind the stop bar).
*Keep your hands at 10 and 2 o'clock on the steering wheel; when making a big turn, do the hand-over-hand motion for turning the wheel.
*Whenever you make a turn, be sure to look over your shoulder to check for bicycles or small motorbikes that might be by your side.
More specific pointers - Course 1

Clear here for the map
(1) Starting out
When leaving the parking area, you'll have to signal at least 2 times to get onto the course. Signal right (to indicate you're leaving the parking area), signal right again (if your car was in one of the far left lanes of the parking area, you'll have to cross over the path of the right parking area), and then before entering the course, signal left. Almost immediately after you've entered the course, there's a crosswalk (close to where point 6 is labeled) - make sure you look both ways before going over the crosswalk.
(2) At (3), you will make a right turn, so at point (2) start signaling right and move closer to the right as preparation for making the right turn.
(3) Right turn
Make sure you look both ways AND also behind your right shoulder, and that you are close to the center lane.
(4) The Railroad tracks
When you get to the tracks, stop, then put the emergency brakes on - the "tracks" are on a very small hill, and a car in manual will roll backwards if the emergency brake isn't put on (something that you will be graded on - don't roll backwards). Both automatic and manual test takers should put the emergency brakes on. Roll down your window and "listen" for a train, then roll your window back up. Make sure you look both ways as well. Once you've "determined" it's "safe" you can undo the emergency brake and then proceed.
(5) The Blind Spot
Concrete walls are suppose to act as "blind spots" on corners, which block your view of traffic at an intersection. Come to a complete stop when you reach this area, and then slowly inch out little by little, looking both ways, until your view of the road is "clear", then you can go ahead. Again, there's no penalty for taking it slow and being extra cautious.
(6) The Hard Left turn
This is a spot where many people end up failing, mostly because they go over the curb. It seems like a left turn should be easy enough, but be extra careful here. If you are too close to the left side, you will hit the curb, but if you are too much on the right side, you will make a wider left turn. If you go too wide, you will cross into the opposite lane. You have to make a tight left turn staying inside your lane the entire time. Remember, though, if you hit the curb, don't keep going; back up and try again.
(7) Another blind spot
Again, inch slowly before making the turn. After making the turn, you'll have to make an immediate right turn onto the narrow 90 degree road (8), so stay close to the line on the right side.
(8) The 90 degree narrow road
This is where the yellow vertical bars line the road - hitting them is also a fail. You have to make the turns in a very tight and narrow lane, again without hitting the curb. The best way to do this part is to make wider turns and sort of "swing around." If you're turning the car right, be closer to the left curb, and when turning left, be closer to the right curb. When leaving this road and turning left back onto the main road, remember to look both ways and over the left shoulder, but if the road is "clear" don't come to a complete stop.
(9) The Stoplight
If the light is green, make sure to look both ways before crossing. Obviously, if it's red, stop (with your bumper behind the stop bar). Once it turns green, look both ways before proceeding.
(10) The S-road
Same thing with (8) applies here (except there are no yellow bars).
(11) and (12) The Hazard
People in Japan unfortunately do the crazy thing of stopping their cars in the road, pretty much anywhere, anytime, for no apparent reason other than they want a break. Before you reach the hazard (once you "see" it), signal right to get into the opposite lane. Make sure traffic from both behind and in front of you is clear (look over your right shoulder). Then move into the opposite lane as you clear the hazard. Make sure you move all the way into the other lane as you clear the hazard. After clearing it, signal left to get back into the left lane, and look over your shoulder. Get back all the way into the left lane. Once you clear point (11), you are pretty much done with the most difficult parts.
(13) The last bit
Signal left to indicate you are moving off the course. The tester should tell you which lane to park the car. Signal left again (remember to look over your shoulder), then get into that lane. Slow down, signal left again to indicate you are pulling over and stopping the car. The tester will tell you at which point to stop the car (there are markers) - park with the rearview mirrors lined up with this marker. Be sure to be close enough to the curb. Once you've stopped, put the car in park, put on the emergency brakes, turn off the vehicle (but leave the key in the ignition). Make sure before exiting you look around, check behind you for "oncoming" traffic, before getting out of the car. Once you are out, you're done!
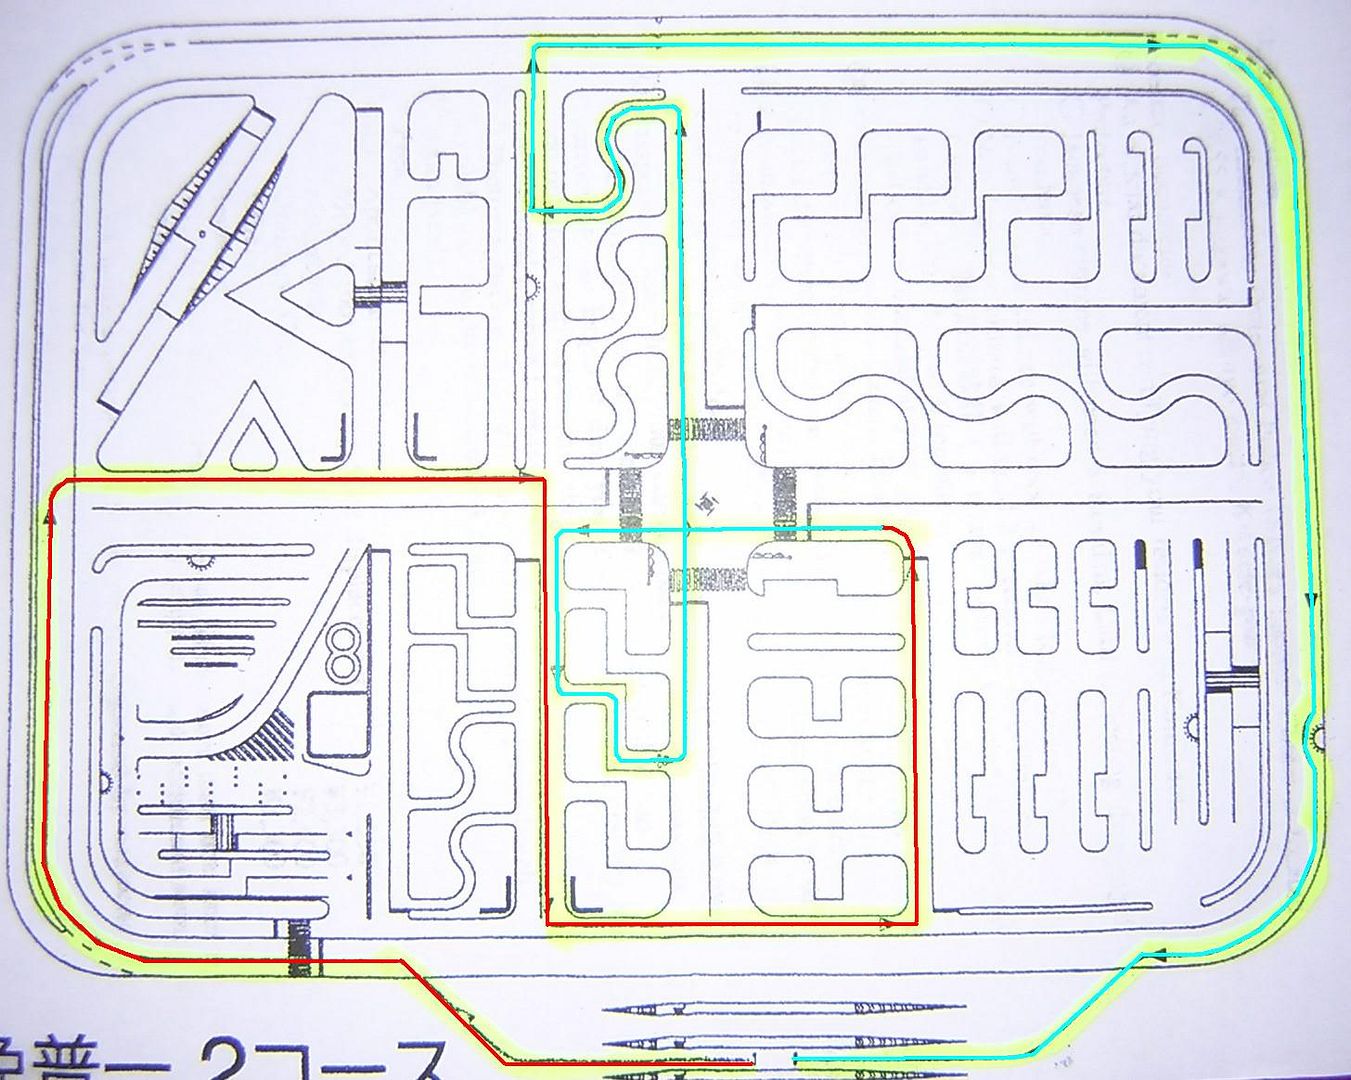
Course 2
Click here for the map
Because I had course 1 both times I was at the center, I can't give any pointers specific to course 2, although the two are suppose to be similar enough, I suppose. The main differences between 1 and 2 is that in course 2, you don't have to do the railroad crossing, and there is only 1 road hazard.
The tester might tell you right away after you get out whether you passed or failed, although that one jerk of a tester might think teasing you is funny and won't give you a straight answer if you failed or passed rigth away. If you do fail (and a lot of people will fail, so don't get upset), the tester should tell you where you went wrong on the course. A lot of people will fail the test many, many times before they pass, so prepare yourself for the possibility of having to take the test again, and don't get upset!!
If you pass, you get to wait around some more, get your license photo taken, fill out a few more forms, etc. The hoops you have to jump through after passing the test are relatively easy from this point on, and one of the ladies who works in the office that takes the pictures speaks incredibly good English, so you probably won't have any problems here.
Links
Kumamoto International Foundation's website on vehicles
The Japan Automobile Federation
Traffic Signs in Japan
Kanagawa Prefectural Police website
Information from Fukui Prefecture
********************
Did you find this information useful? Are there any mistakes that should be corrected? Did I forget any details about taking the test? Please respond and give me feedback!
Sorry for the hiatus. The following is my account of my experience at the Unten Menkyo Center (the Driver's License Center) in Kumamoto. There's a lot of good information for foreigners about taking the driving test in Japan, but I haven't found anything specific to Kumamoto Prefecture online yet, so I thought I would write this up. During my two attempts at this driving test (first time in manual, failed; second time in automatic, passed), I picked up a lot of info, and I hope you find it useful.
Even if you don't have to worry about this for a long while, you might want to know what documents to bring before you leave Japan so you can save yourself the hassle later.
General information
In Japan most foreigners can drive with their home country license and an IDP, an International Driver's Permit, for only up to 1 year from the date of their visa. After that you must get a Japanese menkyo, license. Many foreigners (such as Brits and Canadians) only need to fill out the paperwork and such to change the license (you can find this information elsewhere online). Us Americans, unfortunately, need to pass the driving test. You can take the test in either automatic or manual (aka stick shift), but if you take the test in automatic you cannot drive in manual. (I heard through the grapevine that the fine for driving manual with an automatic license is about 50,000 yen, or roughly $500 US.)
The paperwork needed to change your license includes: a certificate from your town/city's municipal office stating that you do live your prefecture; your gaijin card; a translation of your home license (the information for that can be found at the JAF website; however, their link for the translation application doesn't seem to work); your home licenses (bring previous licenses if you have them - they might be useful); your passport (bring previous passports too); your IDP; and your inkan, your personal seal. Plus money to pay for all the fees (in Kumamoto, 2400 yen each time you take the test, 1650 yen when you pass and actually get your license).
*If you do your translation application by mail, the JAF of Kumamoto says it takes 7 days from the day you mail it to receive your papers. However, me and a friend both received ours in about 4 days. The JAF isn't open on weekends.
*In Kumamoto, the information sheet technically does not mention school transcript as one of the documents you should bring; however, if you have a copy, be sure to bring it. You need to prove that you were in your home country for 3 months after you received your license. In some prefectures, the date of issue on the license is sufficient to prove this, but in Kumamoto neither the passport nor the license can be used to prove this, hence, bring your transcript if you can... If your license was issued less than a year (12 months) before you came to Japan, you might have to put a green and yellow "beginner driver's seals" on your car, even if you've been driving for years in your home country. (Bureaucracy and all.)
*You'll also need 2 ID photos, 3 cm by 2.4, but in Kumamoto you can get this done at the center for 700 yen.
Information specific to Kumamoto-ken
The Unten Menkyo Center is located in Kikuyou-machi, east/northeast of downtown Kumamoto. From the 57 Higashi Bypass, turn onto the 103 (a right at the giant Aoyama clothing store, if you're coming from the west/south - there's a sign for the center just before the turn), and drive about 8-9 km - you should pass the Red Cross Hospital. The center is next door to the giant stadium Park Dome (cannot miss it), and the center itself looks like an airport, both inside and out.
If you can't speak Japanese, chances are you will be referred to a lady at the center who can help you - she speaks English fairly well. If you REALLY can't speak Japanese, you might want to bring someone to interpret for you. Some of the driving testers are quite nice and friendly to foreigners, but there is at least one very rude and mean tester who is hostile to foreigners (and I got stuck with him on my second day).
Edit, 7/29/2007: I've heard from various people that, from 2007, Kumamoto Prefecture's license center does not allow foreigners to come by themselves. Foreigners must either be accompanied by a Japanese person who can translate, or must be fluent in Japanese, according to the rumors. Check with the menkyo center.
Many foreigners have to get their menkyo before the beginning of August, so the center can be busy with other foreigners in July. You might want to make an appointment for your driving test before heading out to the center.
The process can take pretty much all day and there's a lot of waiting. For me, I arrived at 10 AM to fill out the paperwork on the first day; after the paperwork comes the eye exams and the paper test (in English and pretty easy - you need at least 7 out of 10 answers correct to pass). Noon to 1 PM is lunchtime and the time designated for examinees to walk around the course - you can't walk the course at any other time. Driving exams start sometime after lunch; if you pass, you do more paperwork and get your picture taken, all with more waiting involved. The wait depends on how busy the center is that day. On my second day I arrived at 11:30 AM and was finished with everything by around 3:10 in the afternoon, although the previous day was a lot longer.
The actual driving test takes up only about 10-20 minutes of the entire process. Be sure to walk the course during lunchtime! It's especially useful if you walk it with someone who's taken the test already (in other words, failed) and can point out the areas to look out for. (There are umbrellas for anyone to use by the exit leading out to the course. It's a good idea to grab one on a hot and sunny day.) There are 2 routes (maps posted below), find out which one is being used that day.
The Driving Test
Here are some general pointers about the driving test in Kumamoto:
*Exaggerate being cautious. Even if it feels stupid.
*You don't have to do parking on the test (no parallel, no backward-in parking) - you just need to be able to park the car by pulling up to one of the parking lanes.
*Don't wear sandals or high heels when you take the test.
*The testers may take you around the course once in the car (although the testers have been known to make mistakes and forget where to stay on the course). Also, you might have other examinees in the car with you who will take their turns after or before you. It might be a good idea to pay attention to the other drivers' techniques before your turn. Talking to other examinees is not allowed.
*You're graded from when you enter and sit in the driver's seat until you turn off the car and exit.
*Once you're in the driver's seat, check the mirrors, your seat, the emergency brake, everything before you turn the engine on. Make sure everyone else has their seatbelts. Don't start until the driver says so (or ask if it's okay to start).
*You're not penalized for taking it slow, so don't worry about not going fast enough.Edit, 7/29/2007: This may or may not be true anymore - check with the menkyo center.
*Going over a curb is an automatic fail, but if you HIT a curb you can still save yourself. If you find yourself hitting a curb (on TOP of the curb), stop, back up, and try again. If you go completely over it you fail.
*Hitting the yellow poles on tight turns is also an automatic fail (something I didn't know the first time I took the test - and thank goodness I didn't know!).
*If there's a stop sign, a stop light, or a stop bar, then stop obviously, but if there's NO indication to stop and you checked the roads are clear (like, at a turn), then don't make a complete stop. I don't think you get penalized for making a full stop in these areas, but I kept getting scolded for stopping when I didn't need to.
*When you do stop, stop with your front bumper behind the stop bar. If you are not close enough to the stop bar when you stop, and then you continue again, the tester might consider that running a stop sign. (If you do stop too soon, stop again at the proper location - bumper behind the stop bar).
*Keep your hands at 10 and 2 o'clock on the steering wheel; when making a big turn, do the hand-over-hand motion for turning the wheel.
*Whenever you make a turn, be sure to look over your shoulder to check for bicycles or small motorbikes that might be by your side.
More specific pointers - Course 1

Clear here for the map
(1) Starting out
When leaving the parking area, you'll have to signal at least 2 times to get onto the course. Signal right (to indicate you're leaving the parking area), signal right again (if your car was in one of the far left lanes of the parking area, you'll have to cross over the path of the right parking area), and then before entering the course, signal left. Almost immediately after you've entered the course, there's a crosswalk (close to where point 6 is labeled) - make sure you look both ways before going over the crosswalk.
(2) At (3), you will make a right turn, so at point (2) start signaling right and move closer to the right as preparation for making the right turn.
(3) Right turn
Make sure you look both ways AND also behind your right shoulder, and that you are close to the center lane.
(4) The Railroad tracks
When you get to the tracks, stop, then put the emergency brakes on - the "tracks" are on a very small hill, and a car in manual will roll backwards if the emergency brake isn't put on (something that you will be graded on - don't roll backwards). Both automatic and manual test takers should put the emergency brakes on. Roll down your window and "listen" for a train, then roll your window back up. Make sure you look both ways as well. Once you've "determined" it's "safe" you can undo the emergency brake and then proceed.
(5) The Blind Spot
Concrete walls are suppose to act as "blind spots" on corners, which block your view of traffic at an intersection. Come to a complete stop when you reach this area, and then slowly inch out little by little, looking both ways, until your view of the road is "clear", then you can go ahead. Again, there's no penalty for taking it slow and being extra cautious.
(6) The Hard Left turn
This is a spot where many people end up failing, mostly because they go over the curb. It seems like a left turn should be easy enough, but be extra careful here. If you are too close to the left side, you will hit the curb, but if you are too much on the right side, you will make a wider left turn. If you go too wide, you will cross into the opposite lane. You have to make a tight left turn staying inside your lane the entire time. Remember, though, if you hit the curb, don't keep going; back up and try again.
(7) Another blind spot
Again, inch slowly before making the turn. After making the turn, you'll have to make an immediate right turn onto the narrow 90 degree road (8), so stay close to the line on the right side.
(8) The 90 degree narrow road
This is where the yellow vertical bars line the road - hitting them is also a fail. You have to make the turns in a very tight and narrow lane, again without hitting the curb. The best way to do this part is to make wider turns and sort of "swing around." If you're turning the car right, be closer to the left curb, and when turning left, be closer to the right curb. When leaving this road and turning left back onto the main road, remember to look both ways and over the left shoulder, but if the road is "clear" don't come to a complete stop.
(9) The Stoplight
If the light is green, make sure to look both ways before crossing. Obviously, if it's red, stop (with your bumper behind the stop bar). Once it turns green, look both ways before proceeding.
(10) The S-road
Same thing with (8) applies here (except there are no yellow bars).
(11) and (12) The Hazard
People in Japan unfortunately do the crazy thing of stopping their cars in the road, pretty much anywhere, anytime, for no apparent reason other than they want a break. Before you reach the hazard (once you "see" it), signal right to get into the opposite lane. Make sure traffic from both behind and in front of you is clear (look over your right shoulder). Then move into the opposite lane as you clear the hazard. Make sure you move all the way into the other lane as you clear the hazard. After clearing it, signal left to get back into the left lane, and look over your shoulder. Get back all the way into the left lane. Once you clear point (11), you are pretty much done with the most difficult parts.
(13) The last bit
Signal left to indicate you are moving off the course. The tester should tell you which lane to park the car. Signal left again (remember to look over your shoulder), then get into that lane. Slow down, signal left again to indicate you are pulling over and stopping the car. The tester will tell you at which point to stop the car (there are markers) - park with the rearview mirrors lined up with this marker. Be sure to be close enough to the curb. Once you've stopped, put the car in park, put on the emergency brakes, turn off the vehicle (but leave the key in the ignition). Make sure before exiting you look around, check behind you for "oncoming" traffic, before getting out of the car. Once you are out, you're done!
Course 2
Click here for the map
Because I had course 1 both times I was at the center, I can't give any pointers specific to course 2, although the two are suppose to be similar enough, I suppose. The main differences between 1 and 2 is that in course 2, you don't have to do the railroad crossing, and there is only 1 road hazard.
The tester might tell you right away after you get out whether you passed or failed, although that one jerk of a tester might think teasing you is funny and won't give you a straight answer if you failed or passed rigth away. If you do fail (and a lot of people will fail, so don't get upset), the tester should tell you where you went wrong on the course. A lot of people will fail the test many, many times before they pass, so prepare yourself for the possibility of having to take the test again, and don't get upset!!
If you pass, you get to wait around some more, get your license photo taken, fill out a few more forms, etc. The hoops you have to jump through after passing the test are relatively easy from this point on, and one of the ladies who works in the office that takes the pictures speaks incredibly good English, so you probably won't have any problems here.
Links
Kumamoto International Foundation's website on vehicles
The Japan Automobile Federation
Traffic Signs in Japan
Kanagawa Prefectural Police website
Information from Fukui Prefecture
********************
Did you find this information useful? Are there any mistakes that should be corrected? Did I forget any details about taking the test? Please respond and give me feedback!