tutorial
so, i'm bored and i finally have some time to do something. how's about a tut?

to
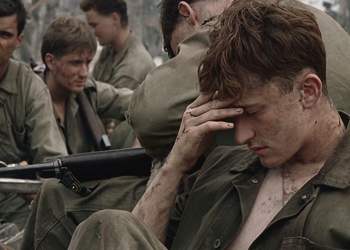
1.find your screencap, i chose this one:

2.crop it to however you like

3.duplicate the base, and desaturate(Image>Adjustments>Desaturate) . set the layer to screen @ 20% opacity.
(it doesn't look like a huge difference yet, but it will help brighten the icon later on)

4.create a new curves layer, (Layer>New Adjustment Layer>Curves), with these in puts:
RGB:(click to see how it should look)
point 1(output 52,input 39) point 2(output 132,input 96) point 3(output 206,input 181)
RED: p1(117,119) p2(184,194)
BLUE: p1(32,40) p2(154,152)

5.create a new levels layer,(Layer>New Adjustment Layer>Levels with these inputs:
RGB:
input:9, 0.82, 255 ;output:0, 255
BLUE
input:0, 0.93, 236 ;output:0, 255

6.create a new selective color layer,Layer>New Adjustment Layer>Selective Color, with these inputs:
REDS:
cyan:-62
magenta:+41
yellow:+56
black:0
YELLOWS:
cyan:-15
magenta:0
yellow:+86
black:0

7.take this texture(sorry i don't know who its by, if its yours or you know who made it please let me know!) and paste as a new layer, and set to softlight @ 100% opacity.

8.take this texture(sorry i don't know who its by, if its yours or you know who made it please let me know!) and paste as a new layer, and set to softlight @ 100% opacity.
and now, you're finished!

if you'd like the psd, just comment and i'll give you the link :)

to

1.find your screencap, i chose this one:

2.crop it to however you like

3.duplicate the base, and desaturate(Image>Adjustments>Desaturate) . set the layer to screen @ 20% opacity.
(it doesn't look like a huge difference yet, but it will help brighten the icon later on)

4.create a new curves layer, (Layer>New Adjustment Layer>Curves), with these in puts:
RGB:(click to see how it should look)
point 1(output 52,input 39) point 2(output 132,input 96) point 3(output 206,input 181)
RED: p1(117,119) p2(184,194)
BLUE: p1(32,40) p2(154,152)

5.create a new levels layer,(Layer>New Adjustment Layer>Levels with these inputs:
RGB:
input:9, 0.82, 255 ;output:0, 255
BLUE
input:0, 0.93, 236 ;output:0, 255

6.create a new selective color layer,Layer>New Adjustment Layer>Selective Color, with these inputs:
REDS:
cyan:-62
magenta:+41
yellow:+56
black:0
YELLOWS:
cyan:-15
magenta:0
yellow:+86
black:0

7.take this texture(sorry i don't know who its by, if its yours or you know who made it please let me know!) and paste as a new layer, and set to softlight @ 100% opacity.

8.take this texture(sorry i don't know who its by, if its yours or you know who made it please let me know!) and paste as a new layer, and set to softlight @ 100% opacity.
and now, you're finished!

if you'd like the psd, just comment and i'll give you the link :)