tutorial
this time we're going from:

to
or
*just a warning its really kind of image heavy.
1. choose a pic for your base. i chose this picof nick stokes of csi.
2.resize and crop to how you want it.

3.now we're going to start on the coloring so create a new curves layer(go to layer> new adjustment layer> curves) with these inputs:
RGB
point 1: output:62 input:40 point 2: output:154 input:90
it should look something like this:

4.now create a new selective color layer (layer> new adjustment layer> selective color) with these inputs:
REDS
cyan:-29
magenta:0
yellow:0
black:0
YELLOWS
cyan:100
magenta:-19
yellow:-77
black:0
WHITES
cyan:100
magenta:100
yellow:0
black:0
NEUTRALS
cyan:-43
magenta:+6
yellow:+11
black:0

5.now create a new levels layer(layer> new adjustment layer> levels) with these inputs:
RGB
input levels: 28. 1.00, 238
output levels: 0, 255
RED
input levels: 0, 0.88, 238
output levels: 0, 230
(for the green and blue channels just leave them at the default settings)

6.create a new photo filter layer(layer> new adjustment layer> photo filter), set it to cooling filter(80) @ 12% density

7.now paste this gradient over the top:
set the layer to softlight @ 55% opacity.

now, thats it as far as the coloring goes. now we're going to to into adding a background.
1.merge all the layers that you just colored(you can right click in your layer pallete and merge visible, or layer>merge visible)
2. find the background that you want to use.
i chose this:

by nokitas @ aube_des_arts
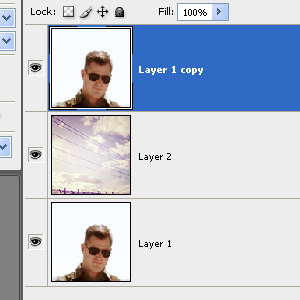
3. duplicate your base and bring it to the top(right click, duplicate base)
you're palette should look something like this:

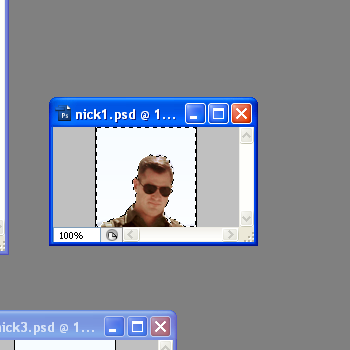
4. now you're going to need to select the background. and since the background on my base is all the same color i'm going to use the magic wand tool. to select just click on the area you want to select(as in this example).
you selection should look something like this:

5. its not exactly as clean as i'd like it to be so now we're going to manually select what we want to be erased using the polygonal lasso tool.
this is were it might be a bit tedious, but it definitely makes the outline more around the subject clean and seemless.
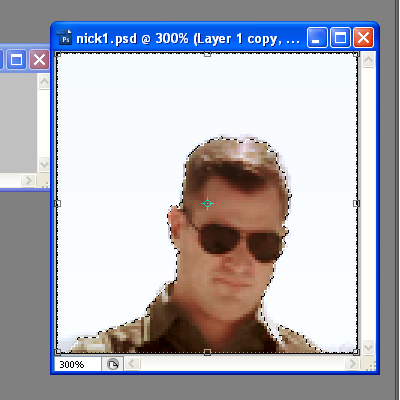
6. to make sure that your selecting everything you need i would zoom in on the icon(i usually go about 300%, it makes it much easier to see the things missed by the magic wand).

7. now with the selecting make sure you have 'subtract from selection' as your mode(make sure this is clicked) and then begin to outline the areas you want selected.(if you want to add to a selection you can do it this way as well, just use the 'add to selection mode).
the selecting should look similar to this.
*after you have it all selected how you like you can go back to the original 100% zoom.
8. now that you have the background selected we can get prepare it for erasing. to make the outline more smooth go to select> modify> smooth and make the radius 1.
it now looks like this
8. now just take your eraser tool and start erasing over the selection.

9.then, if you'd like just add text. i added 'stoked' above his head in white and then set the layer to soflight to give it a transparent look.

ok. i hope that i explained that well and wasn't too confusing.
if you'd like the psd(for just the coloring or the whole process) please let me know!

to

or

*just a warning its really kind of image heavy.
1. choose a pic for your base. i chose this picof nick stokes of csi.
2.resize and crop to how you want it.

3.now we're going to start on the coloring so create a new curves layer(go to layer> new adjustment layer> curves) with these inputs:
RGB
point 1: output:62 input:40 point 2: output:154 input:90
it should look something like this:

4.now create a new selective color layer (layer> new adjustment layer> selective color) with these inputs:
REDS
cyan:-29
magenta:0
yellow:0
black:0
YELLOWS
cyan:100
magenta:-19
yellow:-77
black:0
WHITES
cyan:100
magenta:100
yellow:0
black:0
NEUTRALS
cyan:-43
magenta:+6
yellow:+11
black:0

5.now create a new levels layer(layer> new adjustment layer> levels) with these inputs:
RGB
input levels: 28. 1.00, 238
output levels: 0, 255
RED
input levels: 0, 0.88, 238
output levels: 0, 230
(for the green and blue channels just leave them at the default settings)

6.create a new photo filter layer(layer> new adjustment layer> photo filter), set it to cooling filter(80) @ 12% density

7.now paste this gradient over the top:

set the layer to softlight @ 55% opacity.

now, thats it as far as the coloring goes. now we're going to to into adding a background.
1.merge all the layers that you just colored(you can right click in your layer pallete and merge visible, or layer>merge visible)
2. find the background that you want to use.
i chose this:

by nokitas @ aube_des_arts
3. duplicate your base and bring it to the top(right click, duplicate base)
you're palette should look something like this:

4. now you're going to need to select the background. and since the background on my base is all the same color i'm going to use the magic wand tool. to select just click on the area you want to select(as in this example).
you selection should look something like this:

5. its not exactly as clean as i'd like it to be so now we're going to manually select what we want to be erased using the polygonal lasso tool.
this is were it might be a bit tedious, but it definitely makes the outline more around the subject clean and seemless.
6. to make sure that your selecting everything you need i would zoom in on the icon(i usually go about 300%, it makes it much easier to see the things missed by the magic wand).

7. now with the selecting make sure you have 'subtract from selection' as your mode(make sure this is clicked) and then begin to outline the areas you want selected.(if you want to add to a selection you can do it this way as well, just use the 'add to selection mode).
the selecting should look similar to this.
*after you have it all selected how you like you can go back to the original 100% zoom.
8. now that you have the background selected we can get prepare it for erasing. to make the outline more smooth go to select> modify> smooth and make the radius 1.
it now looks like this
8. now just take your eraser tool and start erasing over the selection.

9.then, if you'd like just add text. i added 'stoked' above his head in white and then set the layer to soflight to give it a transparent look.

ok. i hope that i explained that well and wasn't too confusing.
if you'd like the psd(for just the coloring or the whole process) please let me know!