(no subject)
OKAY RIGHT SO
A tutorial requested by aeolianrain.
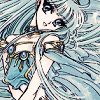
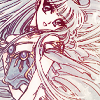
Going from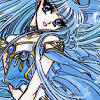
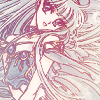
to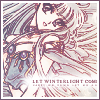
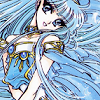
in PSPX, should translate.
Possibly differs from the original - sorry.
1. Sooooo yes right... Base. Stars Umi from Magic Knights Rayearth by CLAMP. Pretty. Let's make it prettier.
2. Duplicate the base and set it to Screen, 50%.
3. Make a new layer, fill it with #062342 [
] and set it to Exclusion, 100%.
4. Duplicate and desaturate your base [Shift+H/Adjust -> Hue and Saturation -> Hue/Saturation/Lightness] with the settings Saturation -100, Lightness 0.
Drag it to top and set it to Overlay, 80%.
5. After that, take this gradient
[by me] and set it to Lighten, 80%.

6. Paste this:
as a new layer [it's a default pattern of PSPX] and set it to Burn, 100%.
7. Let's use a texture.
Use this one
[which is by colorfilter, I believe] and set it to Screen, 73%.
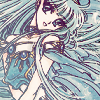
8. The curves step.
Go to Layers -> New Adjustments Layer -> Curves and play around with the settings until you're satisfied. I, personally, wanted the image to be darker and clearer, so I input those settings:
RGB: Input 111, Output 92 [I didn't change Red, Green or Blue]...
And thus my icon looked like that:

9. Duplicate your desaturated base from step #4 and set it to Soft Light, 100%.
10. Now, for the text.
- Before you add text, choose #ffffff [white] as your background color, and, using the Rectangle tool, draw a rectangle. It'll make a place for text.
- Now, add big text. Write anything you want, as long as it fits!
What I did:
- I used #71172f [dark red] as the color;
- I used the 18th Century font;
- The size was six and Kerning was at 100.
- As for tinytext, I used the same font and color, changed the Kerning to 1000 and the size to one and wrote something. I seriously don't remember what...
Anyway, after all that, we have...!
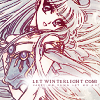
11. Now, let's add BORDERS.
By any means you want - paintbrush, stroke, Selection Borders - make a double border.
Personally, I made a three-pixel border in #ffffff [white] and a one-pixel border in #71172f [dark red; The same color I used for text].
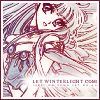
12. LAST STEP.
Use this gradient
and set it to Lighten, 70%.
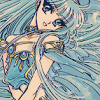
And TA-DAH!, icon is done~
A tutorial requested by aeolianrain.
Going from
to
in PSPX, should translate.
Possibly differs from the original - sorry.
1. Sooooo yes right... Base. Stars Umi from Magic Knights Rayearth by CLAMP. Pretty. Let's make it prettier.
2. Duplicate the base and set it to Screen, 50%.
3. Make a new layer, fill it with #062342 [
] and set it to Exclusion, 100%.
4. Duplicate and desaturate your base [Shift+H/Adjust -> Hue and Saturation -> Hue/Saturation/Lightness] with the settings Saturation -100, Lightness 0.
Drag it to top and set it to Overlay, 80%.
5. After that, take this gradient
[by me] and set it to Lighten, 80%.
6. Paste this:
as a new layer [it's a default pattern of PSPX] and set it to Burn, 100%.
7. Let's use a texture.
Use this one
[which is by colorfilter, I believe] and set it to Screen, 73%.
8. The curves step.
Go to Layers -> New Adjustments Layer -> Curves and play around with the settings until you're satisfied. I, personally, wanted the image to be darker and clearer, so I input those settings:
RGB: Input 111, Output 92 [I didn't change Red, Green or Blue]...
And thus my icon looked like that:
9. Duplicate your desaturated base from step #4 and set it to Soft Light, 100%.
10. Now, for the text.
- Before you add text, choose #ffffff [white] as your background color, and, using the Rectangle tool, draw a rectangle. It'll make a place for text.
- Now, add big text. Write anything you want, as long as it fits!
What I did:
- I used #71172f [dark red] as the color;
- I used the 18th Century font;
- The size was six and Kerning was at 100.
- As for tinytext, I used the same font and color, changed the Kerning to 1000 and the size to one and wrote something. I seriously don't remember what...
Anyway, after all that, we have...!
11. Now, let's add BORDERS.
By any means you want - paintbrush, stroke, Selection Borders - make a double border.
Personally, I made a three-pixel border in #ffffff [white] and a one-pixel border in #71172f [dark red; The same color I used for text].
12. LAST STEP.
Use this gradient
and set it to Lighten, 70%.
And TA-DAH!, icon is done~