Braaaaaaassieres!
So in my anxiety to not miss the start of class today, I kind of left the house around like 7.30? And moseyed to MacDonald's to get some McMuffins and then catch a bus up to Ottawa St. I got to the shop at 8.20am -_-
Anyway, since I had time, I took a picture. Here is the modest signage of Bra Makers Supply:

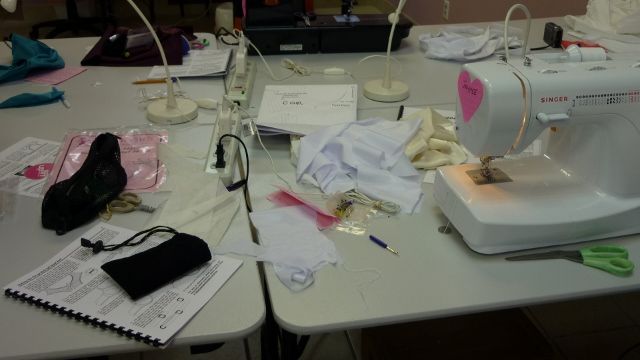
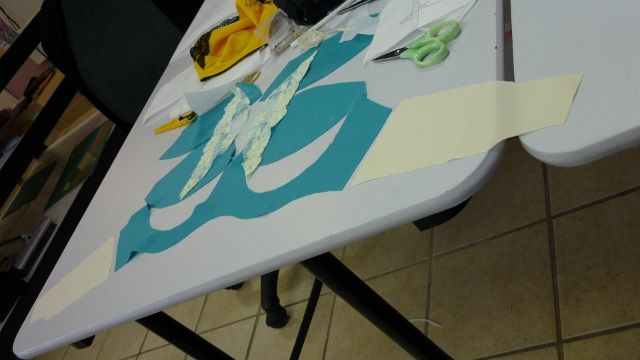
There is a room in the back where the classes are held, with a LOT of table space. Here's my messy workstation for the two days:
On the first day, we make what is called a "training bra" which is on plain white, and it's basically our first experimental bra that we make to determine how well the pattern works for us. Now, we get fitted first thing, and the instructors adjust the pattern accordingly if we need it. Like, say if you have a common complaint about regular bras, like the band is too tight, or the cups are too close, they can fix that in the pattern for you.
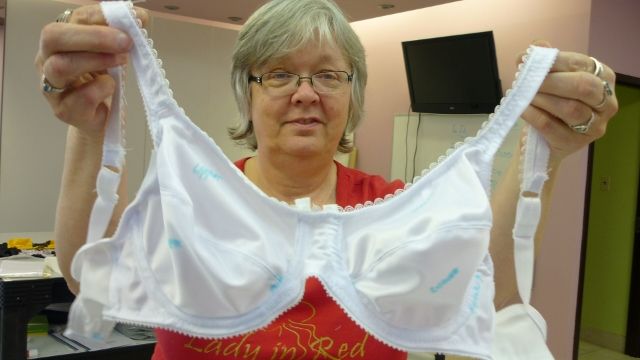
Anyway, because I was late, and I'm slow-ish, I only finished my bra today! Here's Wilma holding it up:
The front:
The back:
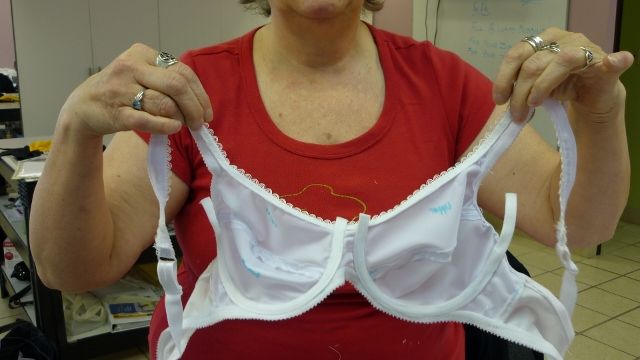
It's somewhat simpler than it looks like. Anyway, yeah, you can see all the blue markings I made.
Beverly Johnson, the proprietress and the lady who started it all, had a look at the fitting, and Linda, the instructor, adjusted my patterns a little, and I went out to pick some new material! I had ivory thread already, so I wanted something to go with that.
Basic bras require two kinds of material, a power net for the band, and pretty much any kind of stretch material for the rest of the bra (but the instructors call it duoplex). And then you have to worry about the fold-overs, the neckline elastics, the band elastic. And then you got the snaps and fasteners and things like that. This shop is pretty much the only shop dedicated to all these supplies (you can find the fabric a bit more easily, I think, but the elastics are a pain to find in any variety... you might get one or two in any given regular fabric store...). I went with a turquoise duoplex, a light-green/ivory lace and ivory elastics. Since they know it's a combo that would match already, they already had sets made:
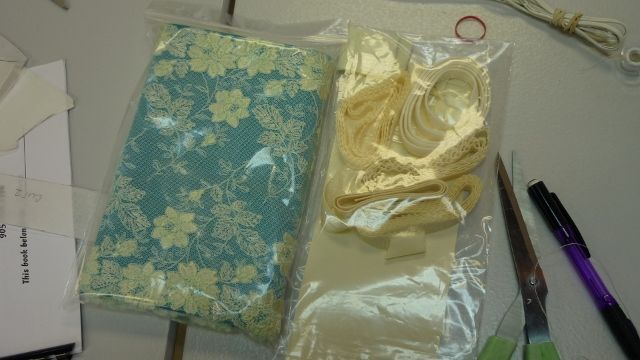
(You can put together your own combination if you like. I just so happened to have picked a combo they'd already put together.)
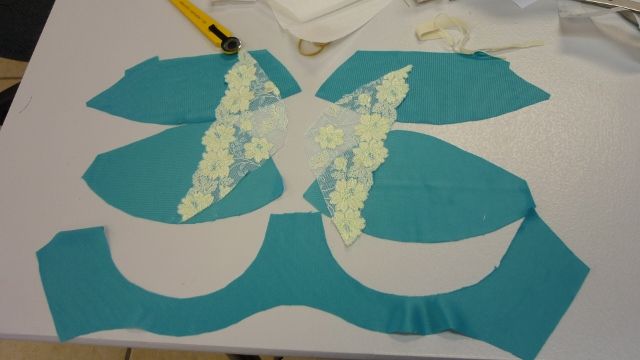
Linda showed us how to make the pattern for the lace covering (if I was to cover the whole cup with the lace, that's a fairly straightforward job, but this one is the butterfly pattern), and then I got to cutting:
Another one, with the ivory back band:
The straightforward thing would have been to sew together the cup pieces first, and then there's top-stitching along each side of the seam. But since we were putting on the butterfly lace, I couldn't exactly do that. So, we joined HALF of the cup first, and then put on the lace. That way the cup is still flat enough for lace application. Otherwise it's all curved and kind of a pain.

(The one on the left's already done! The one on the right with all the pins, I think I'm about to do top-stitching on it.
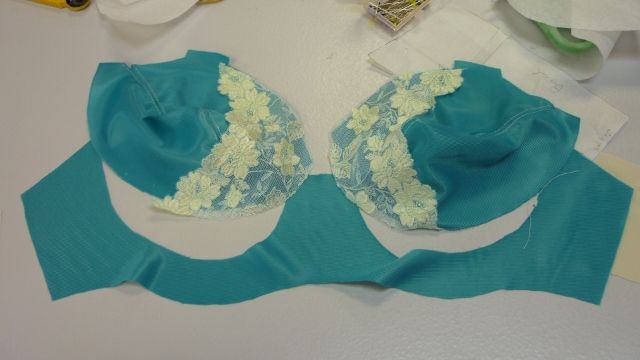
Once that's done, it's stitching to the front band:
After that, er, actually you have to sew on the channeling for the wires, but I forgot to take a picture of that, because I had the devil of the time attaching it. Turns out I was being stupid all along and just holding the thing the wrong way! Hence all my trouble. Anyway, you have to attach the channeling to the seam-lines of where the cups meet the front band.
AFTER THAT, it's onto the edges!

Along the bottom of the band and the underarm sides are fold-over elastics. I need to remember for next time, that under the cups, we need to stretch the fold-over. Anyway, there's all this ribbing along the top, right? Those are called picots (pee-kOHs) (honestly, everytime I hear the word I think "pleco" and all the sucker fishes my family used to own immediately come to mind). They're usually fuzzy on one side. You sew them on fuzzy side up, picots facing IN, on the right side of the fabric. THEN, you FOLD THEM OVER, so the picots are the only things peeking out, and that gets stitched down.
Aaaaaaaaaand that's about as far as I got today with this particular bra, because then my machine started acting up and wouldn't let me get anything else done.
In conversation with various other people, it turns out, there're bra makers all over North America who are graduates of their professional course (where they teach you how to do fittings and measure). Good idea, because it keeps them in business, but the course is $3700. If you can swing that, it's a job that pays for itself pretty easily I think. Wish I'd heard about this earlier... would've given me something to do over the last half a damn year I had nothing to do. If I decide I never want to have anything to do with academia, this might be a good option.
Also, husbands have totally taken that course to learn how to sew bras for their wives. So there's an option. That's a pretty sexy thing.
Anyways. Hope you like the pictures!
Anyway, since I had time, I took a picture. Here is the modest signage of Bra Makers Supply:

There is a room in the back where the classes are held, with a LOT of table space. Here's my messy workstation for the two days:

On the first day, we make what is called a "training bra" which is on plain white, and it's basically our first experimental bra that we make to determine how well the pattern works for us. Now, we get fitted first thing, and the instructors adjust the pattern accordingly if we need it. Like, say if you have a common complaint about regular bras, like the band is too tight, or the cups are too close, they can fix that in the pattern for you.
Anyway, because I was late, and I'm slow-ish, I only finished my bra today! Here's Wilma holding it up:
The front:

The back:

It's somewhat simpler than it looks like. Anyway, yeah, you can see all the blue markings I made.
Beverly Johnson, the proprietress and the lady who started it all, had a look at the fitting, and Linda, the instructor, adjusted my patterns a little, and I went out to pick some new material! I had ivory thread already, so I wanted something to go with that.
Basic bras require two kinds of material, a power net for the band, and pretty much any kind of stretch material for the rest of the bra (but the instructors call it duoplex). And then you have to worry about the fold-overs, the neckline elastics, the band elastic. And then you got the snaps and fasteners and things like that. This shop is pretty much the only shop dedicated to all these supplies (you can find the fabric a bit more easily, I think, but the elastics are a pain to find in any variety... you might get one or two in any given regular fabric store...). I went with a turquoise duoplex, a light-green/ivory lace and ivory elastics. Since they know it's a combo that would match already, they already had sets made:

(You can put together your own combination if you like. I just so happened to have picked a combo they'd already put together.)
Linda showed us how to make the pattern for the lace covering (if I was to cover the whole cup with the lace, that's a fairly straightforward job, but this one is the butterfly pattern), and then I got to cutting:

Another one, with the ivory back band:

The straightforward thing would have been to sew together the cup pieces first, and then there's top-stitching along each side of the seam. But since we were putting on the butterfly lace, I couldn't exactly do that. So, we joined HALF of the cup first, and then put on the lace. That way the cup is still flat enough for lace application. Otherwise it's all curved and kind of a pain.

(The one on the left's already done! The one on the right with all the pins, I think I'm about to do top-stitching on it.
Once that's done, it's stitching to the front band:

After that, er, actually you have to sew on the channeling for the wires, but I forgot to take a picture of that, because I had the devil of the time attaching it. Turns out I was being stupid all along and just holding the thing the wrong way! Hence all my trouble. Anyway, you have to attach the channeling to the seam-lines of where the cups meet the front band.
AFTER THAT, it's onto the edges!

Along the bottom of the band and the underarm sides are fold-over elastics. I need to remember for next time, that under the cups, we need to stretch the fold-over. Anyway, there's all this ribbing along the top, right? Those are called picots (pee-kOHs) (honestly, everytime I hear the word I think "pleco" and all the sucker fishes my family used to own immediately come to mind). They're usually fuzzy on one side. You sew them on fuzzy side up, picots facing IN, on the right side of the fabric. THEN, you FOLD THEM OVER, so the picots are the only things peeking out, and that gets stitched down.
Aaaaaaaaaand that's about as far as I got today with this particular bra, because then my machine started acting up and wouldn't let me get anything else done.
In conversation with various other people, it turns out, there're bra makers all over North America who are graduates of their professional course (where they teach you how to do fittings and measure). Good idea, because it keeps them in business, but the course is $3700. If you can swing that, it's a job that pays for itself pretty easily I think. Wish I'd heard about this earlier... would've given me something to do over the last half a damn year I had nothing to do. If I decide I never want to have anything to do with academia, this might be a good option.
Also, husbands have totally taken that course to learn how to sew bras for their wives. So there's an option. That's a pretty sexy thing.
Anyways. Hope you like the pictures!