Tutorial: It's illegal for Yunho to be this yellow.
How to rid the image of excess yellow? Or any other color for that matter.
A Photoshop Tutorial (Made in CS)
(Before-After Preview)
Warning: image heavy and very wordy
I honestly can't think of a better subject line so I'll edit later when I think of a better name *fails*
Adjustment Layers
Let's go over a few adjustment layers first, as they'll be the heart of the tutorial. The ones we'll be using are Curves, Color Balance and Selective Color.
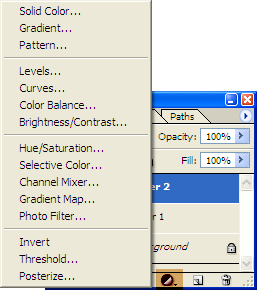
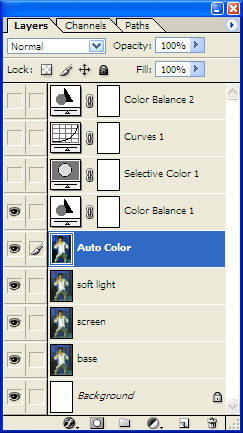
You can find the adjustment layers here. By utilising adjustments this way, you can double click on the layer thumbnail to edit the adjustments and delete the layer if the adjustments don't satisfy you.
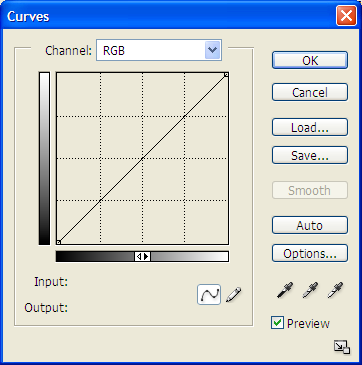
This is how you edit curves. I actually don't use curves a lot myself other than improving contrast, and so I'm not going to be very detailed about them. If you would like to read more on curves, herdestiny goes into much detail about them here.
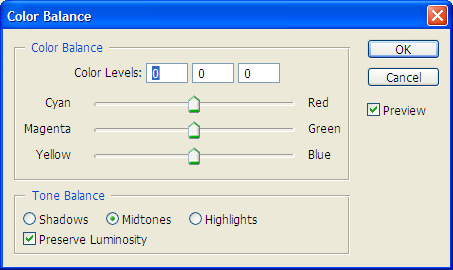
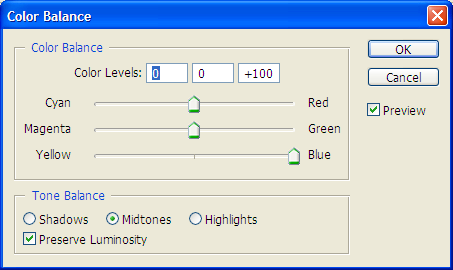
This is how you edit the color balance. As you can see, there are three aspects of the image that you can adjust: shadows, midtones, and highlights. The shadows focus on the darker hues in your image, midtones focus on the neutral hues, and highlights with the lighter tones. We'll go more into this in the tutorial.
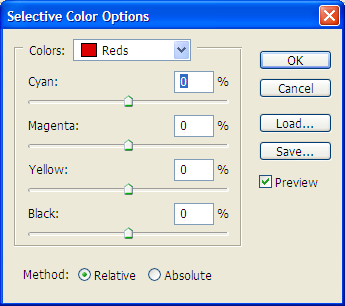
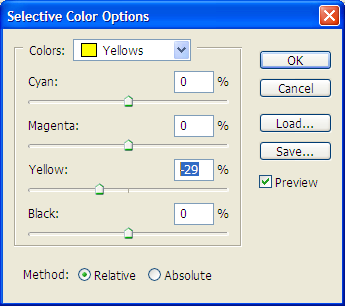
This is how you edit the selective color tool. You use the selective color tool to adjust a specific color in the image. Say if the color was too bright or washed out the image too much, then you can use this tool to intensify or "mellow out" the color. We will also be going more into this in the tutorial.
Attack of the Yellow

This is my base image, feat. Yunho from DBSK that I ganked somewhere off of dbsg. See how yellow the image is? That's some of the most unnatural shade of yellow skin that I've seen in an unedited photo. Normally I wouldn't save such a bad quality image with the excess amount of yellow tones (and the jpeg artifacts that I can see, but this is a coloring tutorial, so we can just ignore that), but Yunho can't be that yellow, so here we go!
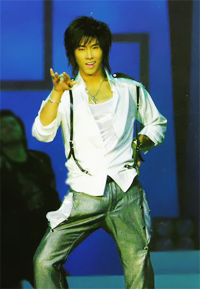
I do what I usually do to prep my base image whenever I start making something. I duplicate my base image twice, set blending mode of the topmost copy to soft light, the middle copy to screen and adjust the opacities to my liking. What these two layers do is the soft light layer will strengthen the darker colors such as the blue in the background, Yunho's hair and yes, the yellow in his skin will get more... yellow but the easier for us to get rid of the yellow later. The screen layer will brighten the overall image, especially the lighter colors in his clothes and skin.
One last thing I usually do to prep my base is first select the entire image (Ctrl + A), and copy merged (Shift + Ctrl + C; copies the entire visible image) and paste it into a new layer (More information on Copy Merged in grrliz's Top Five Favourite Photoshop Tools/Techniques Tutorial). If you are lazy like me and already memorized the keystrokes, you can just create a new layer and Stamp Visible (Shift + Ctrl + Alt + E) which will stamp the visible image so far into the new layer. Once I've got that new layer, I will then use Auto Color (Shift + Ctrl + B), which will automatically adjust some of the colors for me. You can use Fade Auto Color (Edit » Fade Auto Color...) to adjust it.

The first adjustment layer that I will usually mess with will be the color balance. Seeing as how all of Yunho's skin is yellow, I go straight for the yellow-blue slider and move the slide all the way down to blue for the midtones. The yellow in the midtones (aka, neutral areas of the image, such as his skin :P) will immediately decrease. This is kind of like pulling all of the yellow out of said midtones/skin in this case (forgive me the poor analogy). I don't bother with the shadows or the highlights, seeing as I don't see much wrong with the color in his hair or clothes.
The input values of your color adjustments should look something like this.
However! We still see some of that unnatural pesky yellow color lingering around, right? There are many different ways we can get rid of it, but I ended up playing around with curves, color balance (again), and selective color.
The first thing that I tried was the selective color. The only color that I worked with was yellow. First, I switched the color to yellow and dropped the yellow slide until I saw the preview change the skin to a hue that I liked. Now, Yunho looks like a normal shade of human :)
My selective color input value looked something like this.
But then I kind of realized that PSP doesn't have Selective Color, so I played around with curves and color balance again. Both curves and color balance give very similar results to each other, though slightly darker than selective color but I think both still work.

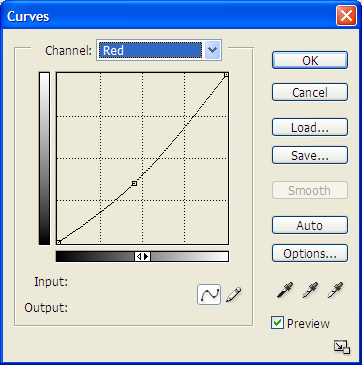
So next, I tried getting rid of the remaining yellow with curves. Seeing as yellow is one of the complementary colors that make up green, I first adjust the curve in the green channel until the yellow is gone. But now, there his skin has this pinkish-red hue, so I go to the red channel and adjust it until most of the red is gone and what's left is a darkish skin tone. To bring up the contrast, I go back to the RGB channel.
Your curves should look something like this:
Green Channel
Red Channel
RGB Channel

The last way I got rid of the yellow from this step is using another color balance layer. Fairly simple, actually. I did almost exactly the same thing as the first color balance step, except if you drag the yellow-blue slide all the way over to +100, then his skin really starts to turn blue, so I only went as far as +45.
And voila! We have Yunho with normal looking skin. You'll notice that both curves and the second color balance layers also adjust the the lighting and contrast of the background and his clothes whereas selective coloring adjusts only the yellow midtones in the skin, hence the point of selective coloring :)
If you find that you don't like how the background changes, you can use the layer mask that is linked to the layer.
For those interested, this is what my final palette looks like.
Another example that I quickly made is of Changmin below, except with excess warm-orange hues. Here, I adjusted mostly the red and yellow colors in color balance (because red + yellow = orange).
to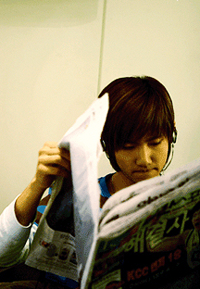
I hope this does become useful to people. This is my first tutorial and I've spent a few hours writing this, so feedback and concrit is very much appreciated. Please ask questions if anything is unclear. Thank you :)
I think I'm done. *conks out on the couch*
x-posted uh... nowhere, actually ._.
A Photoshop Tutorial (Made in CS)
(Before-After Preview)
Warning: image heavy and very wordy
I honestly can't think of a better subject line so I'll edit later when I think of a better name *fails*
Adjustment Layers
Let's go over a few adjustment layers first, as they'll be the heart of the tutorial. The ones we'll be using are Curves, Color Balance and Selective Color.
You can find the adjustment layers here. By utilising adjustments this way, you can double click on the layer thumbnail to edit the adjustments and delete the layer if the adjustments don't satisfy you.
This is how you edit curves. I actually don't use curves a lot myself other than improving contrast, and so I'm not going to be very detailed about them. If you would like to read more on curves, herdestiny goes into much detail about them here.
This is how you edit the color balance. As you can see, there are three aspects of the image that you can adjust: shadows, midtones, and highlights. The shadows focus on the darker hues in your image, midtones focus on the neutral hues, and highlights with the lighter tones. We'll go more into this in the tutorial.
This is how you edit the selective color tool. You use the selective color tool to adjust a specific color in the image. Say if the color was too bright or washed out the image too much, then you can use this tool to intensify or "mellow out" the color. We will also be going more into this in the tutorial.
Attack of the Yellow
This is my base image, feat. Yunho from DBSK that I ganked somewhere off of dbsg. See how yellow the image is? That's some of the most unnatural shade of yellow skin that I've seen in an unedited photo. Normally I wouldn't save such a bad quality image with the excess amount of yellow tones (and the jpeg artifacts that I can see, but this is a coloring tutorial, so we can just ignore that), but Yunho can't be that yellow, so here we go!
I do what I usually do to prep my base image whenever I start making something. I duplicate my base image twice, set blending mode of the topmost copy to soft light, the middle copy to screen and adjust the opacities to my liking. What these two layers do is the soft light layer will strengthen the darker colors such as the blue in the background, Yunho's hair and yes, the yellow in his skin will get more... yellow but the easier for us to get rid of the yellow later. The screen layer will brighten the overall image, especially the lighter colors in his clothes and skin.
One last thing I usually do to prep my base is first select the entire image (Ctrl + A), and copy merged (Shift + Ctrl + C; copies the entire visible image) and paste it into a new layer (More information on Copy Merged in grrliz's Top Five Favourite Photoshop Tools/Techniques Tutorial). If you are lazy like me and already memorized the keystrokes, you can just create a new layer and Stamp Visible (Shift + Ctrl + Alt + E) which will stamp the visible image so far into the new layer. Once I've got that new layer, I will then use Auto Color (Shift + Ctrl + B), which will automatically adjust some of the colors for me. You can use Fade Auto Color (Edit » Fade Auto Color...) to adjust it.
The first adjustment layer that I will usually mess with will be the color balance. Seeing as how all of Yunho's skin is yellow, I go straight for the yellow-blue slider and move the slide all the way down to blue for the midtones. The yellow in the midtones (aka, neutral areas of the image, such as his skin :P) will immediately decrease. This is kind of like pulling all of the yellow out of said midtones/skin in this case (forgive me the poor analogy). I don't bother with the shadows or the highlights, seeing as I don't see much wrong with the color in his hair or clothes.
The input values of your color adjustments should look something like this.
However! We still see some of that unnatural pesky yellow color lingering around, right? There are many different ways we can get rid of it, but I ended up playing around with curves, color balance (again), and selective color.
The first thing that I tried was the selective color. The only color that I worked with was yellow. First, I switched the color to yellow and dropped the yellow slide until I saw the preview change the skin to a hue that I liked. Now, Yunho looks like a normal shade of human :)
My selective color input value looked something like this.
But then I kind of realized that PSP doesn't have Selective Color, so I played around with curves and color balance again. Both curves and color balance give very similar results to each other, though slightly darker than selective color but I think both still work.
So next, I tried getting rid of the remaining yellow with curves. Seeing as yellow is one of the complementary colors that make up green, I first adjust the curve in the green channel until the yellow is gone. But now, there his skin has this pinkish-red hue, so I go to the red channel and adjust it until most of the red is gone and what's left is a darkish skin tone. To bring up the contrast, I go back to the RGB channel.
Your curves should look something like this:
Green Channel
Red Channel
RGB Channel
The last way I got rid of the yellow from this step is using another color balance layer. Fairly simple, actually. I did almost exactly the same thing as the first color balance step, except if you drag the yellow-blue slide all the way over to +100, then his skin really starts to turn blue, so I only went as far as +45.
And voila! We have Yunho with normal looking skin. You'll notice that both curves and the second color balance layers also adjust the the lighting and contrast of the background and his clothes whereas selective coloring adjusts only the yellow midtones in the skin, hence the point of selective coloring :)
If you find that you don't like how the background changes, you can use the layer mask that is linked to the layer.
For those interested, this is what my final palette looks like.
Another example that I quickly made is of Changmin below, except with excess warm-orange hues. Here, I adjusted mostly the red and yellow colors in color balance (because red + yellow = orange).
to
I hope this does become useful to people. This is my first tutorial and I've spent a few hours writing this, so feedback and concrit is very much appreciated. Please ask questions if anything is unclear. Thank you :)
I think I'm done. *conks out on the couch*
x-posted uh... nowhere, actually ._.