Tutorial #1 & Tutorial #2 - Kristen Bell
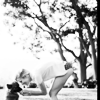
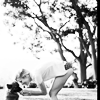
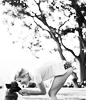
Today kids, we'll be going from this to 
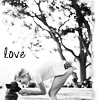
(#1) and/or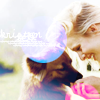
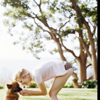
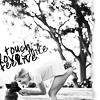
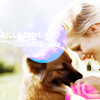
(#2) in PS7.
Tutorial #1
Crop - if you're totally new to this, you might want to go here first (ignore my comments though, *eyeroll*).

The black line is 'cause I cropped outside the image area to get the position I wanted - the extra space is whatever your background colour is.
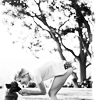
Image > Adjustments > Auto contrast (or Alt+Shft+Ctrl+L) - I've been doing this to every icon recently, really seems to help with clarity.
Desaturate base (Ctrl+Shft+U).

Duplicate base, screen (9%)

Duplicate base (drag to top layer), overlay (84%)
Sharpen base, fade sharpen to 35%
Now to vamoosh the ugly black line. New layer - on top. Use the square marquee tool to select an area larger than the black, fill with white.
Use the 14 px 'spatter' default brush to erase sufficiently in a ripped way (zoom in first). They really called it spatter?!

If you want, you can use the burn tool (brush = 9 px soft round, range = highlights, exposure = 50%) to, well, burn the edges of the white.


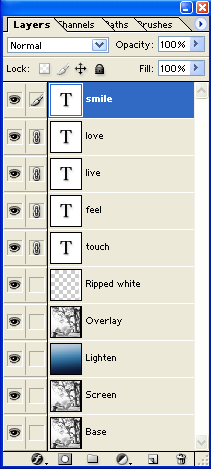
Obviously, choose whatever text / colour / number of lines / position / angle you want, don't copy mine exactly. That wouldn't be much fun.
I used font - High Strung, size - 14 pt, anti aliasing - strong.
Type one line/word.
Rotate and position. Repeat for other words/lines.
It's not too clear, so experiment with different colours. For interests sake, I used...
love #C54054
live #FF4D68
smile #B17881
feel #C6C6C6
touch #E1E1E1
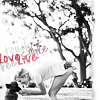
Finally, new layer - between screen and overlay. Set this gradient by crumblingwalls to lighten.

Layers palate
Tutorial #2
Crop & auto contrast, as with tutorial #1.

Duplicate base, screen 57%.

I don't like how the background detail has been lost, so I used a soft round brush to erase the background section of the screen layer.

Duplicate base (to top), overlay 62%.

Desaturate overlay layer.
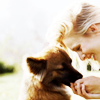
The cute little puppy's too dark to be snuggable, so I erased the puppy and the background from the overlay layer.

Sharpen and fade base as necessary.
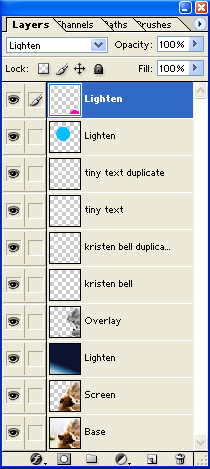
Font = Parker's Hand, size = 12 pt, anti aliasing = strong, text = kristen bell (two different layers), colour = white. The idea here is to overlap the text, so different to tutorial #1.

Merge text layers (link then Ctrl+E), then duplicate (opacity 92%).
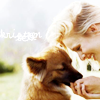
Add 3 lines of tiny text in Times New Roman, size = 2 pt, anti aliasing = smooth, colour = white. Tip: duplicate one line once finished and move it so it looks like a new one, pressing the return / new line key tends to blur the lines. Merge and duplicate text layers (opacity 36%).

New layer - top. Use the elliptical marquee tool to make a selection, fill with #00C0FF.
New layer - top. Use the elliptical marquee tool to make a selection, fill with #FF00C0.
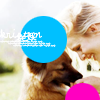
Set both circle layers to lighten.
New layer - between screen and overlay. Set the same gradient as in tutorial #1 by crumblingwalls to lighten.
Layers palate
Fin. Simple.
Hope these were helpful to at least one person. I'm not a huge fan of overly complicated / thousand layer colouring, so sorry to disappoint on that front.
Feedback is appreciated. I'd *love* to see what anyone makes from these.
Please do not copy the tutorial to the letter, it is intended as a guide. Cool people don't make copies ;)
Icons are useable, just remember to comment to let me know, credit fadedscribbles or snarkybecky in keywords, and do NOT hotlink.
+ Friend journal.
+ Affiliates? Comment in this post.
x
(#1) and/or
(#2) in PS7.
Tutorial #1
Crop - if you're totally new to this, you might want to go here first (ignore my comments though, *eyeroll*).
The black line is 'cause I cropped outside the image area to get the position I wanted - the extra space is whatever your background colour is.
Image > Adjustments > Auto contrast (or Alt+Shft+Ctrl+L) - I've been doing this to every icon recently, really seems to help with clarity.
Desaturate base (Ctrl+Shft+U).
Duplicate base, screen (9%)
Duplicate base (drag to top layer), overlay (84%)
Sharpen base, fade sharpen to 35%
Now to vamoosh the ugly black line. New layer - on top. Use the square marquee tool to select an area larger than the black, fill with white.
Use the 14 px 'spatter' default brush to erase sufficiently in a ripped way (zoom in first). They really called it spatter?!
If you want, you can use the burn tool (brush = 9 px soft round, range = highlights, exposure = 50%) to, well, burn the edges of the white.
Obviously, choose whatever text / colour / number of lines / position / angle you want, don't copy mine exactly. That wouldn't be much fun.
I used font - High Strung, size - 14 pt, anti aliasing - strong.
Type one line/word.
Rotate and position. Repeat for other words/lines.
It's not too clear, so experiment with different colours. For interests sake, I used...
love #C54054
live #FF4D68
smile #B17881
feel #C6C6C6
touch #E1E1E1
Finally, new layer - between screen and overlay. Set this gradient by crumblingwalls to lighten.
Layers palate
Tutorial #2
Crop & auto contrast, as with tutorial #1.
Duplicate base, screen 57%.
I don't like how the background detail has been lost, so I used a soft round brush to erase the background section of the screen layer.
Duplicate base (to top), overlay 62%.
Desaturate overlay layer.
The cute little puppy's too dark to be snuggable, so I erased the puppy and the background from the overlay layer.
Sharpen and fade base as necessary.
Font = Parker's Hand, size = 12 pt, anti aliasing = strong, text = kristen bell (two different layers), colour = white. The idea here is to overlap the text, so different to tutorial #1.
Merge text layers (link then Ctrl+E), then duplicate (opacity 92%).
Add 3 lines of tiny text in Times New Roman, size = 2 pt, anti aliasing = smooth, colour = white. Tip: duplicate one line once finished and move it so it looks like a new one, pressing the return / new line key tends to blur the lines. Merge and duplicate text layers (opacity 36%).
New layer - top. Use the elliptical marquee tool to make a selection, fill with #00C0FF.
New layer - top. Use the elliptical marquee tool to make a selection, fill with #FF00C0.
Set both circle layers to lighten.
New layer - between screen and overlay. Set the same gradient as in tutorial #1 by crumblingwalls to lighten.
Layers palate
Fin. Simple.
Hope these were helpful to at least one person. I'm not a huge fan of overly complicated / thousand layer colouring, so sorry to disappoint on that front.
Feedback is appreciated. I'd *love* to see what anyone makes from these.
Please do not copy the tutorial to the letter, it is intended as a guide. Cool people don't make copies ;)
Icons are useable, just remember to comment to let me know, credit fadedscribbles or snarkybecky in keywords, and do NOT hotlink.
+ Friend journal.
+ Affiliates? Comment in this post.
x