(no subject)
Hi People!
Yeah.. 2009! /o/
And in 59 days Backstreet's concert here in Brazil!
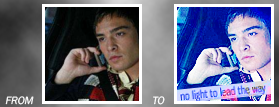
So, today we have a icon coloring tutorial for you!

We hope you like it!
Well, it's a very simple tutorial, we'll use :
-Curves
-Selective color
-Color Balance
Let's starting
First crop your image to 100x100 and sharpen if you wanted.
1º)Duplicate your base and set it to screem
2º)Go to Layer>New Adjustment layer>curves
And change to 75/89
and 149/168
3º)New Layer(crtl+shift+n)- fill with #101058
set it to screen and change opacity ( if you wanted)
4º)Now go to Layer>New Adjustment layer>Selective color
->Reds: +13/-23/+34/0
->Yellows: +13/+23/+33/0
->Cyans: +18/-21/+22/0
->Neutral: +44/+11/-15/0
5°)Go to Layer>New Adjustment layer>color balance
->Midtones: -21/+2/+3
->Shadows: +26/+8/+6
->Highlights: -10/-10/-15
6º)OPTIONAL
Layer>New Adjustment layer>Hue/Saturation
Change Sat. to 17
7º)Merge all ( crtl+shift+e)
8º) Use texture.
I'm using this
( sorry, I don't know who made)
Set the texture to Overlay ( change opacity if you wanted)
Ta-daaaa. Now you have a light blue icon!
And now you only have to add brushes (optional too!)
;D
Yeah.. 2009! /o/
And in 59 days Backstreet's concert here in Brazil!
So, today we have a icon coloring tutorial for you!

We hope you like it!
Well, it's a very simple tutorial, we'll use :
-Curves
-Selective color
-Color Balance
Let's starting
First crop your image to 100x100 and sharpen if you wanted.
1º)Duplicate your base and set it to screem
2º)Go to Layer>New Adjustment layer>curves
And change to 75/89
and 149/168
3º)New Layer(crtl+shift+n)- fill with #101058
set it to screen and change opacity ( if you wanted)
4º)Now go to Layer>New Adjustment layer>Selective color
->Reds: +13/-23/+34/0
->Yellows: +13/+23/+33/0
->Cyans: +18/-21/+22/0
->Neutral: +44/+11/-15/0
5°)Go to Layer>New Adjustment layer>color balance
->Midtones: -21/+2/+3
->Shadows: +26/+8/+6
->Highlights: -10/-10/-15
6º)OPTIONAL
Layer>New Adjustment layer>Hue/Saturation
Change Sat. to 17
7º)Merge all ( crtl+shift+e)
8º) Use texture.
I'm using this

( sorry, I don't know who made)
Set the texture to Overlay ( change opacity if you wanted)
Ta-daaaa. Now you have a light blue icon!
And now you only have to add brushes (optional too!)
;D