Tutorial: TS2 hair texture replacement
Before you begin: You will need to download, install, and set up the Legacy nVidia DDS Utilities, which can be found here. Once downloaded, install them, and then in SimPE you have to tell it where you installed them to. Extra menu - Preferences. Then in the first tab, System Folders, down at the bottom it will say "Nvidia DDS Tool Folder" - if you installed the nVidia DDS utilities to the default folder, this should read "C:\Program Files\NVIDIA Corporation\DDS Utilities" - this utility will allow you to properly import your textures and if you don't already have it, you need to get it and set it up properly before you start. Doesn't matter what sort of graphics card you have, by the way, the utility is just made by nVidia.
That paragraph is stolen from HP's tutorial in a MTS thread titled "default replacements from scratch".
Now onto the replacement tutorial itself.
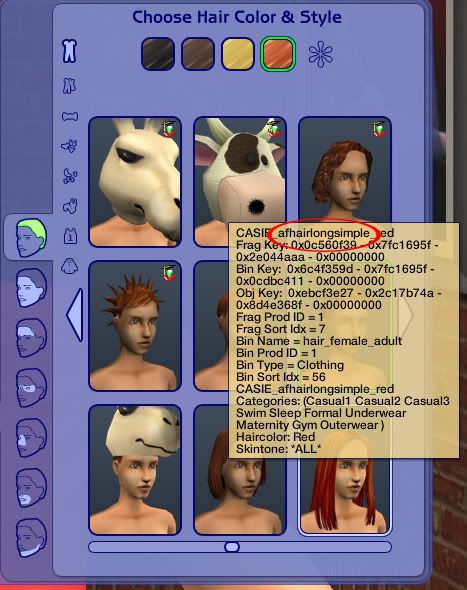
1. Fire up the game. Make sure debug mode is turned on by entering the cheat "boolprop testingcheatsenabled true" at the neighbourhood screen. Go into CAS, type shift+N to activate debug mode in CAS, then choose the age (if the hair is not all ages) and gender and browse through to the hair you want to replace. Hover over the thumbnail of the hair you want to replace.
You will see a whole lot of information. Write down the name of the mesh (circled).
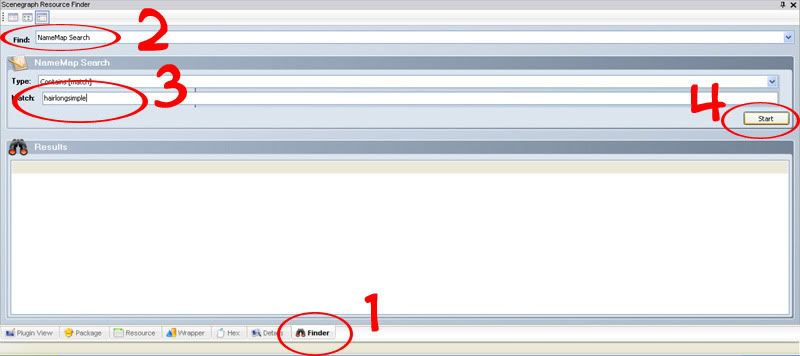
2. Exit the game and fire up SimPE. Click on the Finder tab at the bottom of the screen (1), then use the dropdown to select NameMap Search (2) and type in the name of the mesh, ignoring the age and gender information, in this case hairlongsimple (3) and click on Search (4).
3. It will search for a while and may at times appear to hang. Just let it keep working away until it is done and you get results in the bottom box.
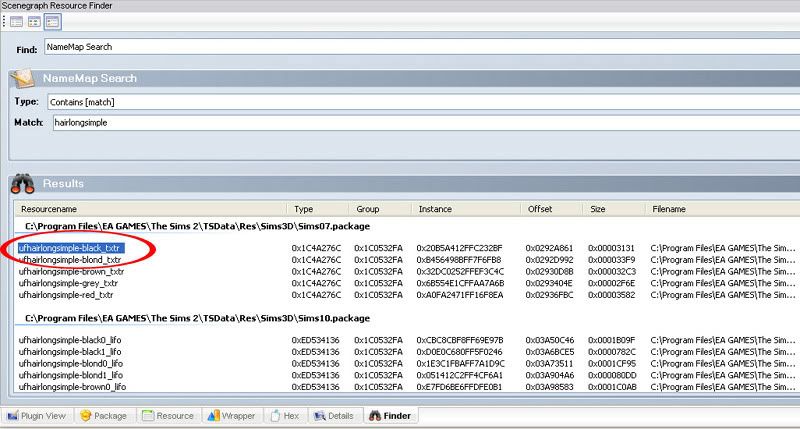
4. Scroll through the results until you find the _txtr references you are looking for. Hair is in the Sims07.package file, the uf part refers to "universal female" (I think). There was also a umhairsimplelong_txtr, but I scrolled past that because that is not what I was looking for.
5. Double click on one of the result lines and it will open the relevant file and automatically scroll to the line you are looking for. Select all the hair colours you want to replace by pressing the shift key and dragging with your mouse, then right click on the selection. Choose to Extract.
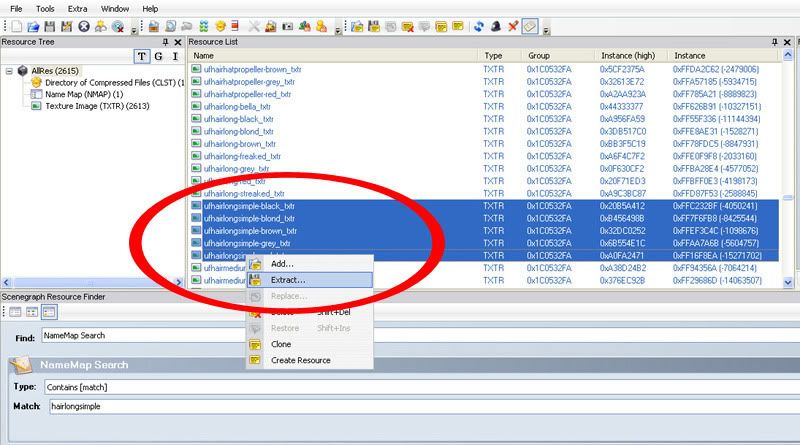
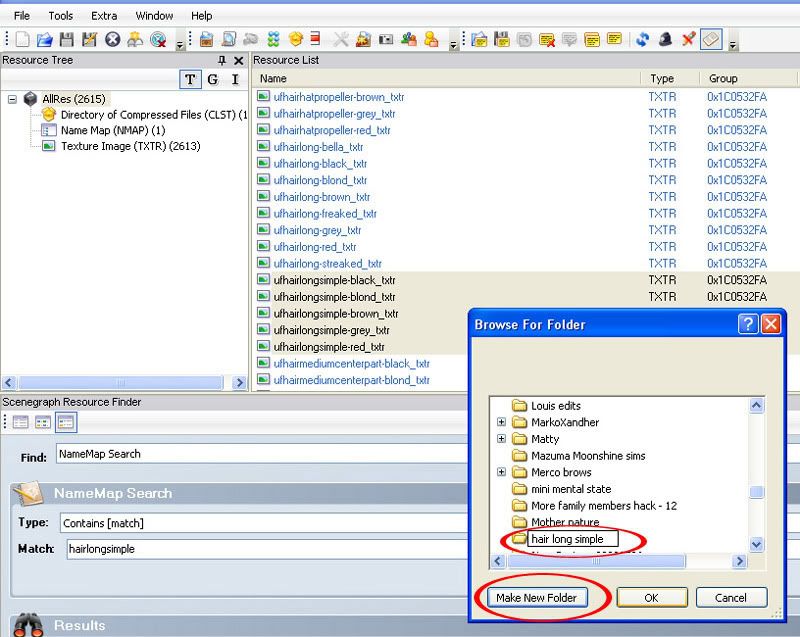
6. Browse through to a ready made folder where you can find what you extracted easily or make a new folder, like you see in the picture below.
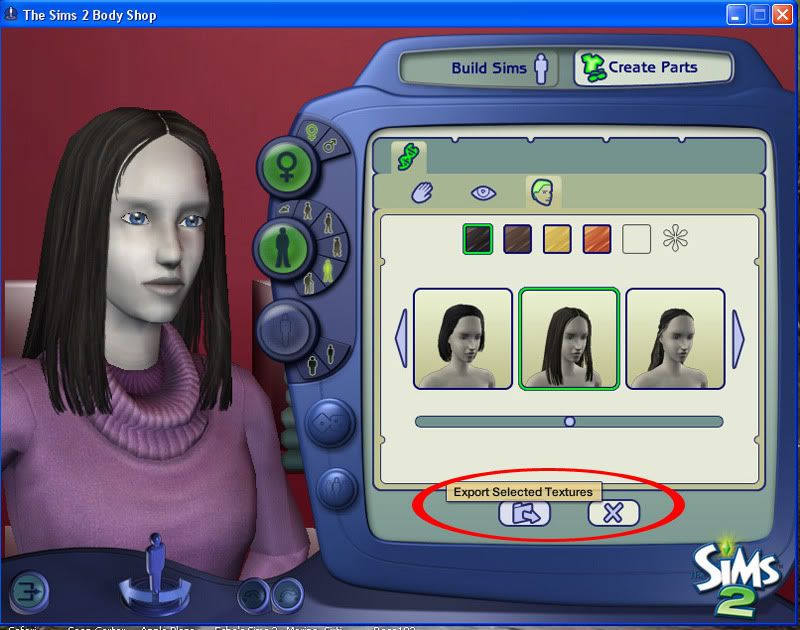
7. Exit SimPE (or you can do this beforehand). Fire up Bodyshop and make a recolour of the hair with your chosen textures. Since this is not a hair recolouring tutorial, this picture is all you will get:
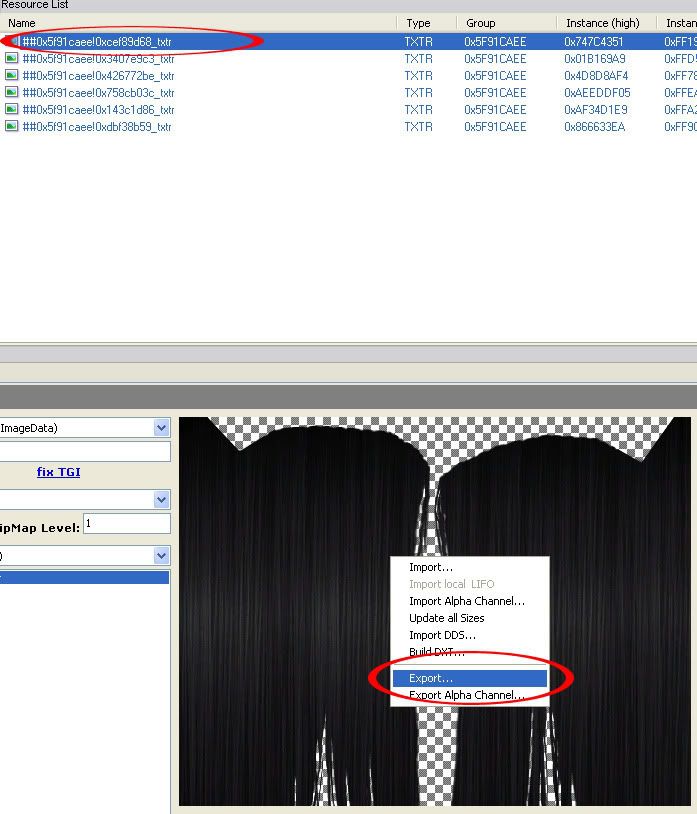
8. Fire up SimPE again (or you may still be in there) and open the hair recolour file. Go to the textures and in the resource list choose one of the textures, then right click on the picture of the texture and select to Export. This is why you had to make a recolour fist - you need to get yourself a PNG file with the correct texture, including transparency.
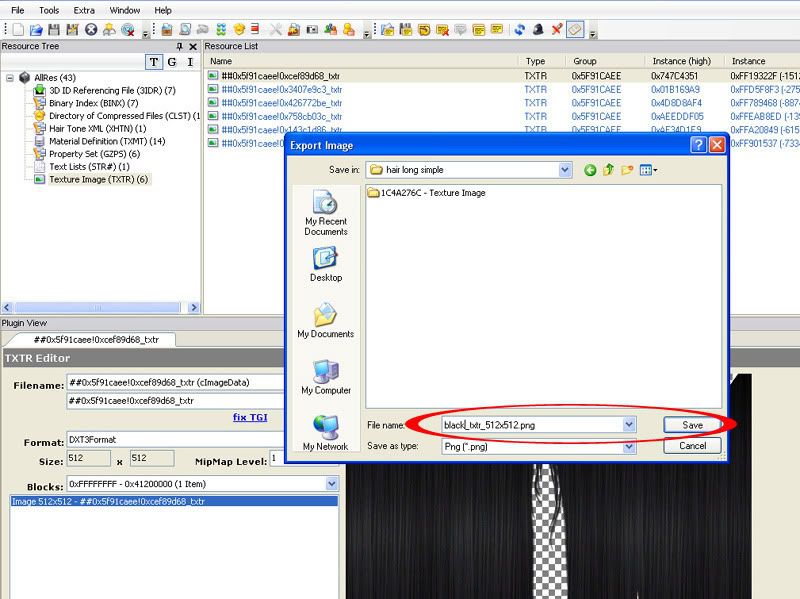
9. When saving the PNG give it a name you will easily recognise or else it will be gibberish and you'll get confused as to which PNG contains what hair colour.
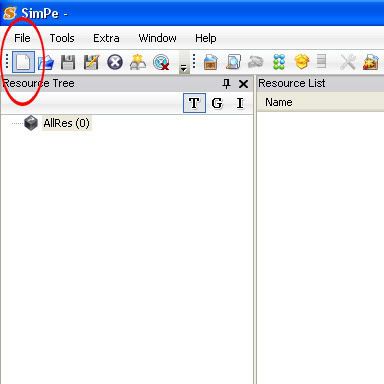
10. Make a new file either through the File dropdown or by clicking on the blank page icon on the toolbar.
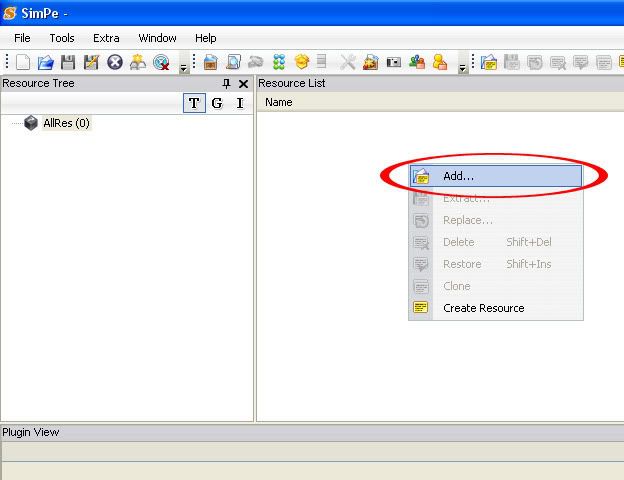
11. Right click in the Resource List box and select Add...
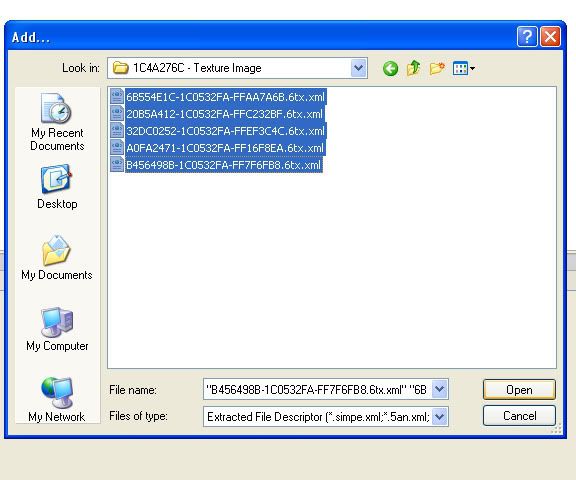
12. Browse through to where your extracted texture resources are (NOT the PNGs, but the resources you extracted in steps 5 and 6). Select them all and click Open.
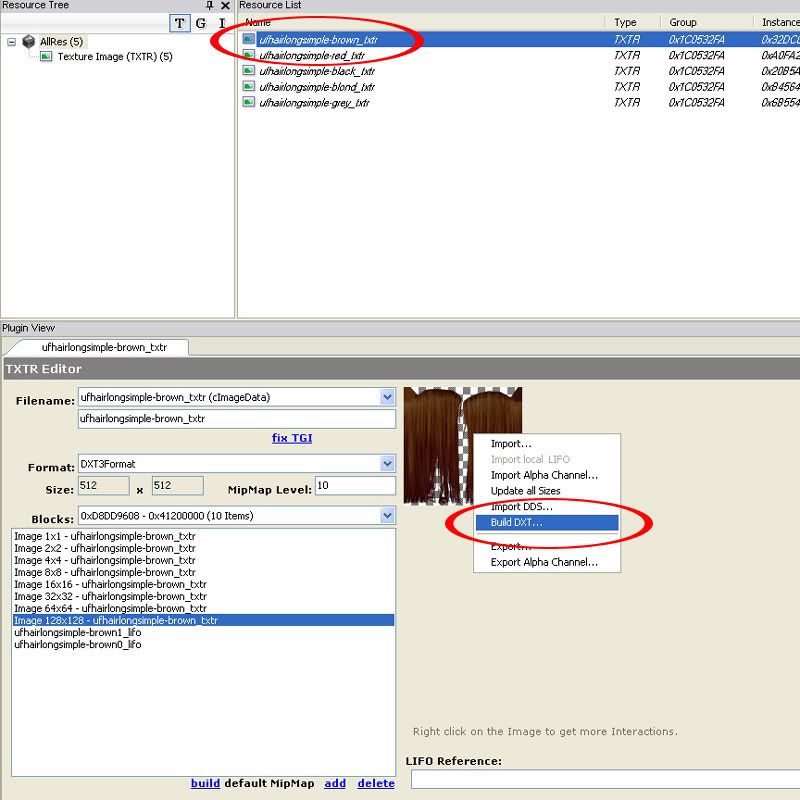
13. Click on a resource (should say easily recognisable things like "black", "brown" etc) then in the bottom box right click anywhere on the image and select to BuildDXT. If Build DXT is greyed out, go back to the very beginning and install NVidia Tools. You can save the file at this point so you don't have to go through all this again if you didn't install the NVidia Tools.
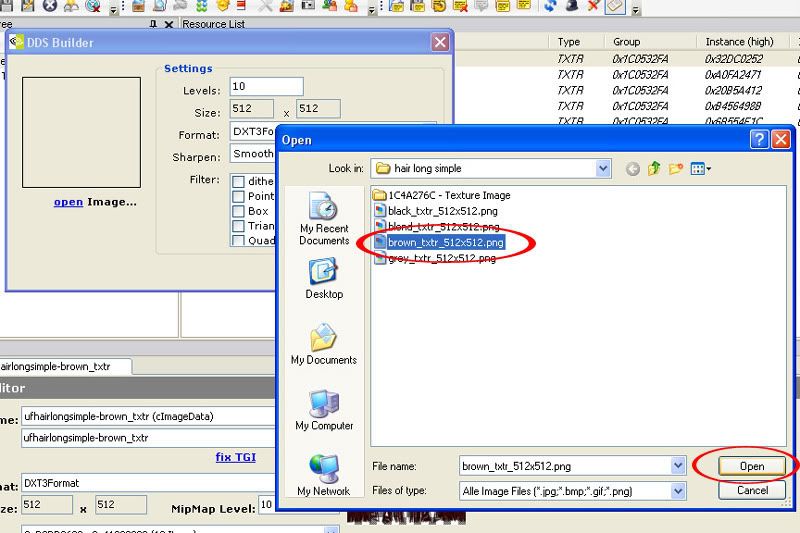
14. Click on Open Image (see pic 15, but you can also see the "open" link in the pic below, in the DDS builder box on the left), then browse through to where you put your extracted PNGs and select the correct colour one.
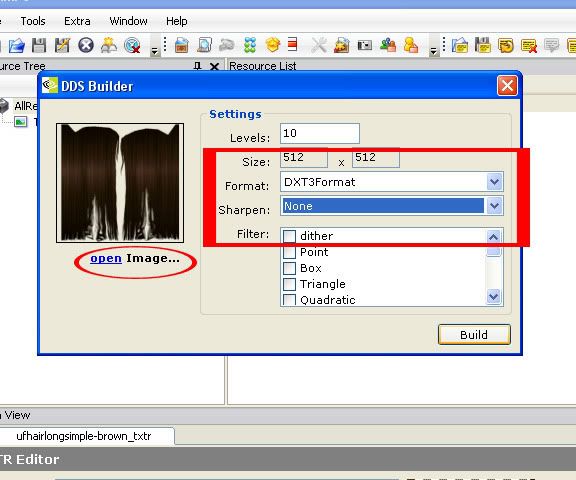
15. Make sure you select DXT3 or DXT5 so that you maintain the PNG's transparency (DXT1 does not support transparency). Change Sharpen to None (defaults to Smoothen, but this degrades image quality). Then click on Build.
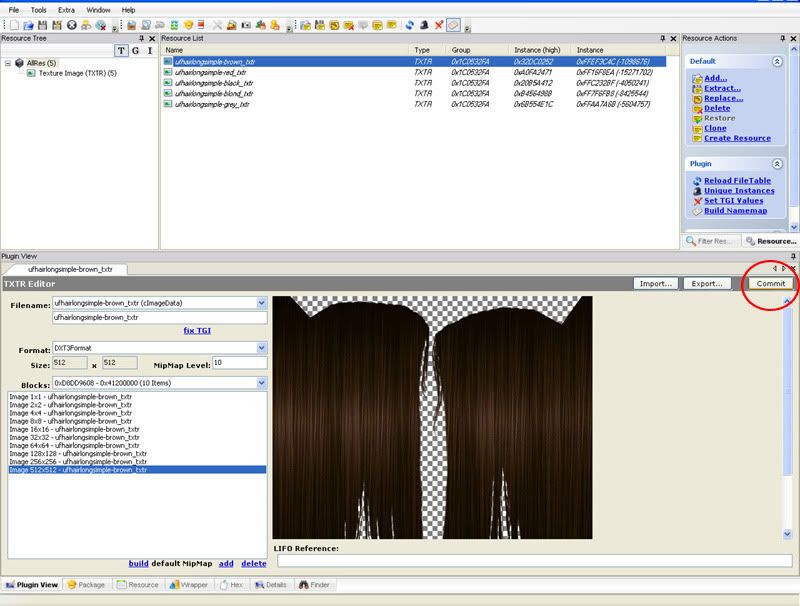
16. A new image will appear in the bottom Plugin View. Click on Commit once you are happy that you have the right colour replacing the Maxis texture.
17. Rinse and repeat for the other hair colours in your resources. I found that with a multi-age hair you can recolour each life stage with a different hair texture colour so that you don't have to make a Bodyshop recolour for each of the 5 hair colours. When doing this example, I recoloured the teen hair black, YA was brown, adult was blond and elder was grey. I didn't bother with red, but if a hair contains a child stage, you could make that red or make a second recolour file with just red. You don't have to keep these recolour files once you're done with the replacement so it doesn't matter if each life stage is a different colour.
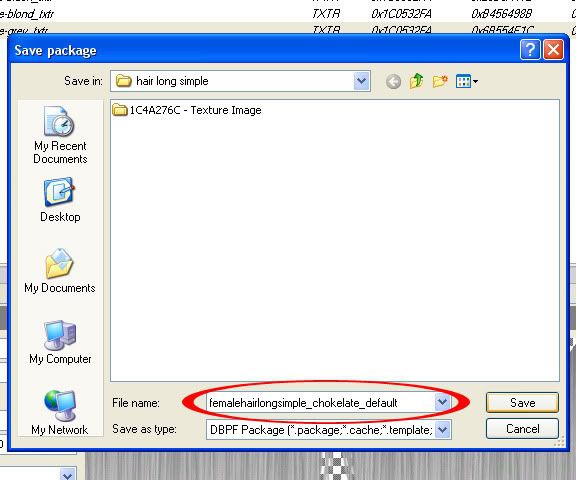
18. Click on Save As. It won't Save, you need to use Save As. Give your file an easily recognisable name.
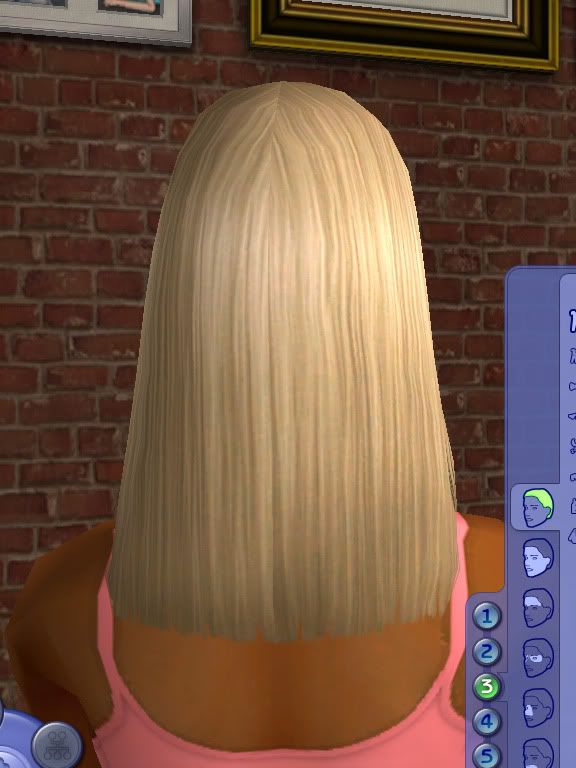
19. And now you are done :) Throw the file into your Downloads folder and test that it all worked. You can see here that this process does indeed work, as evidenced by my inexpert recolouring effort, making the texture at the back of the head go in slightly wonky directions. You may also want to delete the CASThumbnails and cigen.package files to force CAS and Bodyshop to generate thumbnails using your new textures.
This process also works for clothing. Use CAS in debug mode to find the mesh name for the outfit you want to replace, make a recolour of the outfit, get the PNG, extract the necessary txtr resources and replace the Maxis texture with your own. Keep in mind that the recolour has to use exactly the same mesh or you will get texture weirdness happening.
Hope it all made sense. If anyone has any questions, please post them in comments. Please do not PM me with questions.
Warning: Large, format breaking images 800 pixels wide inside!
That paragraph is stolen from HP's tutorial in a MTS thread titled "default replacements from scratch".
Now onto the replacement tutorial itself.
1. Fire up the game. Make sure debug mode is turned on by entering the cheat "boolprop testingcheatsenabled true" at the neighbourhood screen. Go into CAS, type shift+N to activate debug mode in CAS, then choose the age (if the hair is not all ages) and gender and browse through to the hair you want to replace. Hover over the thumbnail of the hair you want to replace.
You will see a whole lot of information. Write down the name of the mesh (circled).

2. Exit the game and fire up SimPE. Click on the Finder tab at the bottom of the screen (1), then use the dropdown to select NameMap Search (2) and type in the name of the mesh, ignoring the age and gender information, in this case hairlongsimple (3) and click on Search (4).

3. It will search for a while and may at times appear to hang. Just let it keep working away until it is done and you get results in the bottom box.
4. Scroll through the results until you find the _txtr references you are looking for. Hair is in the Sims07.package file, the uf part refers to "universal female" (I think). There was also a umhairsimplelong_txtr, but I scrolled past that because that is not what I was looking for.

5. Double click on one of the result lines and it will open the relevant file and automatically scroll to the line you are looking for. Select all the hair colours you want to replace by pressing the shift key and dragging with your mouse, then right click on the selection. Choose to Extract.

6. Browse through to a ready made folder where you can find what you extracted easily or make a new folder, like you see in the picture below.

7. Exit SimPE (or you can do this beforehand). Fire up Bodyshop and make a recolour of the hair with your chosen textures. Since this is not a hair recolouring tutorial, this picture is all you will get:

8. Fire up SimPE again (or you may still be in there) and open the hair recolour file. Go to the textures and in the resource list choose one of the textures, then right click on the picture of the texture and select to Export. This is why you had to make a recolour fist - you need to get yourself a PNG file with the correct texture, including transparency.

9. When saving the PNG give it a name you will easily recognise or else it will be gibberish and you'll get confused as to which PNG contains what hair colour.

10. Make a new file either through the File dropdown or by clicking on the blank page icon on the toolbar.

11. Right click in the Resource List box and select Add...

12. Browse through to where your extracted texture resources are (NOT the PNGs, but the resources you extracted in steps 5 and 6). Select them all and click Open.

13. Click on a resource (should say easily recognisable things like "black", "brown" etc) then in the bottom box right click anywhere on the image and select to BuildDXT. If Build DXT is greyed out, go back to the very beginning and install NVidia Tools. You can save the file at this point so you don't have to go through all this again if you didn't install the NVidia Tools.

14. Click on Open Image (see pic 15, but you can also see the "open" link in the pic below, in the DDS builder box on the left), then browse through to where you put your extracted PNGs and select the correct colour one.

15. Make sure you select DXT3 or DXT5 so that you maintain the PNG's transparency (DXT1 does not support transparency). Change Sharpen to None (defaults to Smoothen, but this degrades image quality). Then click on Build.

16. A new image will appear in the bottom Plugin View. Click on Commit once you are happy that you have the right colour replacing the Maxis texture.

17. Rinse and repeat for the other hair colours in your resources. I found that with a multi-age hair you can recolour each life stage with a different hair texture colour so that you don't have to make a Bodyshop recolour for each of the 5 hair colours. When doing this example, I recoloured the teen hair black, YA was brown, adult was blond and elder was grey. I didn't bother with red, but if a hair contains a child stage, you could make that red or make a second recolour file with just red. You don't have to keep these recolour files once you're done with the replacement so it doesn't matter if each life stage is a different colour.
18. Click on Save As. It won't Save, you need to use Save As. Give your file an easily recognisable name.

19. And now you are done :) Throw the file into your Downloads folder and test that it all worked. You can see here that this process does indeed work, as evidenced by my inexpert recolouring effort, making the texture at the back of the head go in slightly wonky directions. You may also want to delete the CASThumbnails and cigen.package files to force CAS and Bodyshop to generate thumbnails using your new textures.

This process also works for clothing. Use CAS in debug mode to find the mesh name for the outfit you want to replace, make a recolour of the outfit, get the PNG, extract the necessary txtr resources and replace the Maxis texture with your own. Keep in mind that the recolour has to use exactly the same mesh or you will get texture weirdness happening.
Hope it all made sense. If anyone has any questions, please post them in comments. Please do not PM me with questions.
Warning: Large, format breaking images 800 pixels wide inside!