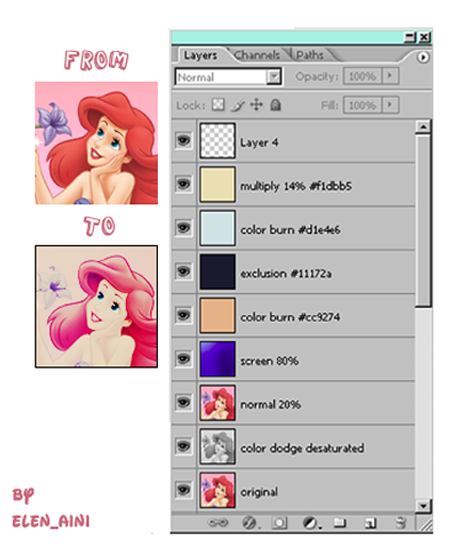
My first icon tutorial
FROM

TO

VARIATIONS:


1. First, duplicate your original picture (ctr + J) and desature it (Image>Adjustments>Desaturate) then set it on color dodge
2. Duplicate your base again and drag it to the top and set opacity 20%
3. Paste this gradient

by
tihana ) set it on color blur at 100% opacity.
4. Add a new layer and fill it with #cc9274 and set it to color burn
5. Add a new layer and fill it with #11172a and set it to exclusion
6. Add a new layer and fill it with #d1e4e6 and set it to color burn
7. Add a new layer and fill it with #f1dbb5 and set it to multiply at 14% opacity
8. You've done! you may add a border, text or some brushes. Be creative!
VARIATIONS:

==>>

To get the icon above, just paste the gradiet (made by
bombayicons ) istead of the blue gradient, and set it to color burn at 30% opacity.

==>>

And to get this icon, delate the blue gradient and paste this light texture (by
tihana ) set it on color burn 100%
Other icons using this tutorial:


La verdad pensaba hacer el tutorial también en español, pero me dio flojera, creo que es muy sencillo y practicamente todo se resume en la imagen de la paleta de layers de arriba, pero igual si alguien tiene dudas o requiere la explicación en español, pues solo modifico el post agregando las instrucciones en nuestro idioma.
Nota: debo agregar que tome los gradients de los magnificos tutoriales de
girls_are_weird