Request Tutorial #1!
Now that I have a little free time, I'll get to a few request tuts. Some of the tuts that were requested use the same coloring like the others, so I'll just put that down as well. Enjoy~
Requested by jiyu_chan!

(Translatable; no Selective Coloring!)
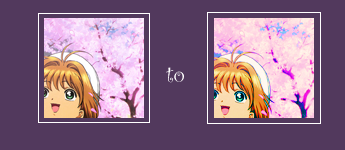
Alright, first tutorial! Today, we're turning this:
into this:
It's pretty simple coloring and I use this technique in many of my icons, with some changes and modifications. Please remember that all of these tutorials must not be copied step by step! Experimentation is greatly induced! All the icons featured in this tutorial are from this icon batch and was requested by jiyu_chan.
Let's begin!
oo1. Grab your base. Use Auto Levels/Contrast if necessary. Do NOT sharpen unless very blurred! I didn't sharpen my base.
oo2. Duplicate your base and set to Screen at 40%. Adjust opacities as necessary.
oo3. Duplicate base again, drag to the top and set to Soft Light at 50% opacity. Adjust opacities, again.
oo4. Open your Hue/Saturation and crank up the levels of the dominant colors. Maximum should be about 44-55 or else your icon will look grainy.
oo5. Duplicate base and drag to top. Set on Luminosity at 54%.
oo6. Make a new layer and fill with a dark navy blue color. Set to Exclusion at 50%.
oo7. Make a new layer and fill with a light pinkish color. Set to Soft Light at 44%.
oo8. Make a new layer and fill with a sky blue color. Set to Soft Light at 35%.
oo9. Duplicate your previous pink layer and drag to top and change the setting to Overlay at 15%.
o10. Make a new layer and fill with a gray color. Set to Color Burn at 47%+.
o11. Duplicate your base, drag to the top and set it to Overlay at 45%.
Feel free to change settings and opacities to suit the icon you're using. Not all icons will agree with these settings, most likely, so experiment. ^^
OTHER ICONS USING THIS TECHNIQUE:


|| WATCH? || JOIN? ||
The other requests will still be on hold. I'm doing this one by one, so I don't stress myself out. ^^;; Sorry again for the inconvienience, a little busy you see. :D Feel free to comment and tell me how I did. :3
Requested by jiyu_chan!

(Translatable; no Selective Coloring!)
Alright, first tutorial! Today, we're turning this:

into this:

It's pretty simple coloring and I use this technique in many of my icons, with some changes and modifications. Please remember that all of these tutorials must not be copied step by step! Experimentation is greatly induced! All the icons featured in this tutorial are from this icon batch and was requested by jiyu_chan.
Let's begin!
oo1. Grab your base. Use Auto Levels/Contrast if necessary. Do NOT sharpen unless very blurred! I didn't sharpen my base.
oo2. Duplicate your base and set to Screen at 40%. Adjust opacities as necessary.
oo3. Duplicate base again, drag to the top and set to Soft Light at 50% opacity. Adjust opacities, again.
oo4. Open your Hue/Saturation and crank up the levels of the dominant colors. Maximum should be about 44-55 or else your icon will look grainy.
oo5. Duplicate base and drag to top. Set on Luminosity at 54%.
oo6. Make a new layer and fill with a dark navy blue color. Set to Exclusion at 50%.
oo7. Make a new layer and fill with a light pinkish color. Set to Soft Light at 44%.
oo8. Make a new layer and fill with a sky blue color. Set to Soft Light at 35%.
oo9. Duplicate your previous pink layer and drag to top and change the setting to Overlay at 15%.
o10. Make a new layer and fill with a gray color. Set to Color Burn at 47%+.
o11. Duplicate your base, drag to the top and set it to Overlay at 45%.
Feel free to change settings and opacities to suit the icon you're using. Not all icons will agree with these settings, most likely, so experiment. ^^
OTHER ICONS USING THIS TECHNIQUE:
|| WATCH? || JOIN? ||
The other requests will still be on hold. I'm doing this one by one, so I don't stress myself out. ^^;; Sorry again for the inconvienience, a little busy you see. :D Feel free to comment and tell me how I did. :3