Tutorial: Imitation Tilt-Shift Photography Effect
Have you ever seen those photographs that look like little miniature train sets or toy models? Those photos are usually taken with special "tilt-shift" photographic lenses to create that fake model effect. I found a tutorial to achieve the same effect with a Photoshop manipulation, but it uses a Quick mask and curves, which are features that Photoshop Elements doesn't have. But there is a way, Elements users!
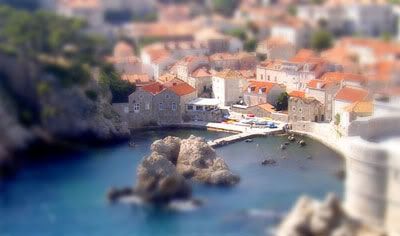
View of Old City of Dubrovnic, Croatia
Not a model: I made this using the technique below!
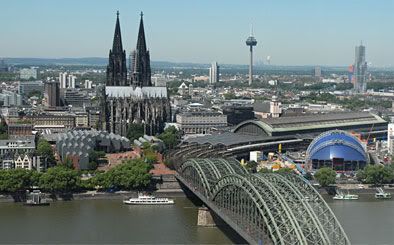
First, we'll start with this photo. Crop it to the size you'd like the final picture to be. Good photos to choose for this type of manipulation are detailed cityscapes, or scenes with small figures in the foreground. Bright daylight is best, to bring out the sharp shadows that objects cast. Edit: If you can find a photo taken from above, looking down upon your scene, that will further the illusion of looking down upon a model.
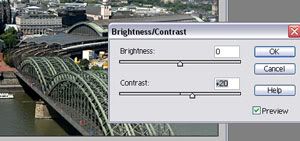
Next, increase the contrast of the image to really emphasize those shadows (I used about +20). (Enhance > Adjust Brightness/Contrast > Brightness/Contrast)
Now we need to bring up the colors, to make them look closer to plastic models. Rather than just increasing the colors across the board, let's selectively brighten the Blue, Red, and Yellow channels. (Enhance > Adjust Color > Hue/Saturation). Select the individual channels from the drop-down selection in the dialogue box.
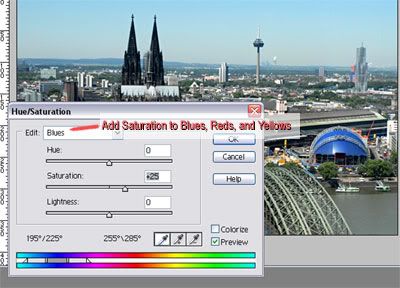
For the yellow channel, bring the saturation way up if you have trees or grass. That gives them that fake sponge tree look. I think I used +50 for the yellow channel to achieve this coloring:
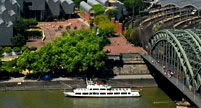
Now we're going to make a selection of what the "camera" will focus upon. Using your elliptical marquee tool...
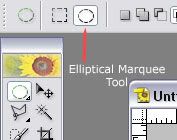
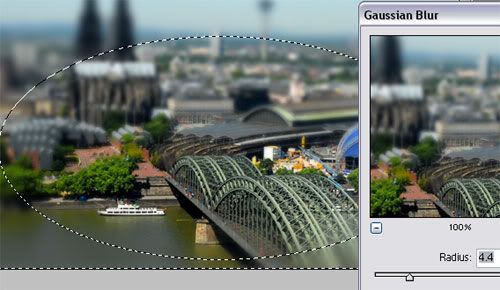
...make a long, narrow oval selection. You can see by my example that I've included the boat in the foreground. Boats always look cool with this technique. Now invert the selection (Select > Inverse), and feather the selection. I use a large feather so that the blur progresses smoothly out to the edges. (Select > Feather, Radius 30 pixels). The size of the feather will change with the size of the image you are working with. (That is, a smaller image will need a smaller feather radius)
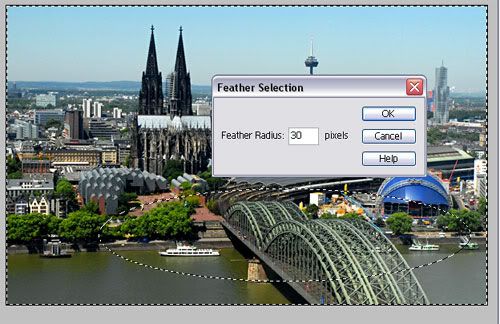
Next, we're ready to apply a blur. (Filter > Blur > Gaussian Blur) Play around with the radius to see what looks appropriate. Don't go overboard! I've used 2.4 pixels to start, because we'll be blurring the edges of the photo even more in the next step.
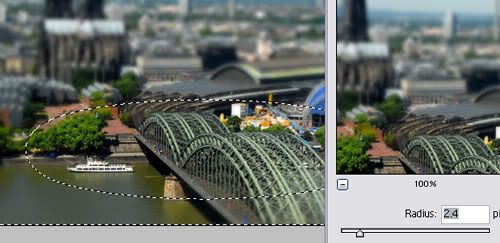
Now it's time to widen the selection area so that we can blur the edges of the photo. (Select > Modify > Contract) I've contracted the selection by 30 pixels in my example, which gives me a wider ellipse. Don't forget to feather this selection as well. Apply (Filter > Blur > Gaussian Blur) again, this time use a larger radius. Again, play around and see what looks best. I've used a 4.4 pixel radius.
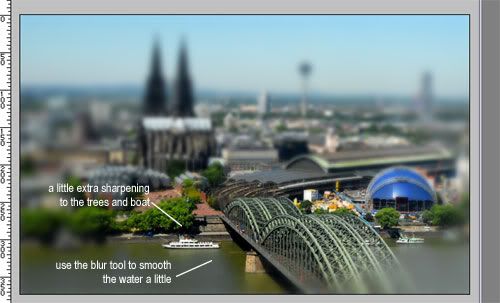
Almost there! Now it's time to tweak the image a little to give it that extra toyland feeling. Use your blur tool to smooth out the water, so there aren't any tiny ripples visible. Fake water is smooth. The sharpen tool can be used sparingly on some of the foreground objects to make them stand out and add to the fakery.
Final result:
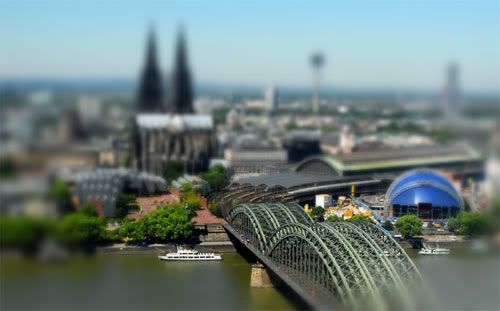
(Cologne, Germany from stock photo)
Here is one more example using a stock photo taken near St. Paul's Cathedral in London:
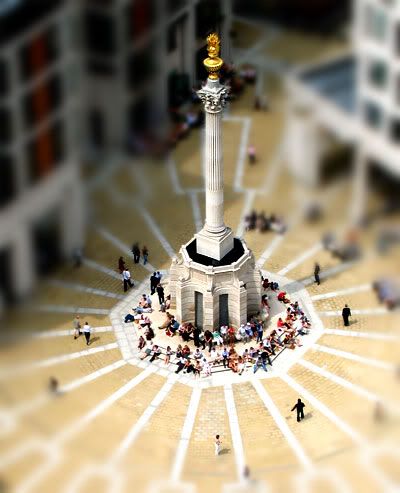
On this one, I used the polygonal lasso tool to make the selection, so I could keep the whole statue in focus, rather than just the base. I used the sharpen tool on the top of the tower afterward to really make it pop.
So there you have it folks. Please comment if any of the steps are unclear, or if you just want to show off your results.

View of Old City of Dubrovnic, Croatia
Not a model: I made this using the technique below!
First, we'll start with this photo. Crop it to the size you'd like the final picture to be. Good photos to choose for this type of manipulation are detailed cityscapes, or scenes with small figures in the foreground. Bright daylight is best, to bring out the sharp shadows that objects cast. Edit: If you can find a photo taken from above, looking down upon your scene, that will further the illusion of looking down upon a model.

Next, increase the contrast of the image to really emphasize those shadows (I used about +20). (Enhance > Adjust Brightness/Contrast > Brightness/Contrast)

Now we need to bring up the colors, to make them look closer to plastic models. Rather than just increasing the colors across the board, let's selectively brighten the Blue, Red, and Yellow channels. (Enhance > Adjust Color > Hue/Saturation). Select the individual channels from the drop-down selection in the dialogue box.

For the yellow channel, bring the saturation way up if you have trees or grass. That gives them that fake sponge tree look. I think I used +50 for the yellow channel to achieve this coloring:

Now we're going to make a selection of what the "camera" will focus upon. Using your elliptical marquee tool...

...make a long, narrow oval selection. You can see by my example that I've included the boat in the foreground. Boats always look cool with this technique. Now invert the selection (Select > Inverse), and feather the selection. I use a large feather so that the blur progresses smoothly out to the edges. (Select > Feather, Radius 30 pixels). The size of the feather will change with the size of the image you are working with. (That is, a smaller image will need a smaller feather radius)

Next, we're ready to apply a blur. (Filter > Blur > Gaussian Blur) Play around with the radius to see what looks appropriate. Don't go overboard! I've used 2.4 pixels to start, because we'll be blurring the edges of the photo even more in the next step.

Now it's time to widen the selection area so that we can blur the edges of the photo. (Select > Modify > Contract) I've contracted the selection by 30 pixels in my example, which gives me a wider ellipse. Don't forget to feather this selection as well. Apply (Filter > Blur > Gaussian Blur) again, this time use a larger radius. Again, play around and see what looks best. I've used a 4.4 pixel radius.

Almost there! Now it's time to tweak the image a little to give it that extra toyland feeling. Use your blur tool to smooth out the water, so there aren't any tiny ripples visible. Fake water is smooth. The sharpen tool can be used sparingly on some of the foreground objects to make them stand out and add to the fakery.

Final result:

(Cologne, Germany from stock photo)
Here is one more example using a stock photo taken near St. Paul's Cathedral in London:

On this one, I used the polygonal lasso tool to make the selection, so I could keep the whole statue in focus, rather than just the base. I used the sharpen tool on the top of the tower afterward to really make it pop.
So there you have it folks. Please comment if any of the steps are unclear, or if you just want to show off your results.