Tutorial 008
We're going from:
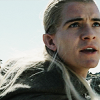
to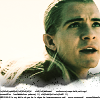
PSP7 | TRANSLATABLE | EASY/NO CURVES
01 Duplicate base twice. First copy set to SCREEN 100% and second copy set to SOFTLIGHT 100%.
02 Merge layers and sharpen once.
03 New layer, fill with #CBFFDD and set to BURN 100%
04 New layer, fill with #ECFF13 and set to MULTIPLY 35%
05 New layer, fill with #740044 and set to DODGE 75%
06 New layer, and use this gradient [#335540 to #77593C] and set it to SCREEN 100%
07 Duplicate base and drag it to the top. Desaturate it and set it to OVERLAY 85%.
08 Merge layers. Now we're going to add the "torn paper" effect and tinytext.
09 New layer, fill with black [#000000]. Open your brush tool.
10 Using the MARKER tool [in brushes] I set the settings at HARDNESS: 54 SIZE: 50 everything else, I left as is. I used the color white [#FFFFFF] and went along the bottom and tried to do a jagged effect. You can do this OR, you can use the image that I used. I saved it for those who don't want to try this. Don't blame you if you don't. lol.
11 Using the freehand selection tool, select around the white, like so.
12 THEN set this layer to SCREEN 100%
13 Merge layers, then go to EFFECTS > 3D EFFECTS > DROP SHADOW. Set it to these settings. Hit OK.
14 Now we're going to add the tinytext. I just added a bunch of random letters and words in Arial Black at size 1. OR you can use this image and add it as a brush or whatnot. Credit isn't needed.
15 Merge layers and you're done! :)
Examples using this tutorial [I inverted selection for these icons]
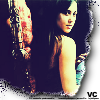
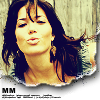
Comments are appriciated!
Credit is NOT needed unless you use the icons in this tutorial for your own personal use. (to bella_anitragrl)
For layouts, -premadelayouts
For my grahpics, myblue-heaven
For the rest of my tutorials, click here
tutorial ©bella-anitragrl

to

PSP7 | TRANSLATABLE | EASY/NO CURVES
01 Duplicate base twice. First copy set to SCREEN 100% and second copy set to SOFTLIGHT 100%.
02 Merge layers and sharpen once.
03 New layer, fill with #CBFFDD and set to BURN 100%
04 New layer, fill with #ECFF13 and set to MULTIPLY 35%
05 New layer, fill with #740044 and set to DODGE 75%
06 New layer, and use this gradient [#335540 to #77593C] and set it to SCREEN 100%
07 Duplicate base and drag it to the top. Desaturate it and set it to OVERLAY 85%.
08 Merge layers. Now we're going to add the "torn paper" effect and tinytext.
09 New layer, fill with black [#000000]. Open your brush tool.
10 Using the MARKER tool [in brushes] I set the settings at HARDNESS: 54 SIZE: 50 everything else, I left as is. I used the color white [#FFFFFF] and went along the bottom and tried to do a jagged effect. You can do this OR, you can use the image that I used. I saved it for those who don't want to try this. Don't blame you if you don't. lol.
11 Using the freehand selection tool, select around the white, like so.
12 THEN set this layer to SCREEN 100%
13 Merge layers, then go to EFFECTS > 3D EFFECTS > DROP SHADOW. Set it to these settings. Hit OK.
14 Now we're going to add the tinytext. I just added a bunch of random letters and words in Arial Black at size 1. OR you can use this image and add it as a brush or whatnot. Credit isn't needed.
15 Merge layers and you're done! :)
Examples using this tutorial [I inverted selection for these icons]


Comments are appriciated!
Credit is NOT needed unless you use the icons in this tutorial for your own personal use. (to bella_anitragrl)
For layouts, -premadelayouts
For my grahpics, myblue-heaven
For the rest of my tutorials, click here
tutorial ©bella-anitragrl