Completed wedding corset dress
Hello community! I am coming up for air and rest after a month and a half of non-stop sewing. I accepted a custom corset wedding dress commission at the beginning of January for a wedding Valentines Day weekend (yesterday was the wedding), and then let my weak-willed heart sucker me into an 11th-hour wedding dress for a friend whose fiancé was deploying (that wedding was on Valentines Day itself).
I posted here about figuring out the cups of the corset, and I figured y’all might enjoy seeing the finished product.
Details: 100% silk satin fashion fabric and lining in corset and skirt. I did cheat and use cotton canvas and not coutil in the corset. I don’t feel too bad about it though, considering the corset will be worn once and the customer bought 2.5 yards of gorgeous silk satin for the skirt BEFORE THE DESIGN WAS SET AND THE PATTERN WAS DRAFTED and I ended up having to rebuy 3.5 yards of silk satin out of my own damn pocket. That was a long, tear-filed subchapter of this saga. (Add that to the list of “things I’ve learned on my first major commission that I will never do again: let the customer buy yardage before the necessary yardage is calculated.”)
Corset: 22 spiral & flat steel bones, underwires, foam bra pads from customer-supplied strapless bra. Two-part size 00 grommets in “antique gold” from corsetmaking.com. Interior waist stay. Gold beaded trim, hand-stitched to top and bottom of corset. Bound top and bottom with the lining fabric. Machine stitched to outside, hand slip-stitched on inside. French-knotted embroidered silk. I had to cut out each knot from the seam allowances and stitchline before I could flatline and assemble. I used WonderUnder to fuse the lining fabric to its canvas layer instead of flatlining, but I flatlined the exterior fabric to its layer of canvas since I figured there was no way to get a good fuse with all those knots. And Wunder-under sucks. I need to source Heat N’ Bond. Joanns used to carry it. Works so much better. By the time I bound the edges of the corset, the Wunder-under had completely failed. Oh, well, it was faster than basting, and it was only for the inside. Anyway. I ended up using the seam allowances as boning channels by running another line of stitching inside the seam allowances only, creating a channel. I pressed the seam allowances on the lining one way, and on the exterior of the corset the other way, so they would “nestle” and there would be equal layers of fabric on each side of the seam, and each seam was double-boned. I like the look of topstitching, and I usually sandwich my bones by stitching lines of topstitching on each side of the seam, but with this exterior fabric that was impossible.
Real pearls supplied by client, and gold beads. The pearls had sentimental value for the couple, and they wanted them incorporated “somehow.” They left how up to me. I was at a loss, because they are too large to do a scattered application, as would have been perfect for seed-pearls, and the bride is so small that they are out of proportion as a line of trim. I tried that and it made me think of Wilma from the Flintstones. My fiancé came up with this application, faux buttons up the center front, and I went with it because I had no better idea. Once they were on and I’d created the hand-worked buttonloop, I really liked it. Each pearl on corset and skirt has a hand-worked buttonloop.
Skirt: silk satin, flatlined to silk organza. Horsehair hem, hand-finished to eliminate exterior stitching line at hem. Custom-built net petticoat attached at waistband. 41 pearls total, increasing along seamlines from front to back. Small, non-bustled train. Seams pinked on the inside (I was really itching to use the vintage Singer Pinking Machine I’d been gifted!). When all was said and done and the skirt was built I had a little breakdown because I hadn’t double-checked my math from fitting to final stitching and the waist had come out about two inches too small. After a night of ice cream and tears, I cut two long triangular gussets and inserted them at the side back seams, under the corset. No one made any comment about them, and I made sure that they looked uniform and regular and like a design choice. (Another note to self: stop using muslin for mockup fabric for close-fitting garments. Just stop. Use the muslin for craft projects or ironing board covers or togas or whatever. No more mockups.)
Photobombing:
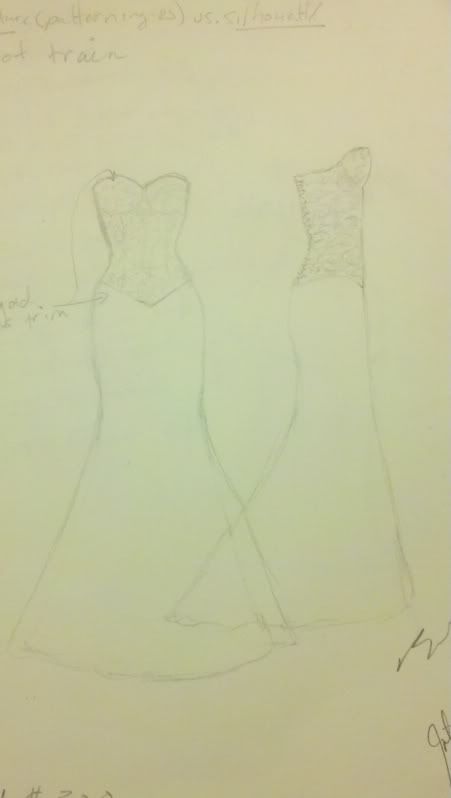
Original working rendering. (I need to keep working on my rendering skills, but it’s a pretty good indication of where we were going, I think.)
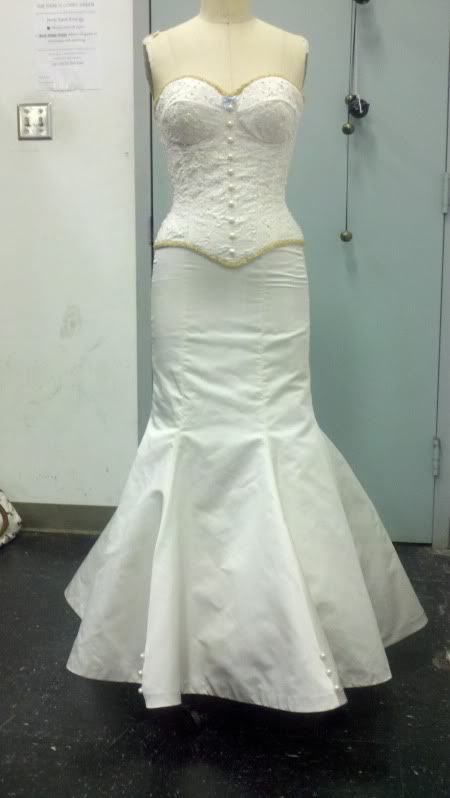
And on the bride:
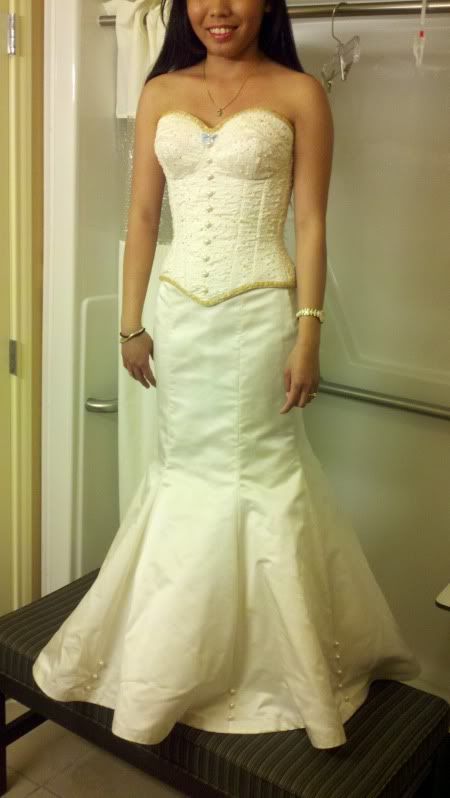
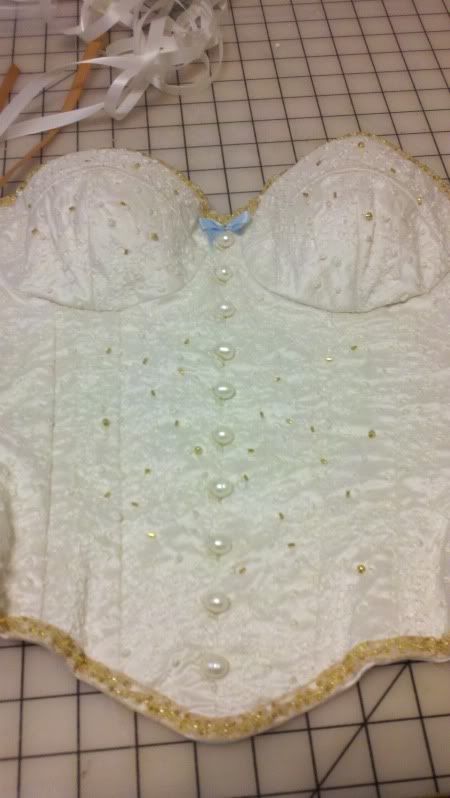
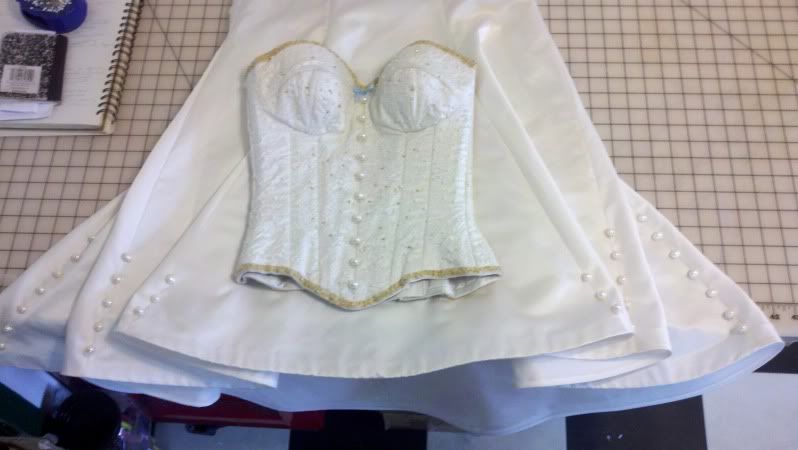
Horsehair hem:
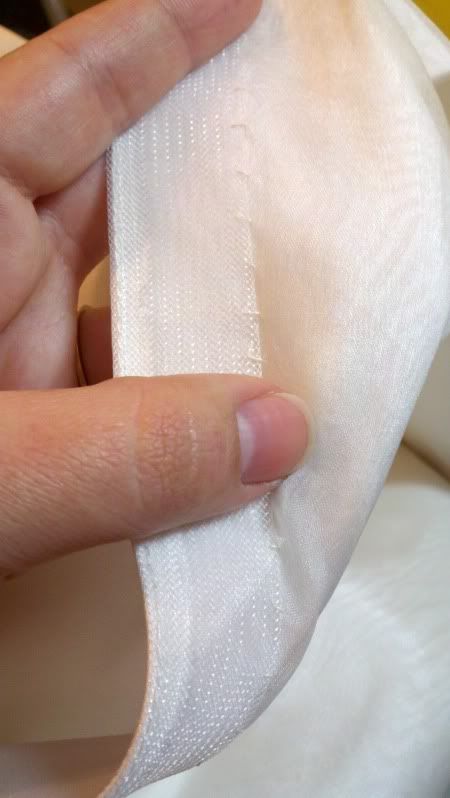
Since a picture is worth a thousand words, here’s a WIP photo of how I stitched the boning channels:
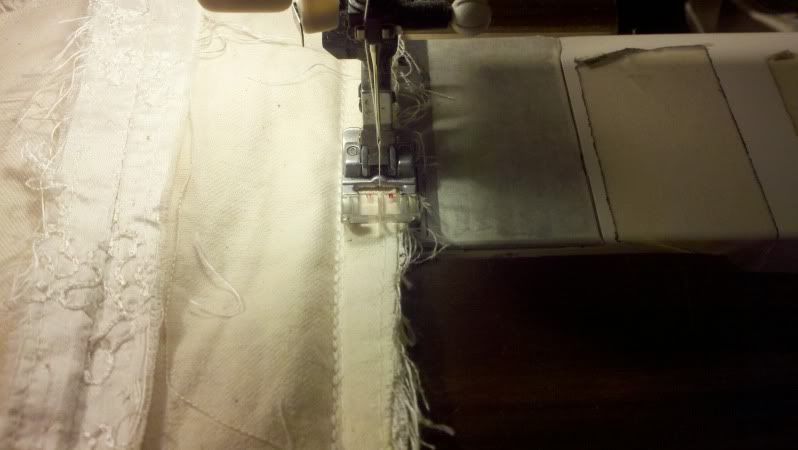
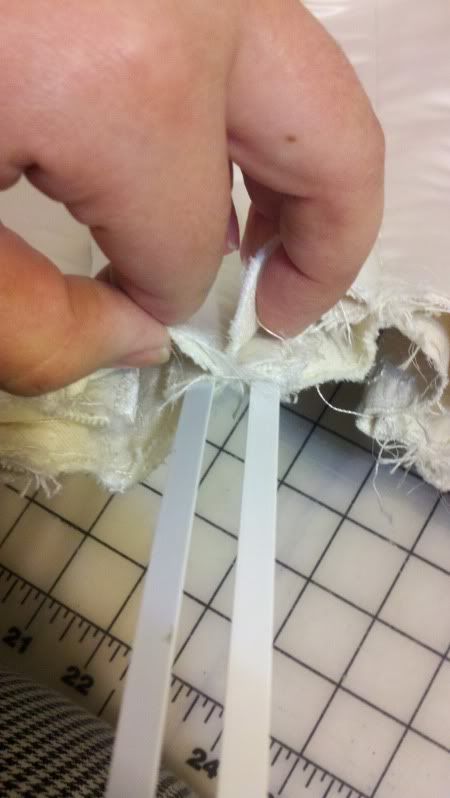
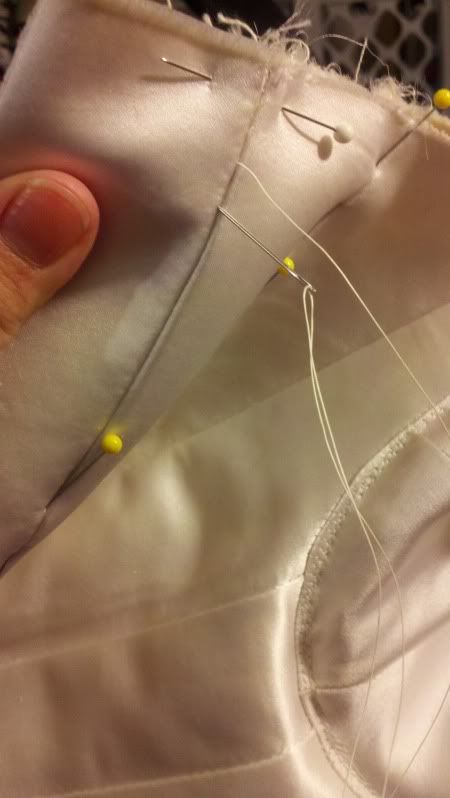
Oh, yeah, and I hand-basted in the ditch of each seam to keep the boning channels laying where they needed to be:
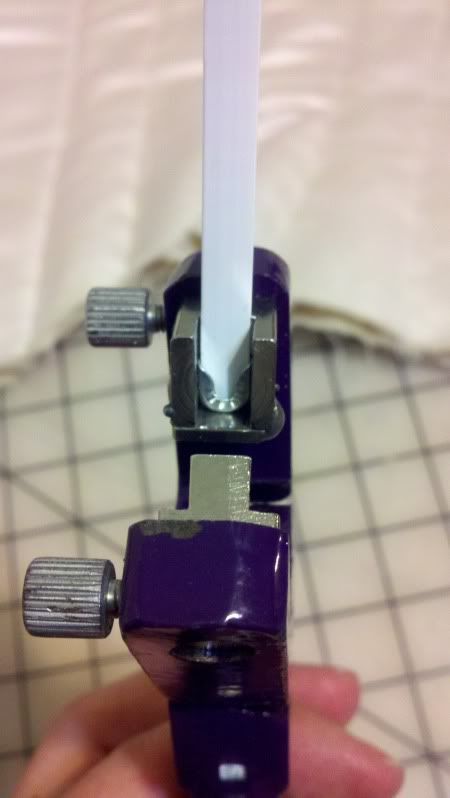
And I had tons of fun breaking in my new bone-tipping dies!! I thought these dies would work on my new grommet press, but I hadn’t read the fine print when I ordered them at o’dark-thirty. Thankfully, they DID fit this old tool I’ve had languishing in my sewing box for years. This tool sucks at setting grommets, but is pretty rad at tipping bones!
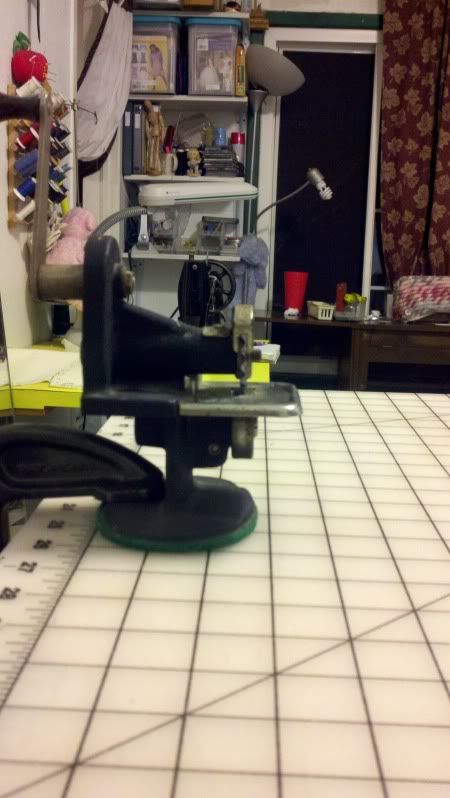
For funsies, here’s a shot of the Singer Pinking Machine. A friend found it at a yardsale, and she knows my obsession with vintage sewing machines and paraphernalia.
All in all, this represents over 100 hours of work in the sewing room, and probably about 30 hours of work outside the sewing room, between design consultations, fittings, and fabric and materials sourcing and purchasing.
Here’s a link to a WIP album of the making of this outfit, if you’re interested. I tried to caption and explain each photo.
http://smg.photobucket.com/albums/v217/peacecat3/WIP%20%20HowTo%20pics/?albumview=slideshow
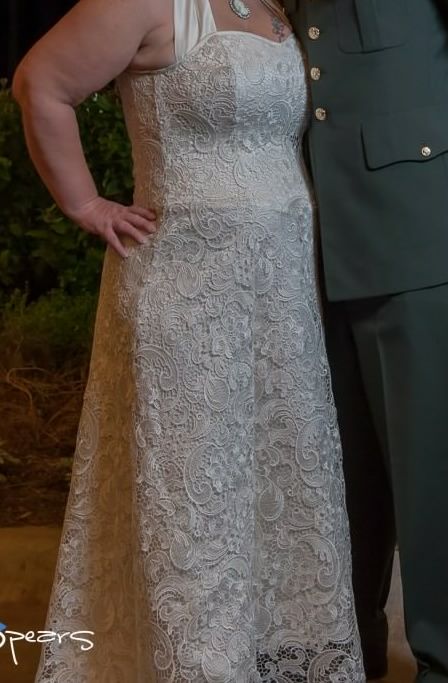
And here’s the “quickie” wedding dress I built over 4 days and 25 hours for my friend.
Satin & lace, 24 spiral & flat steel bones. This is the largest bust I’ve built for so far, and fitting it was a fun challenge. This bodice is only five panels. When I build her a proper corset I look forward to further shaping with multiple panels.
x-posted to my journal & corsetmakers
I posted here about figuring out the cups of the corset, and I figured y’all might enjoy seeing the finished product.
Details: 100% silk satin fashion fabric and lining in corset and skirt. I did cheat and use cotton canvas and not coutil in the corset. I don’t feel too bad about it though, considering the corset will be worn once and the customer bought 2.5 yards of gorgeous silk satin for the skirt BEFORE THE DESIGN WAS SET AND THE PATTERN WAS DRAFTED and I ended up having to rebuy 3.5 yards of silk satin out of my own damn pocket. That was a long, tear-filed subchapter of this saga. (Add that to the list of “things I’ve learned on my first major commission that I will never do again: let the customer buy yardage before the necessary yardage is calculated.”)
Corset: 22 spiral & flat steel bones, underwires, foam bra pads from customer-supplied strapless bra. Two-part size 00 grommets in “antique gold” from corsetmaking.com. Interior waist stay. Gold beaded trim, hand-stitched to top and bottom of corset. Bound top and bottom with the lining fabric. Machine stitched to outside, hand slip-stitched on inside. French-knotted embroidered silk. I had to cut out each knot from the seam allowances and stitchline before I could flatline and assemble. I used WonderUnder to fuse the lining fabric to its canvas layer instead of flatlining, but I flatlined the exterior fabric to its layer of canvas since I figured there was no way to get a good fuse with all those knots. And Wunder-under sucks. I need to source Heat N’ Bond. Joanns used to carry it. Works so much better. By the time I bound the edges of the corset, the Wunder-under had completely failed. Oh, well, it was faster than basting, and it was only for the inside. Anyway. I ended up using the seam allowances as boning channels by running another line of stitching inside the seam allowances only, creating a channel. I pressed the seam allowances on the lining one way, and on the exterior of the corset the other way, so they would “nestle” and there would be equal layers of fabric on each side of the seam, and each seam was double-boned. I like the look of topstitching, and I usually sandwich my bones by stitching lines of topstitching on each side of the seam, but with this exterior fabric that was impossible.
Real pearls supplied by client, and gold beads. The pearls had sentimental value for the couple, and they wanted them incorporated “somehow.” They left how up to me. I was at a loss, because they are too large to do a scattered application, as would have been perfect for seed-pearls, and the bride is so small that they are out of proportion as a line of trim. I tried that and it made me think of Wilma from the Flintstones. My fiancé came up with this application, faux buttons up the center front, and I went with it because I had no better idea. Once they were on and I’d created the hand-worked buttonloop, I really liked it. Each pearl on corset and skirt has a hand-worked buttonloop.
Skirt: silk satin, flatlined to silk organza. Horsehair hem, hand-finished to eliminate exterior stitching line at hem. Custom-built net petticoat attached at waistband. 41 pearls total, increasing along seamlines from front to back. Small, non-bustled train. Seams pinked on the inside (I was really itching to use the vintage Singer Pinking Machine I’d been gifted!). When all was said and done and the skirt was built I had a little breakdown because I hadn’t double-checked my math from fitting to final stitching and the waist had come out about two inches too small. After a night of ice cream and tears, I cut two long triangular gussets and inserted them at the side back seams, under the corset. No one made any comment about them, and I made sure that they looked uniform and regular and like a design choice. (Another note to self: stop using muslin for mockup fabric for close-fitting garments. Just stop. Use the muslin for craft projects or ironing board covers or togas or whatever. No more mockups.)
Photobombing:
Original working rendering. (I need to keep working on my rendering skills, but it’s a pretty good indication of where we were going, I think.)


And on the bride:


Horsehair hem:

Since a picture is worth a thousand words, here’s a WIP photo of how I stitched the boning channels:


Oh, yeah, and I hand-basted in the ditch of each seam to keep the boning channels laying where they needed to be:

And I had tons of fun breaking in my new bone-tipping dies!! I thought these dies would work on my new grommet press, but I hadn’t read the fine print when I ordered them at o’dark-thirty. Thankfully, they DID fit this old tool I’ve had languishing in my sewing box for years. This tool sucks at setting grommets, but is pretty rad at tipping bones!

For funsies, here’s a shot of the Singer Pinking Machine. A friend found it at a yardsale, and she knows my obsession with vintage sewing machines and paraphernalia.

All in all, this represents over 100 hours of work in the sewing room, and probably about 30 hours of work outside the sewing room, between design consultations, fittings, and fabric and materials sourcing and purchasing.
Here’s a link to a WIP album of the making of this outfit, if you’re interested. I tried to caption and explain each photo.
http://smg.photobucket.com/albums/v217/peacecat3/WIP%20%20HowTo%20pics/?albumview=slideshow
And here’s the “quickie” wedding dress I built over 4 days and 25 hours for my friend.
Satin & lace, 24 spiral & flat steel bones. This is the largest bust I’ve built for so far, and fitting it was a fun challenge. This bodice is only five panels. When I build her a proper corset I look forward to further shaping with multiple panels.

x-posted to my journal & corsetmakers