1930s Lounging Pajamas
I've been seriously into vintage fashion for several years, with a focus on the mid to late 1930s and the early years of World War II. I love to make garments from vintage patterns. They fit me well with little modification, probably because the pattern block of the period is more curved than a modern pattern sloper. This is true even for the slim fits of my favorite years. I'm almost a perfect vintage size 16 (waist 28), but my hips are size 18 so sometimes I'll get patterns that fit there and pull in the waist.
I love to wear vintage, but I do go back and forth between wanting to stand out in everyday life and wanting to blend in. Perhaps that's why I have a particular interest in vintage-styled casual wear, since it's worn mostly at home or in very informal situations. I've made overalls, two pairs of shorts, and three nightgowns, all from different patterns.
The Plan
Last fall (2008) I ended up with a lot of corduroy from Joann. I soon disposed of most cuts into various skirts, but there was a lot of gray corduroy I didn't know what to do with, and a yard of ruby-colored stuff that was too gorgeous to leave. They stewed in my to-sew pile for a while.
The main material is gray baby-wale corduroy, a little lighter than in the picture, but still more of a graphite gray than a pearl gray. The other I've called ruby, since it's a very rich, deep color, pink-red without really looking pink. It's "uncut" corduroy, which means the wales (lines) haven't been shaved in it. It's like short-pile cotton velvet, nicer than velveteen.

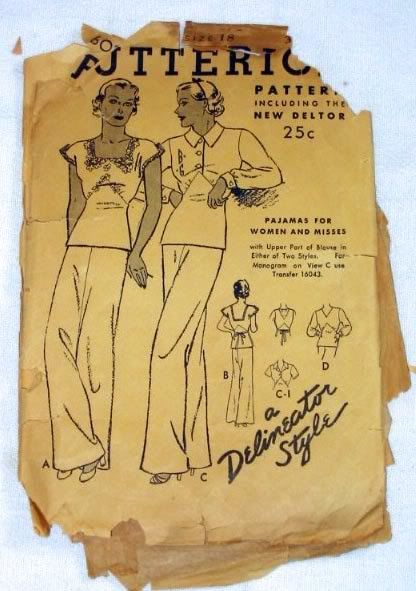
Finally I was thinking how cozy and comfy they would feel after work after a long day; so I started puzzling what sort of garment to make and settled on lounging pajamas. Pajamas were the new lounge wear of the 1920s, not limited to actually sleeping in. They continued wildly popular into the 30s, so I started to hunt for a pattern. Eventually I unearthed and won on Ebay a pajamas pattern with long sleeves and seaming that would allow two-tone construction. The pattern envelope is in terrible condition. I'm not a collector, though, so I didn't mind too much; and I probably got it cheaper than otherwise. They're not terribly common patterns.

I hit a snag when I couldn't figure out HOW to make these pajamas using both colors in a way that was cute, vintage, and made full use of the pretty ruby stuff. Of course the pajama trousers were going to be gray. I've got lots of it, and I'm quite tall with full hips, so I don't want to call attention there. With a full yard of the ruby, I wanted to do more than mere accents. I couldn't do the whole top in the ruby stuff, though. What to do?
Finally I got smart. (I usually do, but sometimes it takes a couple of days/weeks/months.)

I hauled out all three of my Sears catalog 1930s Fashionable Clothing books and pored over them to absorb ideas.
* Early 1930s pajamas are very feminine and interesting in cut. They use lots of different colors, sometimes hard to analyze. They look a lot more stereotypically 1920s than most of the 1920s actually were. :p
* There were very few mid 1930s pajamas. One exception was a corduroy lounging suit. Haha, primary evidence that this sort of thing existed!
* Late 1930s pajamas are sporty and cute and often two-tone, but the two-tone is usually just in accent bits. Cuffs and collars, sometimes lapels and belts, and piping.

Then I printed several copies of the pattern envelope and colored them. (I had to raid our old school cabinet to find the box of colored pencils.)

My first try, imitating some early 1930s styles with contrasting midriffs. Surprisingly emphsized the hips instead of the little waist. Oops.

Second try, the subtle "accent look," with ruby piping between the bodice pieces. This isn't what I really wanted, but I knew it would work. It I only had a little bit of the red, this would be my choice.

Third try with ruby bodice pieces and sleeves with gray accents, and gray everything else. Ctue, and very much 1930s collegiate style. I had my plan!
Patterning and Cutting Out
Confession: I often use the original tissue patterns when I'm cutting things out. Shameful, I know! They're rare pieces of history and won't last forever, &c. &c. But I was astounded from the very first how sturdy they are (especially compared to the instruction sheets, which are often fragile), and I've had pretty good luck, ironing them with a warm iron and then just getting to work. I only trace off a piece if I need to modify it.
This pattern, though? Easily the worst condition I've ever seen. Envelope condition for once was a good clue to the state of the rest of it. The instruction sheet cracked pretty much along every fold when I opened it, and the pattern pieces themselves developed small splits while I was ironing. I wasn't tugging, and the splits weren't along folds. Weird!
Luckily we have plenty of Do-Sew, so I got to work and eventually traced everything off. I had to use it anyway to make a new pants pattern, since I needed to take in the waist and lengthen the legs like always. A new wrinkle to this was that a previous sewer had cut the pattern pieces and tapered the pant legs. I didn't even see it until I saw how weirdly the dots that were supposed to indicate the 3/4" side seam allowance were veering steadily to the edge. The tapering still wasn't drastic - the cuffs were maybe 26" around instead of 30" - but annoying. Bleck.
At least my new method of adjusting the waistline worked very well. In the past I've just curved in the side seams to give a 28" waist instead of 30", but the last time around I got some horrible side seam divots. My new method involves slashing the pattern across from the side notch and down from the waist, then rotating that corner piece in slightly as though creating a dart at the waist. That takes in the waist, but also lengthens the side seam and raises the side waistline, keeping the grainlines straight.
The instruction sheet was definitely unusable. I took pictures of each section, cropped and arranged them in PowerPoint, and printed. They're not the best by any means, since I didn't bother to correct the drastic browning of the paper, but they're quite legible.
Then I went out to cut out the pieces.
Woes! There was not enough ruby corduroy for all the top pieces and the sleeves! I tried and tried, experimented with bias placement and thought dark thoughts of wholesale piecing, but It Wasn't Meant To Be. I honestly don't think there were enough square inches in that 1+ yard to cut out fronts, backs, and sleeves, not to mention front facings.
My other options were:
(1) Cut the fronts and the sleeves in ruby, but have the back be all gray.
Objection: I hate the false front look! Like sweaters that are argyle in front and solid in back. And the layout will still be tough, probably requiring at least some piecing. I'm not sure it's a vintage technique.
(2) Cut the fronts and backs in ruby, the sleeves in gray.
Objection: Potential to be too 40s, like the jerkin look. Cute, but not this pattern.
I tried to sketch the colors for each in my remaining printout, but couldn't get a good idea. Still, (2) was my favorite, and I knew there would be enough material for it. Ruby cuffs were a no-go, even with the gray sleeves, since the collar still needed to be gray. It DID look strange for the collar and cuffs to be different. I consoled myself by cutting the waist ties from red.
So the end result will look like sketch #3, but with gray sleeves and gray cuffs.
Construction, Part 1: Pants
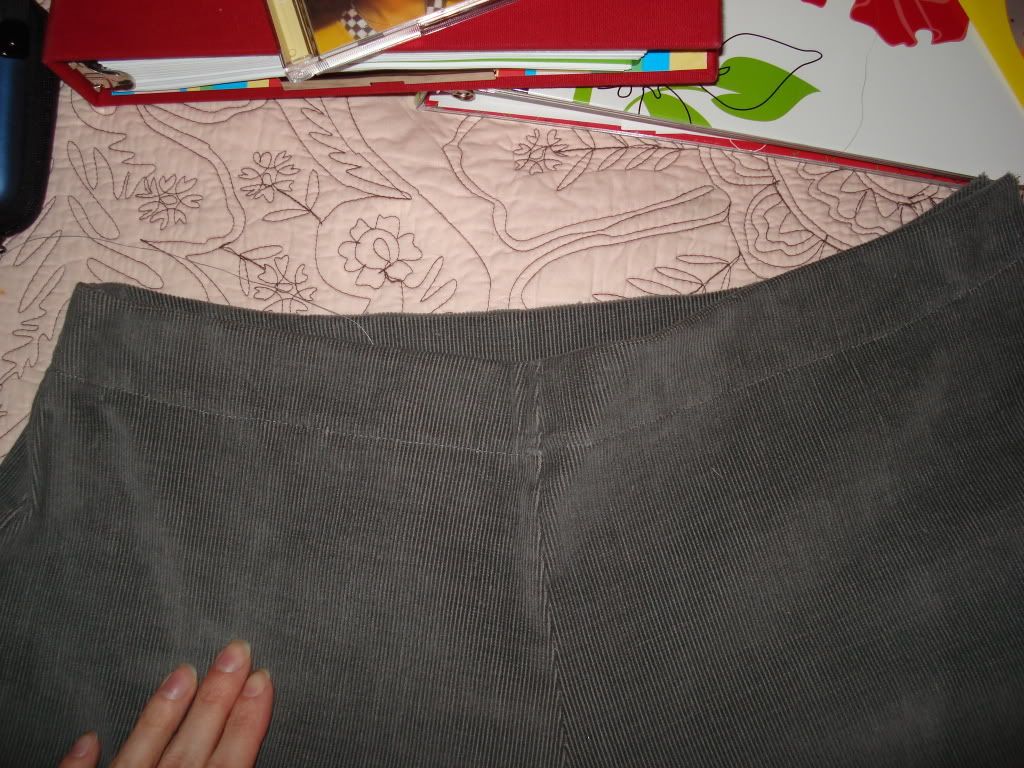
I started with the pants, since they would go together faster. The fronts are flat, while the back is fitted with two darts on each side. And the crotch is monstrously low. But hey! They're pajamas. I wanted to try it.
The instructions called for 3/8" seam allowances and French seams. I... didn't want to try French seams. Particularly on corduroy. A light cotton or rayon, now, that would make sense. Instead, I'm flat-felling the corduroy seams. This is an old technique, still used on blue jeans, and I love it. It's so smooth and neat inside, and when topstitched, pretty cool from the outside. Instead of actually felling them down as I went, I just trimmed and folded the end when I needed to sew a new seam. I wanted to get the machining out of the way at once instead of stopping and starting again.
I got the legs put together and the crotch sewn, then the waist finished. So the major construction is done. I need to finish the seams, hem the cuff edge, and figure out a closing. The instructions call for a zipper, or a "slide fastener." If I have a gray zipper (invisible, of course *ducks*) on hand, I may use that. If not, I may try hooks and eyes. The pants don't fit very snugly, unlike most of my skirts and trousers, and I'm curious to try the hook method.
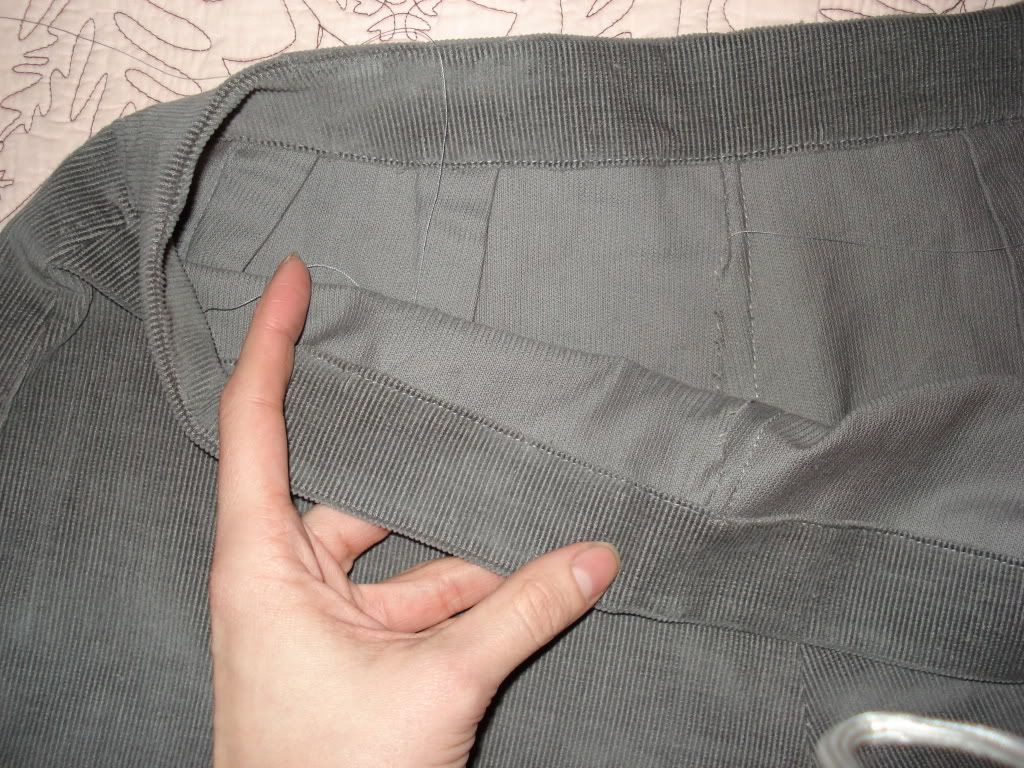
Interestingly, there is no waistband on these pajama pants. There is an inside shaped facing that is sewn down at the lower edge. Rather a neat effect, and I really like how it feels.

Front.

Back. Notice the two long darts.

Inside, showing sewn facing. You can also see where I started felling the center back seam, so it would be all nice underneath the facing.

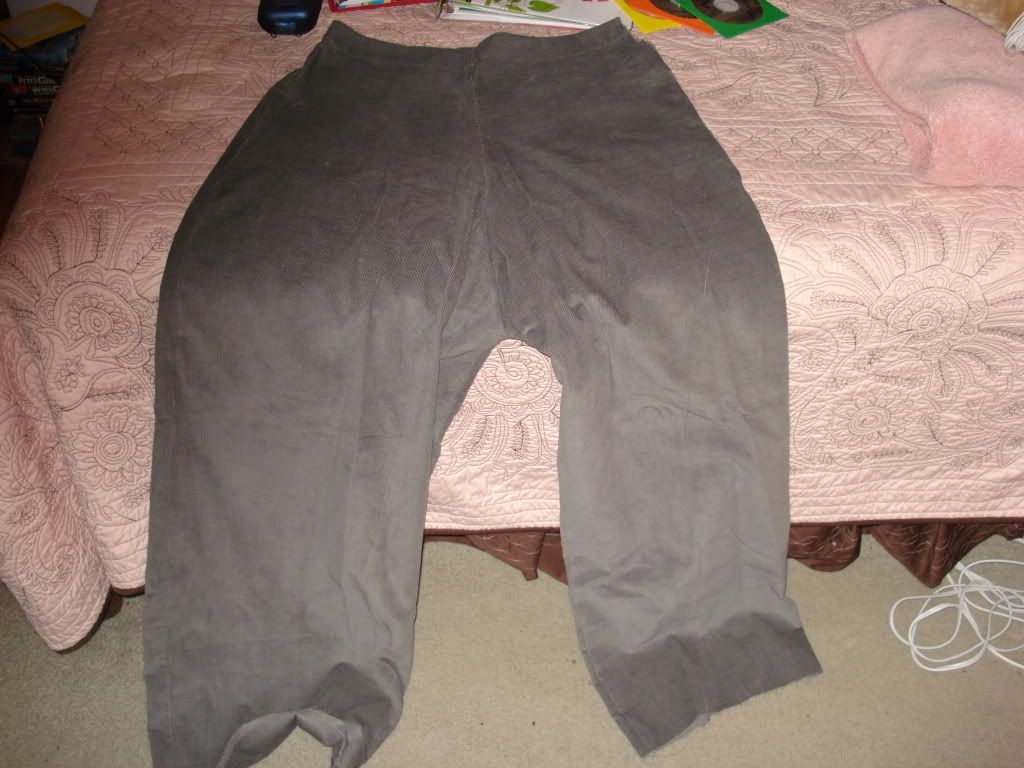
Full view! I haven't measured the rise (drop?) of that crotch; it's probably 20". The full length, waist to unhemmed cuff, is over 45".
To be continued...
I love to wear vintage, but I do go back and forth between wanting to stand out in everyday life and wanting to blend in. Perhaps that's why I have a particular interest in vintage-styled casual wear, since it's worn mostly at home or in very informal situations. I've made overalls, two pairs of shorts, and three nightgowns, all from different patterns.
The Plan
Last fall (2008) I ended up with a lot of corduroy from Joann. I soon disposed of most cuts into various skirts, but there was a lot of gray corduroy I didn't know what to do with, and a yard of ruby-colored stuff that was too gorgeous to leave. They stewed in my to-sew pile for a while.
The main material is gray baby-wale corduroy, a little lighter than in the picture, but still more of a graphite gray than a pearl gray. The other I've called ruby, since it's a very rich, deep color, pink-red without really looking pink. It's "uncut" corduroy, which means the wales (lines) haven't been shaved in it. It's like short-pile cotton velvet, nicer than velveteen.

Finally I was thinking how cozy and comfy they would feel after work after a long day; so I started puzzling what sort of garment to make and settled on lounging pajamas. Pajamas were the new lounge wear of the 1920s, not limited to actually sleeping in. They continued wildly popular into the 30s, so I started to hunt for a pattern. Eventually I unearthed and won on Ebay a pajamas pattern with long sleeves and seaming that would allow two-tone construction. The pattern envelope is in terrible condition. I'm not a collector, though, so I didn't mind too much; and I probably got it cheaper than otherwise. They're not terribly common patterns.

I hit a snag when I couldn't figure out HOW to make these pajamas using both colors in a way that was cute, vintage, and made full use of the pretty ruby stuff. Of course the pajama trousers were going to be gray. I've got lots of it, and I'm quite tall with full hips, so I don't want to call attention there. With a full yard of the ruby, I wanted to do more than mere accents. I couldn't do the whole top in the ruby stuff, though. What to do?
Finally I got smart. (I usually do, but sometimes it takes a couple of days/weeks/months.)

I hauled out all three of my Sears catalog 1930s Fashionable Clothing books and pored over them to absorb ideas.
* Early 1930s pajamas are very feminine and interesting in cut. They use lots of different colors, sometimes hard to analyze. They look a lot more stereotypically 1920s than most of the 1920s actually were. :p
* There were very few mid 1930s pajamas. One exception was a corduroy lounging suit. Haha, primary evidence that this sort of thing existed!
* Late 1930s pajamas are sporty and cute and often two-tone, but the two-tone is usually just in accent bits. Cuffs and collars, sometimes lapels and belts, and piping.

Then I printed several copies of the pattern envelope and colored them. (I had to raid our old school cabinet to find the box of colored pencils.)

My first try, imitating some early 1930s styles with contrasting midriffs. Surprisingly emphsized the hips instead of the little waist. Oops.

Second try, the subtle "accent look," with ruby piping between the bodice pieces. This isn't what I really wanted, but I knew it would work. It I only had a little bit of the red, this would be my choice.

Third try with ruby bodice pieces and sleeves with gray accents, and gray everything else. Ctue, and very much 1930s collegiate style. I had my plan!
Patterning and Cutting Out
Confession: I often use the original tissue patterns when I'm cutting things out. Shameful, I know! They're rare pieces of history and won't last forever, &c. &c. But I was astounded from the very first how sturdy they are (especially compared to the instruction sheets, which are often fragile), and I've had pretty good luck, ironing them with a warm iron and then just getting to work. I only trace off a piece if I need to modify it.
This pattern, though? Easily the worst condition I've ever seen. Envelope condition for once was a good clue to the state of the rest of it. The instruction sheet cracked pretty much along every fold when I opened it, and the pattern pieces themselves developed small splits while I was ironing. I wasn't tugging, and the splits weren't along folds. Weird!
Luckily we have plenty of Do-Sew, so I got to work and eventually traced everything off. I had to use it anyway to make a new pants pattern, since I needed to take in the waist and lengthen the legs like always. A new wrinkle to this was that a previous sewer had cut the pattern pieces and tapered the pant legs. I didn't even see it until I saw how weirdly the dots that were supposed to indicate the 3/4" side seam allowance were veering steadily to the edge. The tapering still wasn't drastic - the cuffs were maybe 26" around instead of 30" - but annoying. Bleck.
At least my new method of adjusting the waistline worked very well. In the past I've just curved in the side seams to give a 28" waist instead of 30", but the last time around I got some horrible side seam divots. My new method involves slashing the pattern across from the side notch and down from the waist, then rotating that corner piece in slightly as though creating a dart at the waist. That takes in the waist, but also lengthens the side seam and raises the side waistline, keeping the grainlines straight.
The instruction sheet was definitely unusable. I took pictures of each section, cropped and arranged them in PowerPoint, and printed. They're not the best by any means, since I didn't bother to correct the drastic browning of the paper, but they're quite legible.
Then I went out to cut out the pieces.
Woes! There was not enough ruby corduroy for all the top pieces and the sleeves! I tried and tried, experimented with bias placement and thought dark thoughts of wholesale piecing, but It Wasn't Meant To Be. I honestly don't think there were enough square inches in that 1+ yard to cut out fronts, backs, and sleeves, not to mention front facings.
My other options were:
(1) Cut the fronts and the sleeves in ruby, but have the back be all gray.
Objection: I hate the false front look! Like sweaters that are argyle in front and solid in back. And the layout will still be tough, probably requiring at least some piecing. I'm not sure it's a vintage technique.
(2) Cut the fronts and backs in ruby, the sleeves in gray.
Objection: Potential to be too 40s, like the jerkin look. Cute, but not this pattern.
I tried to sketch the colors for each in my remaining printout, but couldn't get a good idea. Still, (2) was my favorite, and I knew there would be enough material for it. Ruby cuffs were a no-go, even with the gray sleeves, since the collar still needed to be gray. It DID look strange for the collar and cuffs to be different. I consoled myself by cutting the waist ties from red.
So the end result will look like sketch #3, but with gray sleeves and gray cuffs.
Construction, Part 1: Pants
I started with the pants, since they would go together faster. The fronts are flat, while the back is fitted with two darts on each side. And the crotch is monstrously low. But hey! They're pajamas. I wanted to try it.
The instructions called for 3/8" seam allowances and French seams. I... didn't want to try French seams. Particularly on corduroy. A light cotton or rayon, now, that would make sense. Instead, I'm flat-felling the corduroy seams. This is an old technique, still used on blue jeans, and I love it. It's so smooth and neat inside, and when topstitched, pretty cool from the outside. Instead of actually felling them down as I went, I just trimmed and folded the end when I needed to sew a new seam. I wanted to get the machining out of the way at once instead of stopping and starting again.
I got the legs put together and the crotch sewn, then the waist finished. So the major construction is done. I need to finish the seams, hem the cuff edge, and figure out a closing. The instructions call for a zipper, or a "slide fastener." If I have a gray zipper (invisible, of course *ducks*) on hand, I may use that. If not, I may try hooks and eyes. The pants don't fit very snugly, unlike most of my skirts and trousers, and I'm curious to try the hook method.
Interestingly, there is no waistband on these pajama pants. There is an inside shaped facing that is sewn down at the lower edge. Rather a neat effect, and I really like how it feels.

Front.

Back. Notice the two long darts.

Inside, showing sewn facing. You can also see where I started felling the center back seam, so it would be all nice underneath the facing.

Full view! I haven't measured the rise (drop?) of that crotch; it's probably 20". The full length, waist to unhemmed cuff, is over 45".
To be continued...