Quick Patched Pants


These cute patched pants are easy to make for anyone just beginning sewing.
You will need:
-one old jersey knit (like a t-shirt or sweat shirt) shirt or some fabric
-scrap paper for making the pattern
-a marker or fabric pen for marking the pattern
-elastic for waistband
-needle and colored thread (or sewing machine)
I made these pants from a cute patterned t-shirt I found used. The heart patches are made from the same fabric, I just turned it over so that the print was on the underside. You can use hearts for a girl or another shape if you have a boy. By using jersey or similar knit fabric, you will not have to finish the seams. They will not fray. The patches are unnecessary, but they may offer some small amount of protection to both the pants and little knees as they crawl across the floor.
Tip: If you cut the leg patterns so that the bottom of the leg is the bottom edge of the shirt, you won't have to hem the ends of the pants. It will already be done for you.
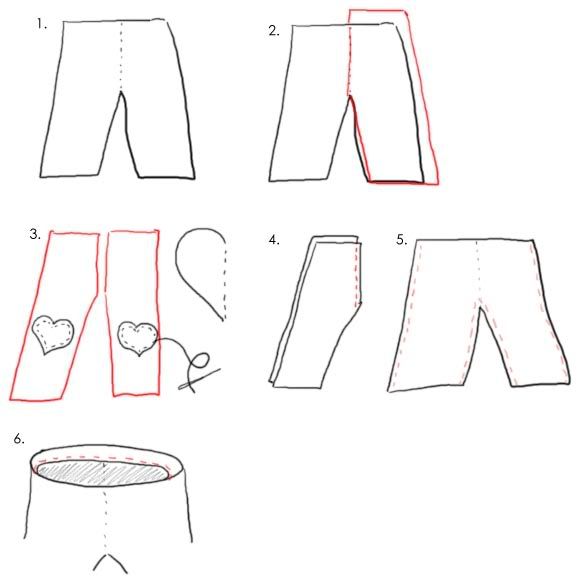
Step1: Find a pair of pants that fit your baby. Lay them over a piece of newspaper or other scrap paper. Have someone stretch the waistband of the pants as wide as it will go. While they hold it, use a pencil to trace around one side of the pants. Start from the center of the waistband and end in the crotch. You should extend the pattern one inch above the top (waistline). It will be folded down to contain the elastic waistband.
Step2: If you are trying to make a pair of pants that are slightly larger than the pair you have, add half an inch or so to the pattern you are drawing just around the top and side of the pattern. Lay your pattern over the back (inside) of the cloth you plan to use and draw it onto the fabric using a fabric pen or marker. Go lightly so it does not bleed onto the front of the fabric.
Step3: Fold a piece of paper in half and cut half a heart shape so that when you open it you have a full heart with matching sides. Cut the patches from more jersey fabric. Place them onto the front leg panels where you would like them to go. Pin them securely to the fabric and sew them to the knees using a running stitch around the edges. You do not need to finish the edges. They will not fray.
If you did not follow the tip above and cut the ends of the pants so that they are already hemmed, hem them up now. Fold them up about 1/4 inch and sew along the inside edge.
Step 4: Lay both front panels facing each other and sew them together down the crotch. Do this with both back panels as well.
Step 5: Open the front and back panels of the pants and lay them flat. Lay the front panel facing up on the table in front of you. Lay the back panel over it facing down. Starting from the bottom of the leg, sew up the sides of the pants. Again, starting from the bottom of the leg, sew up the crotch of the pants as seen in red
Step 6: Turn the pants right-side out. Cut a piece of elastic that is as tight as you would like it to be around your baby's waist. Sew it securely into a loop (circle) and lay one edge along the inside of the waistline of the pants. Fold the top of the pants over the elastic and down inside the pants. There should be just a small edge where you can sew the hem around the inside. Work your way around as you sew until the elastic is entirely encased in the hem. Sew the elastic to the pants with one or two stitches at each of the four seams of the pants - one in front, one in back, and one on each side. This will prevent the elastic from twisting.