Sharpening Guide
Here's a (hopefully) simple walkthrough the sharpness options in Photoshop. It does require some knowledge of Photoshop (filters, layer masks, layer opacity)
We're going to start with this base:
As you can see, when you shrink down an image to 100x100, some of the details get fuzzy or lost. This is why we sharpen!
What do the sharpness filters do? They essentially raise the contrast of part or the entire image.
First, the sharpness menu is located Filters:
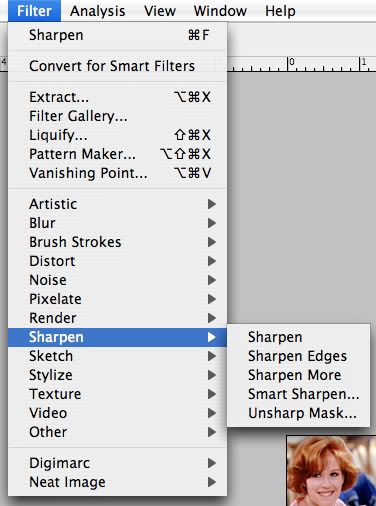
I will start in order.
Sharpen:

This is option is most commonly used. It sharpens the overall icon.
Sharpen Edges

This filter finds the areas of greatest contrast in color and sharpens those edges. Since Claire's eyes differ greatly from her skin tone, that area has been sharpened. This can be a very useful filter when making icons out of people's faces, as the skin won't be sharpened, but the eyes and mouth will be.
Sharpen More

This is essentially a more drastic version of your basic Sharpen. As you can see, when put at 100% it tends to oversharpen the icon, cutting the features too deeply.
However, lowering the opacity on this layer can look quite nice.

In this case, I brought the opacity down to 44%
Smart Sharpen

This is a more complicated option that allows you greater control. I find this one to be my least favourite. The following are the settings I used, with an explanation of what each option means.
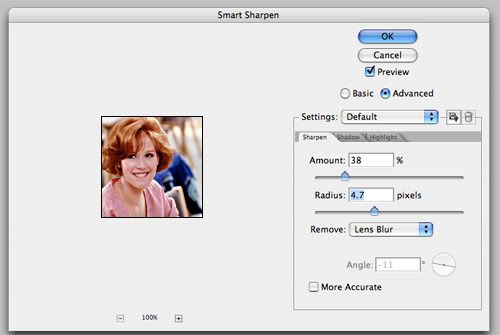
Amount How sharp you want the image to be.
Radius Affects how large of an area will be sharpened
Remove Sets the different options used to sharpen (Gaussian Blur, Lens Blur Motion Blur)
Angle Used in conjunction with Motion Blur
Unsharpen Mask

It works similar to Sharpen Edges by increasing contrast along the edges in an image, but gives you more control.
Again, the settings I used this time
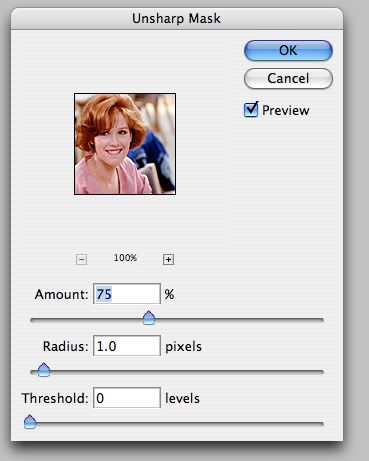
Amount & Radius mean the same as before.
Threshold, according to Adobe means "how different the sharpened pixels must be from the surrounding area before they are considered edge pixels and sharpened by the filter." The higher the threshold, less will be sharpened.
This filter is also very useful for editing photographs for print.
And that's a run through of the Sharpness filters in Photoshop!
I'll leave you with a few pointers to consider:
• Always duplicate your base/image you want to sharpen. This allows you to lower the opacity of the sharpened layer, which allows you to adjust how sharp the image looks.
• Sharpening will only work for images that are fuzzy due to reduction in size or are slightly blurry. Excessively blurry images will not become magically in focus with the sharpen tool.
• Think of this as only a guideline, not a rule book. As making graphics is highly subjective, you may like one filter more than others. Use the filters as you see fit and as the image requires.
• One caveat to the previous point: AVOID OVERSHARPENING. An oversharpened icon will look gritty and pixelated.
• Layer masks are your friend! Use them when you don't want sections to be sharpened, such as a blurred background.
• Have fun & experiment!
We're going to start with this base:

As you can see, when you shrink down an image to 100x100, some of the details get fuzzy or lost. This is why we sharpen!
What do the sharpness filters do? They essentially raise the contrast of part or the entire image.
First, the sharpness menu is located Filters:

I will start in order.
Sharpen:

This is option is most commonly used. It sharpens the overall icon.
Sharpen Edges

This filter finds the areas of greatest contrast in color and sharpens those edges. Since Claire's eyes differ greatly from her skin tone, that area has been sharpened. This can be a very useful filter when making icons out of people's faces, as the skin won't be sharpened, but the eyes and mouth will be.
Sharpen More

This is essentially a more drastic version of your basic Sharpen. As you can see, when put at 100% it tends to oversharpen the icon, cutting the features too deeply.
However, lowering the opacity on this layer can look quite nice.

In this case, I brought the opacity down to 44%
Smart Sharpen

This is a more complicated option that allows you greater control. I find this one to be my least favourite. The following are the settings I used, with an explanation of what each option means.

Amount How sharp you want the image to be.
Radius Affects how large of an area will be sharpened
Remove Sets the different options used to sharpen (Gaussian Blur, Lens Blur Motion Blur)
Angle Used in conjunction with Motion Blur
Unsharpen Mask

It works similar to Sharpen Edges by increasing contrast along the edges in an image, but gives you more control.
Again, the settings I used this time

Amount & Radius mean the same as before.
Threshold, according to Adobe means "how different the sharpened pixels must be from the surrounding area before they are considered edge pixels and sharpened by the filter." The higher the threshold, less will be sharpened.
This filter is also very useful for editing photographs for print.
And that's a run through of the Sharpness filters in Photoshop!
I'll leave you with a few pointers to consider:
• Always duplicate your base/image you want to sharpen. This allows you to lower the opacity of the sharpened layer, which allows you to adjust how sharp the image looks.
• Sharpening will only work for images that are fuzzy due to reduction in size or are slightly blurry. Excessively blurry images will not become magically in focus with the sharpen tool.
• Think of this as only a guideline, not a rule book. As making graphics is highly subjective, you may like one filter more than others. Use the filters as you see fit and as the image requires.
• One caveat to the previous point: AVOID OVERSHARPENING. An oversharpened icon will look gritty and pixelated.
• Layer masks are your friend! Use them when you don't want sections to be sharpened, such as a blurred background.
• Have fun & experiment!