Penelo Cosplay WIP, and some food
I swear, I've been semi-productive in these past few weeks! Heavy emphasis on the "semi" part of that. But really, I don't have a whole lot to show for all that time between posts, but I made some Cinco de Mayo resolutions that I actually plan to keep this year! (That's how that holiday works, right?) I realized that... it's been an uncomfortably long time since those bright-eyed, optimistic high school days, and all the things I wanted to become good at I never did, and a lot of the stuff I was actually pretty good at already I've let deteriorate. So I'm going to... not necessarily "better" myself, but at least get myself back up to the quality of skill that I used to have.
TL;DR The reason I'm so sparse with the updates is because I'm scrabbling to not suck at the things I used to be good at.
Anyway, the stuff I do have to show off is under...
So, my Penelo cosplay is coming along well, if slowly. I finally managed to get the sleeves on! I opted to use a sort of organza-esque material (I don't know what it really is, I found it in the remnants bin at the fabric store) which looks nice, but isn't stretchy. I messed up the measurements a tad so it's kind of tight around the shoulders, and I feel like I might Hulk-rip through them if I move wrong, but so far they seem to be holding up pretty well.
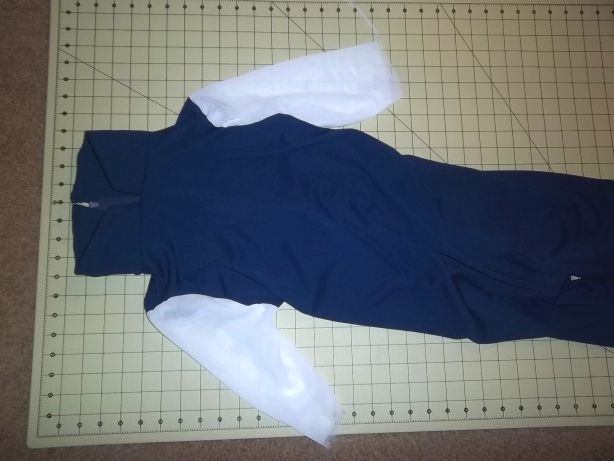
Because of the way the body was put together, I couldn't use my usual method of sewing on the sleeves (which you can find here) so I had to use the method where you just push the sleeve through the armhole and add it that way. Which... is apparently how you're supposed to do it anyway? I dunno, whatever. So I used this tutorial to help me out.[EDIT] Whoops, that was the wrong link, I used that one as a quick visual reference on how to do the pattern for the sleeves, since I would need some extra room at the armpit and shoulder. This tutorial from the same site is the one for the harder method of sewing in sleeves. NOTE: don't be dumb like me! I accidentally sewed the sleeve on inside-out the first time. So, remember, the body of your garment will be inside-out, but your sleeve will be outside-out when you attach it.
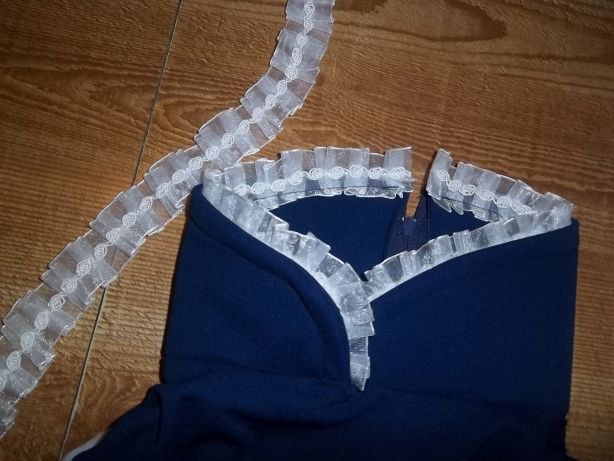
I spent a lot of time agonizing over how I was going to do the ruffles on the collar, or even whether I'd do them at all. Then as I was rummaging through my big box o' random crafting crap I found exactly what I needed!
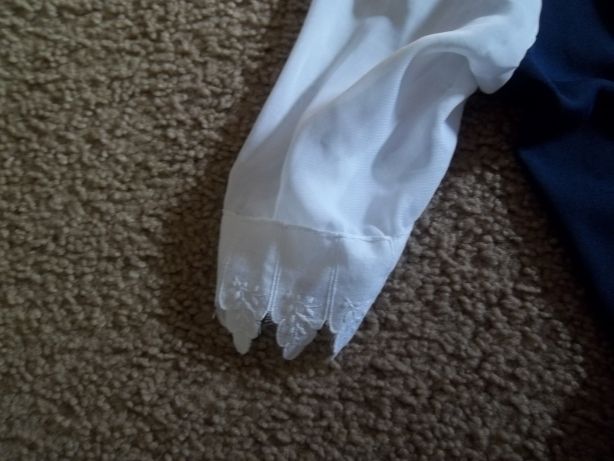
I had also bought a nice approximation of the sleeve-ends from the fabric store, which I had to stitch on by hand... which took for damn ever but looks passable.
Something else I've been agonizing over is how I'm going to do all the brown leather armorish bits on the costume. I bought a somewhat thick brown fabric that might pass for suede if you didn't look at it too hard, but it's not the best thing I could have gotten. It was, however, affordable. Then my sister gave me a small scrap of material that's sort of perfect, but which I'm guessing is going to be butt-expensive. I cut out some of the pieces I'd need from it, just to see how it'd look, and now I'm facing a dilemma.
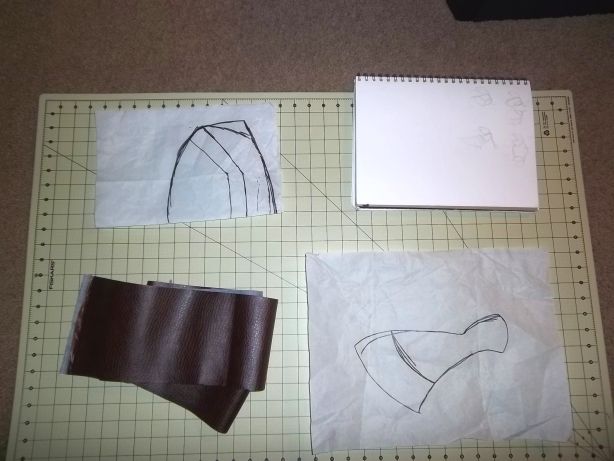
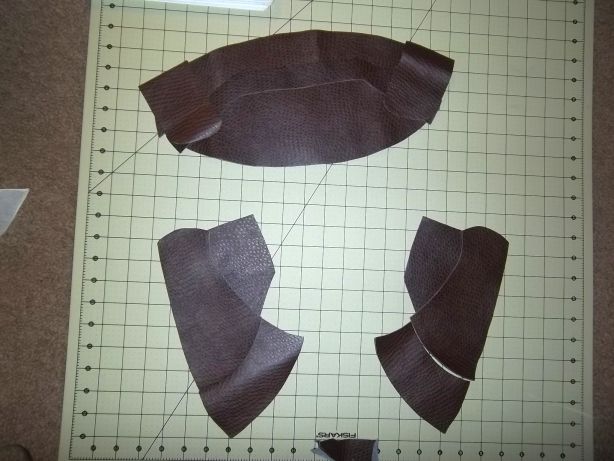
It looks so, SO good, but I don't know if I can justify spending more money on a material for an aspect of the costume I supposedly had covered already.
Anyway, costume stuff aside, I've been trying out a few new recipes here and there, and figured I'd post them since, hey, I've got nothing better to share, hahah.
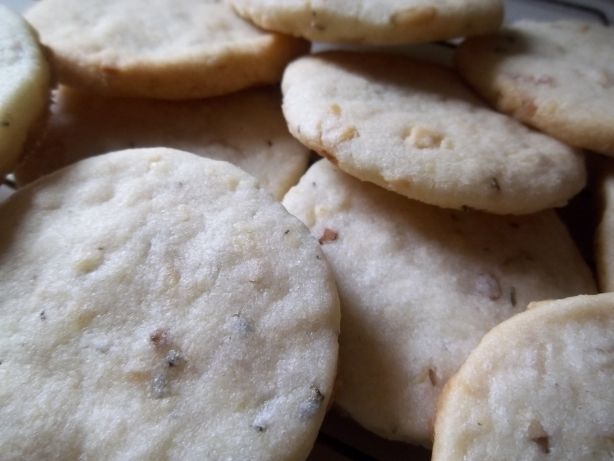
These are pine nut and rosemary shortbread cookies from the winter 2011 edition of that free magazine Raley's puts out every few months. Seeing that the magazine is free and I just mentioned the chain by name, it's okay to post the recipe in its entirety here, right? Oh well, if it's not then... who the hell's gonna know anyway? What, like 3 people (including me) ever visit this journal? Hahah. I made some minor changes, but it's mostly the same as in the magazine.
2 c all purpose flour
light pinch fine grain sea salt (I used Kosher salt)
1 c unsalted butter, at room temp
2/3 c sugar
zest of 1 lemon
2/3 c pine nuts
1 1/4 t finely chopped fresh rosemary (I used more, and think that even more would have been nice... maybe 3 t?)
These things are seriously delicious, nice and crispy but soft. I might use less sugar to let the pine nuts and rosemary come through more, though.
The other thing I made that I thought might be good enough to share was some falafel (I've been cooking with some frequency, but most of that stuff is either not something most of you reading this will want to eat or simple enough that you've probably done it yourself).
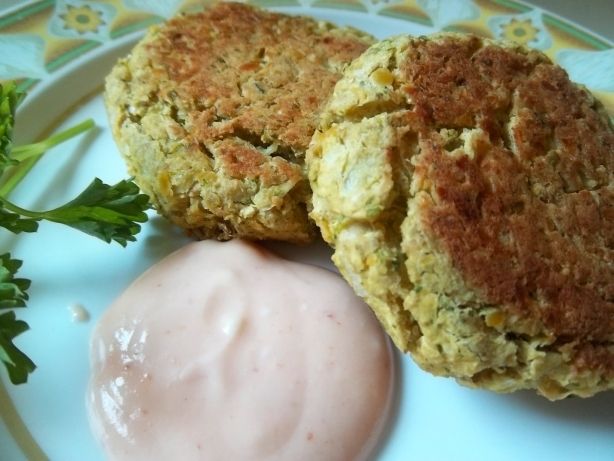
I loves me some falafel; it's filling, a good vegetarian meal option if you're having a no-meat day, and can be made with little more than your basic pantry staples. I prefer to use dried chickpeas, since the canned stuff usually has added salt and is more expensive, but if you don't have the time/patience to soak and then cook yours then canned works just as well. This recipe is adapted from one I found on AllRecipes.com. This one is a baked version, by the way.
2c chickpeas
1 med onion, chopped
1/2 c fresh parsley
3 cloves garlic, chopped
1 egg
2 t ground cumin
1 ½ t ground coriander
1 dash pepper
1 pinch cayenne pepper
1 t lemon juice
1 t baking powder
1 T olive oil
1 c dry bread crumbs
It's a good idea to have some extra chickpeas on hand, as there’s a LOT of onion. Also, I don't use salt in my cooking (unless it's a baking thing, I don't like messing with all that chemistry voodoo it's got going on) so if this seems a tad bland to you, the original recipe calls for like a teaspoon or so of it. Watch out when you flip 'em, some of mine fell tragically apart.
Sadly, I didn't have any dill or cucumber on hand, so I couldn't make any tzatziki sauce. However, I'm kind of in love with that spicy mayo sauce you get at Japanese restaurants when you order potato croquettes, so I thought I'd make some of that to go with the falafel. My sauce... tastes nothing like that stuff. But it's still quite good! This one's adapted from a couple different recipes I found scattered about the intarwebs.
2 T nonfat yogurt
2 T mayonnaise
1 T sriracha
1 T lemon/lime juice
1 t rice vinegar
Sugar to taste
Combine all ingredients, adjust ratios to taste.
I'm guessing the real stuff is supposed to be made with that Kewpie mayonnaise, but since I don't have any I added sugar and upped the lemon juice.
TL;DR The reason I'm so sparse with the updates is because I'm scrabbling to not suck at the things I used to be good at.
Anyway, the stuff I do have to show off is under...
So, my Penelo cosplay is coming along well, if slowly. I finally managed to get the sleeves on! I opted to use a sort of organza-esque material (I don't know what it really is, I found it in the remnants bin at the fabric store) which looks nice, but isn't stretchy. I messed up the measurements a tad so it's kind of tight around the shoulders, and I feel like I might Hulk-rip through them if I move wrong, but so far they seem to be holding up pretty well.
Because of the way the body was put together, I couldn't use my usual method of sewing on the sleeves (which you can find here) so I had to use the method where you just push the sleeve through the armhole and add it that way. Which... is apparently how you're supposed to do it anyway? I dunno, whatever. So I used this tutorial to help me out.[EDIT] Whoops, that was the wrong link, I used that one as a quick visual reference on how to do the pattern for the sleeves, since I would need some extra room at the armpit and shoulder. This tutorial from the same site is the one for the harder method of sewing in sleeves. NOTE: don't be dumb like me! I accidentally sewed the sleeve on inside-out the first time. So, remember, the body of your garment will be inside-out, but your sleeve will be outside-out when you attach it.
I spent a lot of time agonizing over how I was going to do the ruffles on the collar, or even whether I'd do them at all. Then as I was rummaging through my big box o' random crafting crap I found exactly what I needed!
I had also bought a nice approximation of the sleeve-ends from the fabric store, which I had to stitch on by hand... which took for damn ever but looks passable.
Something else I've been agonizing over is how I'm going to do all the brown leather armorish bits on the costume. I bought a somewhat thick brown fabric that might pass for suede if you didn't look at it too hard, but it's not the best thing I could have gotten. It was, however, affordable. Then my sister gave me a small scrap of material that's sort of perfect, but which I'm guessing is going to be butt-expensive. I cut out some of the pieces I'd need from it, just to see how it'd look, and now I'm facing a dilemma.
It looks so, SO good, but I don't know if I can justify spending more money on a material for an aspect of the costume I supposedly had covered already.
Anyway, costume stuff aside, I've been trying out a few new recipes here and there, and figured I'd post them since, hey, I've got nothing better to share, hahah.
These are pine nut and rosemary shortbread cookies from the winter 2011 edition of that free magazine Raley's puts out every few months. Seeing that the magazine is free and I just mentioned the chain by name, it's okay to post the recipe in its entirety here, right? Oh well, if it's not then... who the hell's gonna know anyway? What, like 3 people (including me) ever visit this journal? Hahah. I made some minor changes, but it's mostly the same as in the magazine.
2 c all purpose flour
light pinch fine grain sea salt (I used Kosher salt)
1 c unsalted butter, at room temp
2/3 c sugar
zest of 1 lemon
2/3 c pine nuts
1 1/4 t finely chopped fresh rosemary (I used more, and think that even more would have been nice... maybe 3 t?)
- Toast and coarsely chop the pine nuts
- Sift flour and salt, stir together with a whisk
- Cream butter until light and fluffy in med bowl; beat in sugar and lemon zest
- Add flour, nuts, and rosemary; mix until dough goes just past the crumbly stage and begins to clump together (don't overmix)
- Turn dough out onto floured surface and knead once or twice, just to bring it together
- Form dough into 1" thick disk, wrap with plastic, chill for 15 min
- Preheat oven at 350 F; taking the dough a small handful at a time, knead together just enough to make it not crumble, flatten to about 1/4" thick, and cut into desired shape
- Bake ~10 min on prepared baking sheet or until cookies just start to brown on the bottom
These things are seriously delicious, nice and crispy but soft. I might use less sugar to let the pine nuts and rosemary come through more, though.
The other thing I made that I thought might be good enough to share was some falafel (I've been cooking with some frequency, but most of that stuff is either not something most of you reading this will want to eat or simple enough that you've probably done it yourself).
I loves me some falafel; it's filling, a good vegetarian meal option if you're having a no-meat day, and can be made with little more than your basic pantry staples. I prefer to use dried chickpeas, since the canned stuff usually has added salt and is more expensive, but if you don't have the time/patience to soak and then cook yours then canned works just as well. This recipe is adapted from one I found on AllRecipes.com. This one is a baked version, by the way.
2c chickpeas
1 med onion, chopped
1/2 c fresh parsley
3 cloves garlic, chopped
1 egg
2 t ground cumin
1 ½ t ground coriander
1 dash pepper
1 pinch cayenne pepper
1 t lemon juice
1 t baking powder
1 T olive oil
1 c dry bread crumbs
- Mash chickpeas until thick and pasty using a fork, potato masher, whisk, whatever; don't use a blender. If needed, add water.
- Finely chop onion, parsley and garlic (or use a food processor). Stir into mashed chickpeas.
- Combine egg, cumin, coriander, salt, pepper, cayenne, lemon juice and baking powder. Stir into chickpea mixture along with olive oil. Slowly add bread crumbs until mixture is not sticky but will hold together; add more or less bread crumbs, as needed. Form 8 balls and then flatten into patties.
- Bake at 350 F on baking pan lightly drizzled with oil for 15-20 min, turning halfway through cooking (mine took longer to bake, ~12 min each side)
It's a good idea to have some extra chickpeas on hand, as there’s a LOT of onion. Also, I don't use salt in my cooking (unless it's a baking thing, I don't like messing with all that chemistry voodoo it's got going on) so if this seems a tad bland to you, the original recipe calls for like a teaspoon or so of it. Watch out when you flip 'em, some of mine fell tragically apart.
Sadly, I didn't have any dill or cucumber on hand, so I couldn't make any tzatziki sauce. However, I'm kind of in love with that spicy mayo sauce you get at Japanese restaurants when you order potato croquettes, so I thought I'd make some of that to go with the falafel. My sauce... tastes nothing like that stuff. But it's still quite good! This one's adapted from a couple different recipes I found scattered about the intarwebs.
2 T nonfat yogurt
2 T mayonnaise
1 T sriracha
1 T lemon/lime juice
1 t rice vinegar
Sugar to taste
Combine all ingredients, adjust ratios to taste.
I'm guessing the real stuff is supposed to be made with that Kewpie mayonnaise, but since I don't have any I added sugar and upped the lemon juice.