(no subject)
How To Make a Renaissance Tube Dress (AKA, a simple chemise)
The instructions listed below make for a very full chemise that falls about mid calf on a woman of average height. So it's One Size Fits Most. If you are much smaller or much larger than "average," the advice in the Taking Your Measure section will help you work out how much fabric and elastic you need for your own chemise.
You will need:
2 2/3 yards 45 inch[1] cotton[2] fabric
1 1/3 yards 1/4" Elastic
1 yard 1/2" Elastic
Matching thread
Measure 2/3 of a yard of the fabric for your sleeves. Cut this off and lay it aside. Cut the remaining fabric into two equal pieces, perpendicular to the fold. Iron out the folds, then pin right sides together and stitch along the selvage.

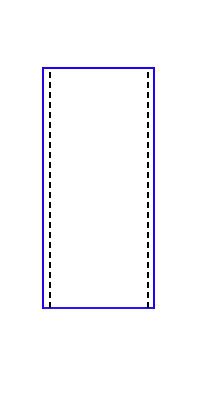
Black dotted line is your stitching. At this point, you can either iron the seams flat, or use a zigzag stitch between the stitching and the edge of the fabric to reinforce the seams. You should now have a large tube of fabric. Fold the bottom hem up twice about a quarter of an inch. This puts your raw bottom edge into a fold of fabric, and reduces fraying. I use an iron to help keep the hem nice and straight during this process. Straight stitch along the fold.

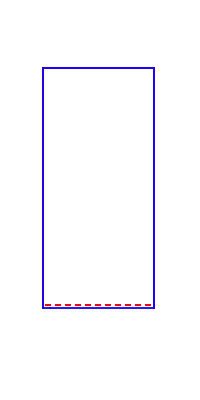
Now for the hard part! Use your iron to fold your top edge down once, about a quarter of an inch. Fold and iron it again about an inch and a half. I like to run a single straight stitch along the top edge of the fold (purple in image below), because I feel it helps keep the ruffle nice and neat, but you can skip this if you like. Run a straight stitch 1" up from your bottom edge, all the way around. Run another straight stitch along the bottom edge of your fold, leaving a two inch gap. This is your elastic pocket.

Run your 1/2" elastic through this pocket, gathering the fabric as your go. I like to use a large safety pin on one end of the elastic to help me work it through the pocket, while I use another safety pin to hold the other end in place outside the pocket. Make sure your elastic doesn't turn as you run it through! Put your dress on and pull the elastic so that it is snug, but not too tight. Stitch the elastic at this point. Push the ends up into the elastic pocket, and stitch the pocket shut. Turn your dress right side out, and you're halfway there.
Take your sleeve piece and cut it along the fold. Fold one piece right sides together so that your selvage and the recent cut make your seam. Pin and stitch this together. Again, you can either iron this open, or run a zigzag along the seam. You should now have a long narrow tube. Fold one edge edge down once, about a quarter of an inch. Fold it down again about an inch. Decorative stitch is still optional. Run a single stitch about a half inch up from your bottom fold. Run another single stitch at the fold, leaving a two inch gap for the elastic. Put the sleeve on, snug the elastic to your wrist[3], sew the elastic, and close up your pocket. Do the same for the other end, snugging the elastic to just above your bicep. Do all of this for the other piece of fabric, turn right side out, and you'll have two sleeves. Almost done!
Match the seam of one sleeve at the bicep end to a side seam at the top of the dress. Run two inches of straight stitching through both pieces, between the top of the elastic pocket and the decorative stitching. You'll want to go back and forth over this two or three times to make sure it's attached well.
Notes:
[1] This can be done with a 60" fabric, but it makes for a *very* full chemise. Generally, you'll want about twice as much fabric at your width as you are around the chest just below your armpits. If you are smaller than 42" at your widest point (or 57" for 60" fabric), you can make a much snugger chemise using only one panel and simply giving your chemise a back or side side seam. Bear in mind that 45" fabric can run anywhere from 42 to 46 inches.
[2] A chemise is usually made of an absorbent fabric such as cotton or linen because it's intended to soak up sweat and keep your bodice or corset clean. Feel free to use a fancier fabric if you like.
[3] If you tend to push your sleeves up, you'll want to make the elastic at your wrists a little looser.
Taking Your Measure:
I buy most of my elastics in pre-packaged lengths and measure it out as I need it. But your general formula goes like this:
1/4" elastic: ((wrist measurement+2")+(bicep measurement+2")) x 2
1/2" elastic: upper torso measurement+4"
You can tighten or loosen your elastic as needed.
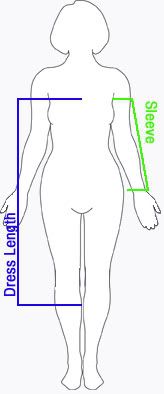
For your fabric measurement, see the image below:

This length gives you a nice full chemise, which will be about to the top of most boots. Lengthen or shorten as you like. Ankle length works for longer dresses, or hip length makes for a nice shirt. Take the blue measurement, add 3", multiply that number by two. This is the body of your dress. Add to that number the green measurement, plus 6". This gives you a nice puffy sleeve. So:
Fabric: (body + 3") x 2) + (arm + 6")
It's usually best to round up to the nearest quarter or third yard, so as not to confuse your poor cutting table attendant too much.

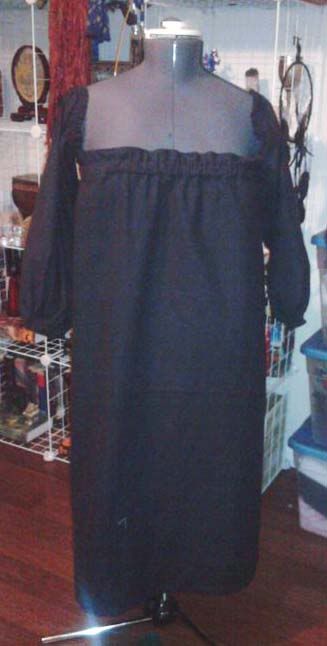
The finished chemise for my wedding dress! The dress part is just one piece, since I didn't want to add too much bulk under the corset, and made of cotton flannel, since we're going to be outside for the ceremony.
The instructions listed below make for a very full chemise that falls about mid calf on a woman of average height. So it's One Size Fits Most. If you are much smaller or much larger than "average," the advice in the Taking Your Measure section will help you work out how much fabric and elastic you need for your own chemise.
You will need:
2 2/3 yards 45 inch[1] cotton[2] fabric
1 1/3 yards 1/4" Elastic
1 yard 1/2" Elastic
Matching thread
Measure 2/3 of a yard of the fabric for your sleeves. Cut this off and lay it aside. Cut the remaining fabric into two equal pieces, perpendicular to the fold. Iron out the folds, then pin right sides together and stitch along the selvage.

Black dotted line is your stitching. At this point, you can either iron the seams flat, or use a zigzag stitch between the stitching and the edge of the fabric to reinforce the seams. You should now have a large tube of fabric. Fold the bottom hem up twice about a quarter of an inch. This puts your raw bottom edge into a fold of fabric, and reduces fraying. I use an iron to help keep the hem nice and straight during this process. Straight stitch along the fold.

Now for the hard part! Use your iron to fold your top edge down once, about a quarter of an inch. Fold and iron it again about an inch and a half. I like to run a single straight stitch along the top edge of the fold (purple in image below), because I feel it helps keep the ruffle nice and neat, but you can skip this if you like. Run a straight stitch 1" up from your bottom edge, all the way around. Run another straight stitch along the bottom edge of your fold, leaving a two inch gap. This is your elastic pocket.

Run your 1/2" elastic through this pocket, gathering the fabric as your go. I like to use a large safety pin on one end of the elastic to help me work it through the pocket, while I use another safety pin to hold the other end in place outside the pocket. Make sure your elastic doesn't turn as you run it through! Put your dress on and pull the elastic so that it is snug, but not too tight. Stitch the elastic at this point. Push the ends up into the elastic pocket, and stitch the pocket shut. Turn your dress right side out, and you're halfway there.
Take your sleeve piece and cut it along the fold. Fold one piece right sides together so that your selvage and the recent cut make your seam. Pin and stitch this together. Again, you can either iron this open, or run a zigzag along the seam. You should now have a long narrow tube. Fold one edge edge down once, about a quarter of an inch. Fold it down again about an inch. Decorative stitch is still optional. Run a single stitch about a half inch up from your bottom fold. Run another single stitch at the fold, leaving a two inch gap for the elastic. Put the sleeve on, snug the elastic to your wrist[3], sew the elastic, and close up your pocket. Do the same for the other end, snugging the elastic to just above your bicep. Do all of this for the other piece of fabric, turn right side out, and you'll have two sleeves. Almost done!
Match the seam of one sleeve at the bicep end to a side seam at the top of the dress. Run two inches of straight stitching through both pieces, between the top of the elastic pocket and the decorative stitching. You'll want to go back and forth over this two or three times to make sure it's attached well.
Notes:
[1] This can be done with a 60" fabric, but it makes for a *very* full chemise. Generally, you'll want about twice as much fabric at your width as you are around the chest just below your armpits. If you are smaller than 42" at your widest point (or 57" for 60" fabric), you can make a much snugger chemise using only one panel and simply giving your chemise a back or side side seam. Bear in mind that 45" fabric can run anywhere from 42 to 46 inches.
[2] A chemise is usually made of an absorbent fabric such as cotton or linen because it's intended to soak up sweat and keep your bodice or corset clean. Feel free to use a fancier fabric if you like.
[3] If you tend to push your sleeves up, you'll want to make the elastic at your wrists a little looser.
Taking Your Measure:
I buy most of my elastics in pre-packaged lengths and measure it out as I need it. But your general formula goes like this:
1/4" elastic: ((wrist measurement+2")+(bicep measurement+2")) x 2
1/2" elastic: upper torso measurement+4"
You can tighten or loosen your elastic as needed.
For your fabric measurement, see the image below:

This length gives you a nice full chemise, which will be about to the top of most boots. Lengthen or shorten as you like. Ankle length works for longer dresses, or hip length makes for a nice shirt. Take the blue measurement, add 3", multiply that number by two. This is the body of your dress. Add to that number the green measurement, plus 6". This gives you a nice puffy sleeve. So:
Fabric: (body + 3") x 2) + (arm + 6")
It's usually best to round up to the nearest quarter or third yard, so as not to confuse your poor cutting table attendant too much.

The finished chemise for my wedding dress! The dress part is just one piece, since I didn't want to add too much bulk under the corset, and made of cotton flannel, since we're going to be outside for the ceremony.