Tutorial: Photography 101
You guys are ALWAYS so sweet about the photographs I post, and I've been asked a few questions from time-to-time, so I thought I do a little informative post, with the little I know about the topic. I'm not a professional - not by a long shot - but I figured I could tell you what I have figured out, and if that's helpful, great.
The details: Among a few smaller digital cameras, I mainly use a Canon Digital Rebel. It's a great camera, a little pricey and bulky for everyday use, but great. You don't need to spend that much to take fab photos though. It helps, sure, but isn't the only thing that matters, you know?
I have a Canon Rebel SLR, which is a film camera, as well, and love it. I've worked in darkrooms, and that's something everyone that's interested should learn to do. Digital photography is amazing, and love it, but it can't compare to being in a darkroom.
But for this guide, I'm going to talk about digitial photography, since that's what I'm doing the most of now - and chances are, you probably are too.
So I bring you:
- Rule #01 -
Take pictures. Hundreds. Thousands. It's a digital camera - the cost is behind you now, no more buying film - so dammit, why aren't you using it? If they're bad, delete 'em. If they're duplicates, delete 'em. But if you don't snap away, you'll never get anything.
- Rule #02 -
Read your manual. I know, it's boring. Really boring. But if you don't know how to operate all the awesome features that came with your camera, then you're just not going to be able to use it to it's fullest. If you're really interested, read a book or two. I recommend something like A Short Course in Photography. Something not too wordy, with lots of visual examples.
- Rule #03 -
Find your angle. One of the fastest ways to spot a beginner's work is if the angle never changes. Your instinct is to take the picture from where you're standing, that means, anything below you is going to be downwards shot. Don't be afraid to get face-to-face with your subject. As long as your subject isn't a hissing rattlesnake or something. Then, getting to face-to-face with it, is all you. Heh.
Examples:
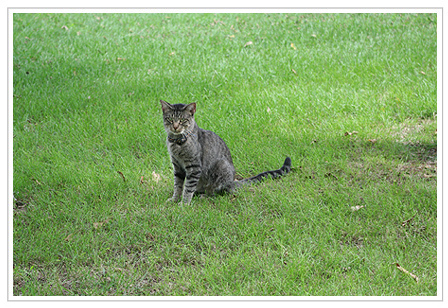
You can see where I was standing when I spotted my subject. I snapped a pic from there. I'm too far away, I'm looking down on him, and it's an uninteresting shot. So I moved in:
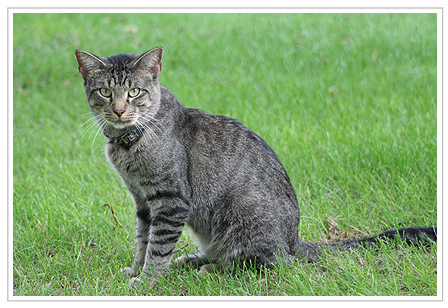
Now, I'm closer to him, and down on his level. Doesn't this shot look more interesting? It does to me.
- Rule #04 -
It's blurry, and/or out of focus, what do I do?! Well, there's two major reasons for blurriness in photography. 1) You moved, or 2) your subject moved. That's it. It's super-easy to detect which is your problem. If something, anything, is in focus in your photograph - your subject moved. You can't do much about that. But it means that you did nothing wrong. Now, if the entire thing is out of blurry - nothing at all is in focus - chances are, you moved.
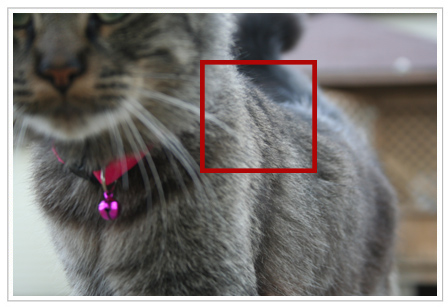
He's blurry because he moved. There is a focal point on his back. Not a good picture, regardless, but at least you know that there was nothing much you could do to keep him from moving.
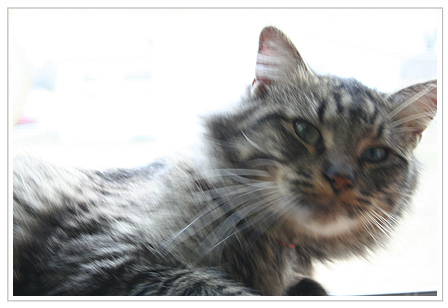
This one, nothing is in focus, so I moved.
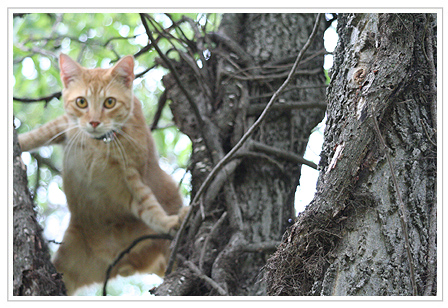
Focus to your advantage. Make it interesting. Obvious, isn't always best, at least to me. In this one, the focus is on the first tree trunk. Fat Bobby is just lingering in the background. This can be achieved by adjusting your aperture slightly.
If you find that you're having quite a bit of trouble with YOU moving, learn to tuck the camera in. Brace your elbows up against your chest and pull it a close as you can. That will keep it the steadiest you can, holding it. If you can't hold still at ALL, find a flat surface to set it on - or invest in a tripod.
Now, if everything you shoot is out of focus, then that could very well be a camera issue.
- Rule #05 -
Trust your eye. If you have an artistic eye, at all, trust it. Some of the very best shots come from that blinding, gut-reaction of, "I need to snap this photo NOW." There's a reason for that feeling - run with it.

You can only get an action photo if you're ready to go when the action happens. Most times, you can't make it happen again, when you're finally ready.
- Rule #06 -
Get only what you want in the frame. Cropping afterwards, is a simple way to do this, but I'm really talking about knowing what aperture is, and how to use it. On Canon cameras, this is the AV fuction. It might seem a little backwards (at least it felt that way to me) but the smaller the aperture, the less light that enters, giving you MORE depth of field. That means you have a better chance at seeing EVERYTHING in the shot, in focus. You see the front focus object, and everything behind it. The larger the aperture, the less depth you're going to get - meaning the front object with clear, and the rest with blur away.
Using a large aperture, is great for when you don't care about what's going on it the background and want it gone. This is good for editorial photography, and artistic stuff as well.
I couldn't find anything in any of the shots I had saved on this laptop, that showcased the idea as well as the example in the book I recommended earlier. So I took a shot of it, and borrowed it for you all to get the idea.
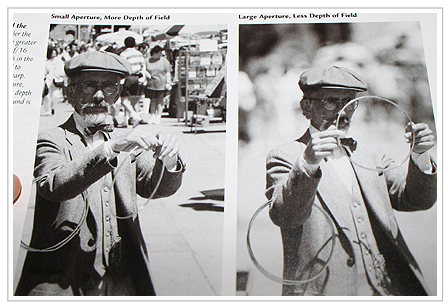
Doesn't the one taken with the large aperture look so much better? It just pops. Stands out way more than the one taken at a small aperture.
- Rule #07 -
Don't be afraid to shoot semi-blind. This goes hand-in-hand with rule #1. If you don't shoot it, you'll never know. You can get some great stuff by shooting semi-blind. Use a little geometry, figure out your rough angle, and aim that camera. You'll know instantly if it was a good, or bad, idea as soon as you've taken it.
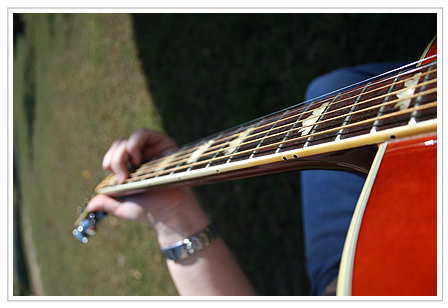
There's not really much of a way to take a picture of yourself, playing the guitar, without a tripod and timer - unless you're going in blind. I set the aperture a little larger than standard to blur out my hand a little more than the guitar, and took the pic.
- Rule #08 -
Understand how light works. If the sun is behind your subject, your shot is backlit, and chances are it WILL be in shadow. This can be very cool, if that's your goal, but if it's not, it can be annoying. If you're getting this effect, you can try to remedy it by setting your shutter speed (on a Canon it's TV) to be open longer. The only problem with this, is that the human body can only hold still so long, and you eventually will move. So go back to your flat surface or tripod if you really need to open that sucker up.
Also, leaving the shutter open for a long time is awesome for light effect photos. That's where you get your movement.
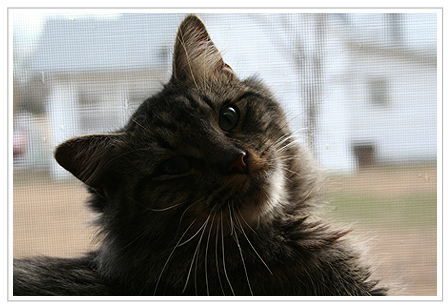
Boone is backlit because he's sitting in a brightly lit window. This can be corrected by opening up the shutter longer, or turning on the flash.

This was taken with a slightly longer shutter speed, from a moving ferris wheel, achieving neat light effect from the carnival below.
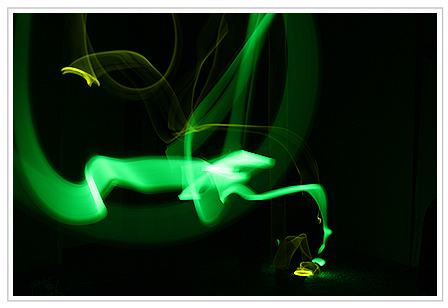
This was taken at an even longer shutter speed, catching everything from the initial crazy movement of the child with the glow sticks - to the moment he lost his grip on the circle and it fell to the floor.
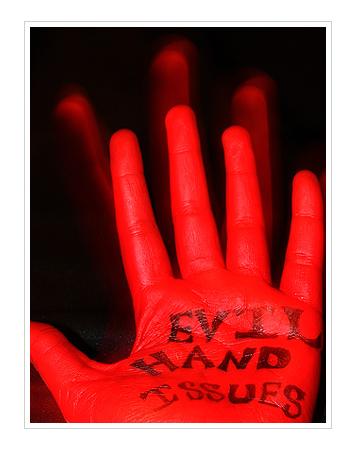
Another purposeful movement shot. This is my evil hand, and to make it look evil, I set the shutter to be open a little longer, and moved. Voila, instant "evil" hand.
- Rule #09 -
Frame it up. Don't be boring. If you icon - or do any other artwork - you don't need to be told that front and center isn't always the best way to make something cool. It isn't evil either. Know what's interesting, for each different shot, and get rid of the rest. If you're far, far away and can't get closer know that cropping the rest afterwards is also key. Get down to the focus.
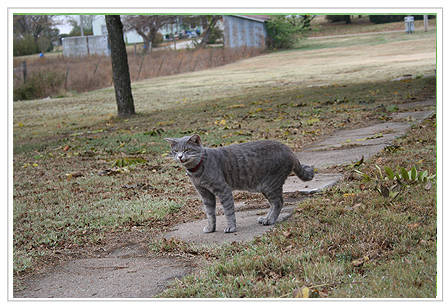
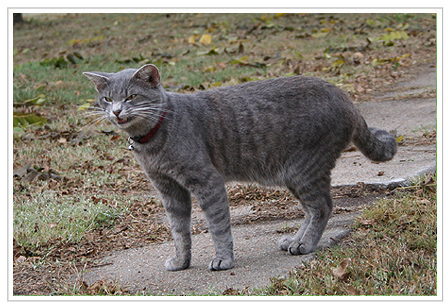
Exact same photo, now which one tells a better story? Sure the first one tells more, but it's a little distracting to the action - the focus. It's just, "Hey, a cat." Not, "Good god, Mehar le Boob is being a bitchy little psychopath again!"
- Rule #10 -
Rules are meant to be broken. Always, always remember that. Some of the coolest stuff is captured when you do things out of the ordinary - against the "proper" procedure. If you can think it up, try it. The worst that can happen is that it won't work out how you planned.
No reposting the images, or text, elsewhere but you're welcome to link to this post if you'd like. :)
That's all I've got for now. If anything else comes to me, and there's an interest, I might to a follow up later. And if you think you have questions I might know the answer to, feel free to ask. :)
The details: Among a few smaller digital cameras, I mainly use a Canon Digital Rebel. It's a great camera, a little pricey and bulky for everyday use, but great. You don't need to spend that much to take fab photos though. It helps, sure, but isn't the only thing that matters, you know?
I have a Canon Rebel SLR, which is a film camera, as well, and love it. I've worked in darkrooms, and that's something everyone that's interested should learn to do. Digital photography is amazing, and love it, but it can't compare to being in a darkroom.
But for this guide, I'm going to talk about digitial photography, since that's what I'm doing the most of now - and chances are, you probably are too.
So I bring you:
- Rule #01 -
Take pictures. Hundreds. Thousands. It's a digital camera - the cost is behind you now, no more buying film - so dammit, why aren't you using it? If they're bad, delete 'em. If they're duplicates, delete 'em. But if you don't snap away, you'll never get anything.
- Rule #02 -
Read your manual. I know, it's boring. Really boring. But if you don't know how to operate all the awesome features that came with your camera, then you're just not going to be able to use it to it's fullest. If you're really interested, read a book or two. I recommend something like A Short Course in Photography. Something not too wordy, with lots of visual examples.
- Rule #03 -
Find your angle. One of the fastest ways to spot a beginner's work is if the angle never changes. Your instinct is to take the picture from where you're standing, that means, anything below you is going to be downwards shot. Don't be afraid to get face-to-face with your subject. As long as your subject isn't a hissing rattlesnake or something. Then, getting to face-to-face with it, is all you. Heh.
Examples:

You can see where I was standing when I spotted my subject. I snapped a pic from there. I'm too far away, I'm looking down on him, and it's an uninteresting shot. So I moved in:

Now, I'm closer to him, and down on his level. Doesn't this shot look more interesting? It does to me.
- Rule #04 -
It's blurry, and/or out of focus, what do I do?! Well, there's two major reasons for blurriness in photography. 1) You moved, or 2) your subject moved. That's it. It's super-easy to detect which is your problem. If something, anything, is in focus in your photograph - your subject moved. You can't do much about that. But it means that you did nothing wrong. Now, if the entire thing is out of blurry - nothing at all is in focus - chances are, you moved.

He's blurry because he moved. There is a focal point on his back. Not a good picture, regardless, but at least you know that there was nothing much you could do to keep him from moving.

This one, nothing is in focus, so I moved.

Focus to your advantage. Make it interesting. Obvious, isn't always best, at least to me. In this one, the focus is on the first tree trunk. Fat Bobby is just lingering in the background. This can be achieved by adjusting your aperture slightly.
If you find that you're having quite a bit of trouble with YOU moving, learn to tuck the camera in. Brace your elbows up against your chest and pull it a close as you can. That will keep it the steadiest you can, holding it. If you can't hold still at ALL, find a flat surface to set it on - or invest in a tripod.
Now, if everything you shoot is out of focus, then that could very well be a camera issue.
- Rule #05 -
Trust your eye. If you have an artistic eye, at all, trust it. Some of the very best shots come from that blinding, gut-reaction of, "I need to snap this photo NOW." There's a reason for that feeling - run with it.

You can only get an action photo if you're ready to go when the action happens. Most times, you can't make it happen again, when you're finally ready.
- Rule #06 -
Get only what you want in the frame. Cropping afterwards, is a simple way to do this, but I'm really talking about knowing what aperture is, and how to use it. On Canon cameras, this is the AV fuction. It might seem a little backwards (at least it felt that way to me) but the smaller the aperture, the less light that enters, giving you MORE depth of field. That means you have a better chance at seeing EVERYTHING in the shot, in focus. You see the front focus object, and everything behind it. The larger the aperture, the less depth you're going to get - meaning the front object with clear, and the rest with blur away.
Using a large aperture, is great for when you don't care about what's going on it the background and want it gone. This is good for editorial photography, and artistic stuff as well.
I couldn't find anything in any of the shots I had saved on this laptop, that showcased the idea as well as the example in the book I recommended earlier. So I took a shot of it, and borrowed it for you all to get the idea.

Doesn't the one taken with the large aperture look so much better? It just pops. Stands out way more than the one taken at a small aperture.
- Rule #07 -
Don't be afraid to shoot semi-blind. This goes hand-in-hand with rule #1. If you don't shoot it, you'll never know. You can get some great stuff by shooting semi-blind. Use a little geometry, figure out your rough angle, and aim that camera. You'll know instantly if it was a good, or bad, idea as soon as you've taken it.

There's not really much of a way to take a picture of yourself, playing the guitar, without a tripod and timer - unless you're going in blind. I set the aperture a little larger than standard to blur out my hand a little more than the guitar, and took the pic.
- Rule #08 -
Understand how light works. If the sun is behind your subject, your shot is backlit, and chances are it WILL be in shadow. This can be very cool, if that's your goal, but if it's not, it can be annoying. If you're getting this effect, you can try to remedy it by setting your shutter speed (on a Canon it's TV) to be open longer. The only problem with this, is that the human body can only hold still so long, and you eventually will move. So go back to your flat surface or tripod if you really need to open that sucker up.
Also, leaving the shutter open for a long time is awesome for light effect photos. That's where you get your movement.

Boone is backlit because he's sitting in a brightly lit window. This can be corrected by opening up the shutter longer, or turning on the flash.

This was taken with a slightly longer shutter speed, from a moving ferris wheel, achieving neat light effect from the carnival below.

This was taken at an even longer shutter speed, catching everything from the initial crazy movement of the child with the glow sticks - to the moment he lost his grip on the circle and it fell to the floor.

Another purposeful movement shot. This is my evil hand, and to make it look evil, I set the shutter to be open a little longer, and moved. Voila, instant "evil" hand.
- Rule #09 -
Frame it up. Don't be boring. If you icon - or do any other artwork - you don't need to be told that front and center isn't always the best way to make something cool. It isn't evil either. Know what's interesting, for each different shot, and get rid of the rest. If you're far, far away and can't get closer know that cropping the rest afterwards is also key. Get down to the focus.


Exact same photo, now which one tells a better story? Sure the first one tells more, but it's a little distracting to the action - the focus. It's just, "Hey, a cat." Not, "Good god, Mehar le Boob is being a bitchy little psychopath again!"
- Rule #10 -
Rules are meant to be broken. Always, always remember that. Some of the coolest stuff is captured when you do things out of the ordinary - against the "proper" procedure. If you can think it up, try it. The worst that can happen is that it won't work out how you planned.
No reposting the images, or text, elsewhere but you're welcome to link to this post if you'd like. :)
That's all I've got for now. If anything else comes to me, and there's an interest, I might to a follow up later. And if you think you have questions I might know the answer to, feel free to ask. :)