Tutorial #1
Since parkbenches asked so nicely. My first tutorial...
TUTORIAL
How to make:

or
Using Photoshop CS2
Start off with your picture. I chose this picture from JustJared[dot]com.
Without cropping or anything, add a new layer and filled it with #EBEBEB.
Set to Soft Light at 50%.
Duplicate your image and drag to top.
Set to Soft Light at 71%
Create a new Selective Colouring layer
Red: -100, 0, +100, 0
Yellow: -100, 0, -100, 0
Cyan: +100, 0, -100, 0
Blue: +100, 0, -100, 0
White: -49, 0, 0, 0
Neutral: +100, +28, +26, -32
Duplicate the Selective Colouring layer.
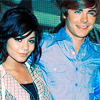
Crop your image into a 100x100 icon.
Result:

OR
Create a new layer.
Click Ctrl+Alt+Shift+E (this will copy you entire icon)
Change the image size to 50% (or 50 pixels, whichever, it means the same)
Copy the icon (Ctrl+C) and then go back in your History to where you've only created a new layer (before changing the image size). Paste (Ctrl+V) the small image (twice) and position them where you like. Sharpen it if necessary.
Create a new layer underneath the small images. Fill with #EBEBEB.
Still under the two images (but over the coloured layer), create a new layer and using the Custom Shape (squiggly blob), select a flowery shape.
Make the flowery shape in # 0D202A and make it big enough to show a little over the two images.
Set to Soft Light.
(I also made smaller shapes and flipped/rotated to add little more decoration)
Create a new layer and add text.
I added ">>>>" in #0D202A, Rockwell Extra Bold, size 2 (one line at 50% the other at 100%, set to Soft Light and duplicated three times)
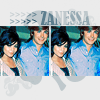
and "ZANESSA" in #0D202A, Bernard MT Condensed, size 4 (Set to Soft Light and duplicated twice).
Result:

Hopefully this wasn't TOO confusing. Let me know if there's questions or anything.
TUTORIAL
How to make:
or
Using Photoshop CS2
Start off with your picture. I chose this picture from JustJared[dot]com.
Without cropping or anything, add a new layer and filled it with #EBEBEB.
Set to Soft Light at 50%.
Duplicate your image and drag to top.
Set to Soft Light at 71%
Create a new Selective Colouring layer
Red: -100, 0, +100, 0
Yellow: -100, 0, -100, 0
Cyan: +100, 0, -100, 0
Blue: +100, 0, -100, 0
White: -49, 0, 0, 0
Neutral: +100, +28, +26, -32
Duplicate the Selective Colouring layer.
Crop your image into a 100x100 icon.
Result:
OR
Create a new layer.
Click Ctrl+Alt+Shift+E (this will copy you entire icon)
Change the image size to 50% (or 50 pixels, whichever, it means the same)
Copy the icon (Ctrl+C) and then go back in your History to where you've only created a new layer (before changing the image size). Paste (Ctrl+V) the small image (twice) and position them where you like. Sharpen it if necessary.
Create a new layer underneath the small images. Fill with #EBEBEB.
Still under the two images (but over the coloured layer), create a new layer and using the Custom Shape (squiggly blob), select a flowery shape.
Make the flowery shape in # 0D202A and make it big enough to show a little over the two images.
Set to Soft Light.
(I also made smaller shapes and flipped/rotated to add little more decoration)
Create a new layer and add text.
I added ">>>>" in #0D202A, Rockwell Extra Bold, size 2 (one line at 50% the other at 100%, set to Soft Light and duplicated three times)
and "ZANESSA" in #0D202A, Bernard MT Condensed, size 4 (Set to Soft Light and duplicated twice).
Result:
Hopefully this wasn't TOO confusing. Let me know if there's questions or anything.