Icon Tutorial 003
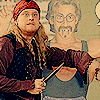
Today we will recreate this icon:

T U T O R I A L . N O. 3
Today I'll help you recreate the following icon:

Program: Adobe Photoshop 7 ;; I'm sure it's translatable
Experience/Previous Knowledge: Must know basic Photoshop commands
Requested by: _likeablade
C R E A T I O N

Step 1
Find your pic, crop, resize, ect. Sharpen x2 - on the second sharpen, go to Edit>>Fade Sharpen. I don't remember what I entered in, but choose an opacity you like best.
After you sharpen, duplicate the base once. Desaturate it (ctrl+shift+U) and set this layer to Soft Light.

Step 2
Duplicate your BASE (the colored one) and drag it to the top. Set this layer to Screen.

Step 3
Create a new curves layer. Enter the following values:
RGB:
Point 1 - 85, 123
Point 2 - 191, 206
Red:
Point 1 - 160, 198
Point 2 - 98, 88
Green:
Point 1 - 81, 77
Point 2 - 144, 172
Blue:
Point 1 - 162, 141

Step 4
Create a new layer. Fill this with #FBF3D9 and set it to Color Burn (simply Burn for PSP users).

Step 5
Create a new layer. Fill this with #01152C and set it to Exclusion.

Step 6
Create a new layer. Fill this with #F3EDD7 and set it to Multiply.

Step 7
Last step! Create a new layer and fill it with #D7E1F6. Set this layer to Multiply @ 61% opacity.
E X A M P L E S


F O O T N O T E S
*Please do not copy this tutorial exactly. Experiment!
*I'd love to see your results! =D
*I hope this tutorial was helpful to you in some way. :]
*Make sure to join catharsis___ to see more of my icons!

T U T O R I A L . N O. 3
Today I'll help you recreate the following icon:

Program: Adobe Photoshop 7 ;; I'm sure it's translatable
Experience/Previous Knowledge: Must know basic Photoshop commands
Requested by: _likeablade
C R E A T I O N

Step 1
Find your pic, crop, resize, ect. Sharpen x2 - on the second sharpen, go to Edit>>Fade Sharpen. I don't remember what I entered in, but choose an opacity you like best.
After you sharpen, duplicate the base once. Desaturate it (ctrl+shift+U) and set this layer to Soft Light.

Step 2
Duplicate your BASE (the colored one) and drag it to the top. Set this layer to Screen.

Step 3
Create a new curves layer. Enter the following values:
RGB:
Point 1 - 85, 123
Point 2 - 191, 206
Red:
Point 1 - 160, 198
Point 2 - 98, 88
Green:
Point 1 - 81, 77
Point 2 - 144, 172
Blue:
Point 1 - 162, 141

Step 4
Create a new layer. Fill this with #FBF3D9 and set it to Color Burn (simply Burn for PSP users).

Step 5
Create a new layer. Fill this with #01152C and set it to Exclusion.

Step 6
Create a new layer. Fill this with #F3EDD7 and set it to Multiply.

Step 7
Last step! Create a new layer and fill it with #D7E1F6. Set this layer to Multiply @ 61% opacity.
E X A M P L E S


F O O T N O T E S
*Please do not copy this tutorial exactly. Experiment!
*I'd love to see your results! =D
*I hope this tutorial was helpful to you in some way. :]
*Make sure to join catharsis___ to see more of my icons!