Tutorials
_not_fade_away asked for a tutorial on blending and how to write text on a picture. It is extremely hard to write a tutorial for blending so please forgive me for any confusion that might ensue.

First let's start with a definition of what blending is. Blending is the combination of two images so they appear to fit, or blend, together. This means there are no obvious lines showing where one image ends and the other begins. Now this is not always possible with every image but you can come close. I've written this tutorial for PSP8 but I'm sure it's simple to translate to other programs.
Start with the two (or more) images you want to blend together. Since I'm working on a batch of SN icons at the moment, I decided to go with these two caps (by marishna) from "Salvation".


First I usually decide which one will be the "background" so I only have to erase the background of one image instead of both. In this case it was pretty obvious that Monica would be in the background and Sam would be in the front.
After this I cleaned up both pictures and made the second one black and white.


The next step is to erase the background of the Sam image. (Make sure your layer is set on "raster" and not "background") This is the real step of blending and it is impossible to describe because you have to do it yourself to get it. But here are some steps/tips:

This is the eraser tool. Click on it and make sure your tool settings are set (like in the image below) on a small size (like 5) so you can make the erasing precise, the hardness is on "0' so it will be smooth and the opacity is on "100" so you erase everything in one stroke.

Once your settings are set, erase! I know it's not that simple but you just have to practice at it until your hands are steady and accurate. Also it is very important that you zoom in when you are erasing so you can see all the details (I usually zoom in "5 steps" or "300%").

A shortcut method to this is to use the program's "erase background tool". You can access it by clicking on the little arrow next to the eraser tool. But be warned it doesn't work with every image and it also requires a lot of practice and precision to master!
Okay once you've erased the background of the Sam image (I chose to only do one side since I knew I'd be cropping it later) it should look like this.

Now copy the image, open the Monica pic and paste it "as a new layer". Then you can move either the Sam image or the Monica image around until you get them where you like them. Then merge the layers and you have a blended image!

In this case I wanted the two images to stand out and be separated but sometimes you want two images to blend so you can't tell that they are separate. To do this you would have to make sure that the two images have the same coloring and contrast which can all be adjusted using different options in the menu.
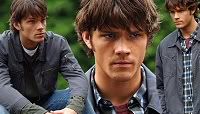
An example of this would be this image

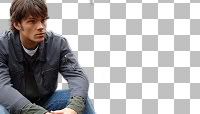
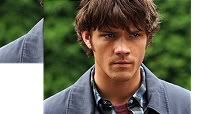
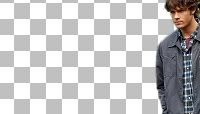
which is made up of the three images below


To sum it up all I can say is that blending requires a lot of practice and time to master. Don't expect it to be perfect right away.
----------------------------------------------------
As for getting good quality text, the only thing I can say is to try lots of different fonts and make sure you text is set on "Anti-alias". You have no idea what a world of difference it makes to have unpixelated text on your icons/graphics.
To do this, first click on the text tool (the big "A"), then click somewhere on the canvas, type in your text and hit "apply". Then go to "Objects" on the main bar and select "Properties". Make sure all your setting are the same as the image below and you are all set (to change the font color just click on the black and select a new one from the color palette).

IMPORTANT!
I know it doesn't apply much to these tutorials but please remember that tutorials are guides and are not meant to be copied step-for-step. It is okay to do that when you are practicing but do not post icons in the exact same style as a tutorial and definitely DO NOT enter icons made using tutorials into contests. I know it sounds stupid but it has happened to me many times before and is the main reason why I don't write style tutorials anymore. But like I said before, that doesn't really apply to these tutorials since they are teaching a technique and not a style but please keep it in mind when you use other tutorials in the future.
First let's start with a definition of what blending is. Blending is the combination of two images so they appear to fit, or blend, together. This means there are no obvious lines showing where one image ends and the other begins. Now this is not always possible with every image but you can come close. I've written this tutorial for PSP8 but I'm sure it's simple to translate to other programs.
Start with the two (or more) images you want to blend together. Since I'm working on a batch of SN icons at the moment, I decided to go with these two caps (by marishna) from "Salvation".
First I usually decide which one will be the "background" so I only have to erase the background of one image instead of both. In this case it was pretty obvious that Monica would be in the background and Sam would be in the front.
After this I cleaned up both pictures and made the second one black and white.
The next step is to erase the background of the Sam image. (Make sure your layer is set on "raster" and not "background") This is the real step of blending and it is impossible to describe because you have to do it yourself to get it. But here are some steps/tips:
This is the eraser tool. Click on it and make sure your tool settings are set (like in the image below) on a small size (like 5) so you can make the erasing precise, the hardness is on "0' so it will be smooth and the opacity is on "100" so you erase everything in one stroke.
Once your settings are set, erase! I know it's not that simple but you just have to practice at it until your hands are steady and accurate. Also it is very important that you zoom in when you are erasing so you can see all the details (I usually zoom in "5 steps" or "300%").
A shortcut method to this is to use the program's "erase background tool". You can access it by clicking on the little arrow next to the eraser tool. But be warned it doesn't work with every image and it also requires a lot of practice and precision to master!
Okay once you've erased the background of the Sam image (I chose to only do one side since I knew I'd be cropping it later) it should look like this.
Now copy the image, open the Monica pic and paste it "as a new layer". Then you can move either the Sam image or the Monica image around until you get them where you like them. Then merge the layers and you have a blended image!
In this case I wanted the two images to stand out and be separated but sometimes you want two images to blend so you can't tell that they are separate. To do this you would have to make sure that the two images have the same coloring and contrast which can all be adjusted using different options in the menu.
An example of this would be this image
which is made up of the three images below
To sum it up all I can say is that blending requires a lot of practice and time to master. Don't expect it to be perfect right away.
----------------------------------------------------
As for getting good quality text, the only thing I can say is to try lots of different fonts and make sure you text is set on "Anti-alias". You have no idea what a world of difference it makes to have unpixelated text on your icons/graphics.
To do this, first click on the text tool (the big "A"), then click somewhere on the canvas, type in your text and hit "apply". Then go to "Objects" on the main bar and select "Properties". Make sure all your setting are the same as the image below and you are all set (to change the font color just click on the black and select a new one from the color palette).
IMPORTANT!
I know it doesn't apply much to these tutorials but please remember that tutorials are guides and are not meant to be copied step-for-step. It is okay to do that when you are practicing but do not post icons in the exact same style as a tutorial and definitely DO NOT enter icons made using tutorials into contests. I know it sounds stupid but it has happened to me many times before and is the main reason why I don't write style tutorials anymore. But like I said before, that doesn't really apply to these tutorials since they are teaching a technique and not a style but please keep it in mind when you use other tutorials in the future.