Edible iPhone
I found out a week ago that it was Ruth's birthday on Wednesday, and since she helped me SO much the ENTIRE week before the Hogwarts party, I wanted to do something cool for a cake or something for her even though I knew we'd already have alto cake for sectionals, which is a tradition. I remembered how excited she was to get her iPhone since I was there with her in San Luis Obispo, so I thought I could use the iPhone bag I got, make a mini-"cake" that was larger than a real iPhone to reproduce detail, but still fit inside the iPhone bag. The problem was that I was gone for Labor Day weekend, plus had Tuesday night plans, so getting it ready for Wednesday was a challenge!
The Making of the Edible iPhone
My estimate of the total time involved to create the Edible iPhone was about 7 hours of work, mostly painting icons and doing lettering, not including waiting for anything to dry or set. I started with mixing up the modeling chocolate the Thursday before since it had to set up in the fridge anyway, then started work rolling out shapes on Monday since it was a holiday. Not having air conditioning and working with modeling chocolate in the California heat isn't easy! The trick is to keep chilling the chocolate again once it gets too sticky to form or roll out.
1. Homemade modeling chocolate for front & back of the iPhone. I added black food coloring to dark 60% cocoa Ghirardelli baking disks when I melted it, then mixed in the corn syrup. The white is candy melts with corn syrup.
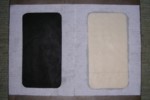
Modeling chocolate front & back of Edible iPhone
2. To form the icon buttons I rolled out a thin layer of white chocolate modeling clay, cut them into squares with a straight-edge pastry cutter, then gently trimmed & rounded the corners by hand before laying them out on wax paper to dry.
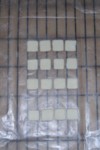
iPhone iCons ready for painting
3. Here are the iPhone icons painstakingly painted with food coloring. Note the calendar says 5 since Ruth's birthday is the 5th. Painting on chocolate is difficult because the surface is waxy so the liquid beads on the surface. Also I obviously need new fine point brushes (argh! :P ) AND my food coloring pens are all mostly run dry! Glad I at least found out before needing them for Halloween!
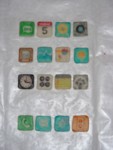
Handpainted iPhone icons
4. I had decided since we were already having cake and my scale was much smaller, crispy marshmallow treats would be the way to go for the iPhone structure, then the rest of the marshmallow treats would hold Happy Birthday candles and be for our group to eat. I molded the marshmallow treats into the correct shape with rounded sides and corners, then let it sit to cool completely before adding the back of the iPhone. Here is the back of iPhone gently molded around the cooled rice crispy marshmallow treats, then painted silver with luster dust and vodka. I used leftover buttercream icing from my freezer stash to anchor the chocolate to the marshmallow treats.
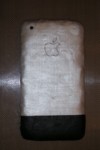
Back of Edible iPhone - see the Apple logo?
5. Here is the silver text added to the front of the Edible iPhone. Since I had discovered my brushes were toast and would never give me as fine detail for that size lettering, I used a wooden toothpick to write with the silver luster dust in vodka. The silver text on pale silver background at the bottom was a challenge. Note the time is 7:30pm, the time I planned to give this to the birthday girl. I had wanted to recess all the icons, but I knew I would run out of time, so only the bottom 4 are recessed into the black chocolate. The others are glued on with melted Ghirardelli semi-sweet chocolate chips.
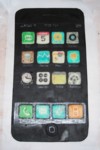
Silver text added to the front of the Edible iPhone
6. Here is the Edible iPhone completely assembled, with the front glued on with buttercream icing, then I added a gray modeling chocolate edge to be the shiny silver edging and to anchor everything together. Trying to distinguish between the matte silver finish on the back and the shiny chrome effect was hard using the same silver luster dust.
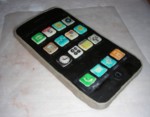
Edible iPhone completely assembled but not quite finished
7. I did like how the curved corners turned out, especially on the black back bottom. I did add a docking port at the bottom, the bottom front button, the top speaker "button" and the ringer and volume buttons on the side. After adding the silver to the gray edges, the back had several fingerprints that annoyed me, so I re-silvered the back, then put it in the fridge to be sure it wouldn't melt in my house before I could give it to the birthday girl!
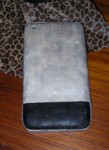
Back of the completed iPhone, now with ringer and volume buttons on the side
8. The whole reason for the small size of this birthday "cake" was to fit it inside the opening weekend iPhone bag I had already, since I thought that would make the whole experience even funnier. I thought Ruth would like the leopard print tissue paper, so I was ready for a photo shoot! Nice sleek model resting on animal prints! ;)
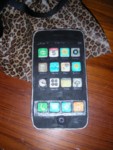
Edible iPhone closeup (click to enlarge) - can you see the full 5 bars of AT&T signal plus full wifi? ;)
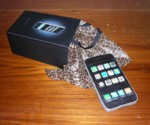
Edible iPhone with opening weekend iPhone bag
Ruth absolutely LOVED it, as you can see from the gallery photos towards the end…and all the altos laughed hysterically when we saw her reverse forced perspective shot making them look the same size…LOL!!! :D
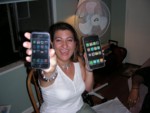
The Birthday Girl - real vs edible iPhones - can you tell which is which? ;)
However, the kicker that REALLY had me in in stitches was Ruth's email reply to the altos:
Britta - you are AMAZING! What a gift. And iGot to share it all y'all. iSpeachless and iOverwhelmed.
Thanks again for such an incredible end of the Best Birthday Ever!
I am so fortunate!
Ruth
Sent from my (non-edible) iPhone
(I'm working on hacking the edible one.)
HAHAHAHAHAHAHAHA! :D I really want a photo of Ruth taking a bite of her Edible iPhone, but she is still too busy showing it off to everyone at work & whoever will sit still enough to see it, so I'm not sure when I'll actually get that photo!
Everyone have a great weekend!
The Making of the Edible iPhone
My estimate of the total time involved to create the Edible iPhone was about 7 hours of work, mostly painting icons and doing lettering, not including waiting for anything to dry or set. I started with mixing up the modeling chocolate the Thursday before since it had to set up in the fridge anyway, then started work rolling out shapes on Monday since it was a holiday. Not having air conditioning and working with modeling chocolate in the California heat isn't easy! The trick is to keep chilling the chocolate again once it gets too sticky to form or roll out.
1. Homemade modeling chocolate for front & back of the iPhone. I added black food coloring to dark 60% cocoa Ghirardelli baking disks when I melted it, then mixed in the corn syrup. The white is candy melts with corn syrup.
Modeling chocolate front & back of Edible iPhone
2. To form the icon buttons I rolled out a thin layer of white chocolate modeling clay, cut them into squares with a straight-edge pastry cutter, then gently trimmed & rounded the corners by hand before laying them out on wax paper to dry.
iPhone iCons ready for painting
3. Here are the iPhone icons painstakingly painted with food coloring. Note the calendar says 5 since Ruth's birthday is the 5th. Painting on chocolate is difficult because the surface is waxy so the liquid beads on the surface. Also I obviously need new fine point brushes (argh! :P ) AND my food coloring pens are all mostly run dry! Glad I at least found out before needing them for Halloween!
Handpainted iPhone icons
4. I had decided since we were already having cake and my scale was much smaller, crispy marshmallow treats would be the way to go for the iPhone structure, then the rest of the marshmallow treats would hold Happy Birthday candles and be for our group to eat. I molded the marshmallow treats into the correct shape with rounded sides and corners, then let it sit to cool completely before adding the back of the iPhone. Here is the back of iPhone gently molded around the cooled rice crispy marshmallow treats, then painted silver with luster dust and vodka. I used leftover buttercream icing from my freezer stash to anchor the chocolate to the marshmallow treats.
Back of Edible iPhone - see the Apple logo?
5. Here is the silver text added to the front of the Edible iPhone. Since I had discovered my brushes were toast and would never give me as fine detail for that size lettering, I used a wooden toothpick to write with the silver luster dust in vodka. The silver text on pale silver background at the bottom was a challenge. Note the time is 7:30pm, the time I planned to give this to the birthday girl. I had wanted to recess all the icons, but I knew I would run out of time, so only the bottom 4 are recessed into the black chocolate. The others are glued on with melted Ghirardelli semi-sweet chocolate chips.
Silver text added to the front of the Edible iPhone
6. Here is the Edible iPhone completely assembled, with the front glued on with buttercream icing, then I added a gray modeling chocolate edge to be the shiny silver edging and to anchor everything together. Trying to distinguish between the matte silver finish on the back and the shiny chrome effect was hard using the same silver luster dust.
Edible iPhone completely assembled but not quite finished
7. I did like how the curved corners turned out, especially on the black back bottom. I did add a docking port at the bottom, the bottom front button, the top speaker "button" and the ringer and volume buttons on the side. After adding the silver to the gray edges, the back had several fingerprints that annoyed me, so I re-silvered the back, then put it in the fridge to be sure it wouldn't melt in my house before I could give it to the birthday girl!
Back of the completed iPhone, now with ringer and volume buttons on the side
8. The whole reason for the small size of this birthday "cake" was to fit it inside the opening weekend iPhone bag I had already, since I thought that would make the whole experience even funnier. I thought Ruth would like the leopard print tissue paper, so I was ready for a photo shoot! Nice sleek model resting on animal prints! ;)
Edible iPhone closeup (click to enlarge) - can you see the full 5 bars of AT&T signal plus full wifi? ;)
Edible iPhone with opening weekend iPhone bag
Ruth absolutely LOVED it, as you can see from the gallery photos towards the end…and all the altos laughed hysterically when we saw her reverse forced perspective shot making them look the same size…LOL!!! :D
The Birthday Girl - real vs edible iPhones - can you tell which is which? ;)
However, the kicker that REALLY had me in in stitches was Ruth's email reply to the altos:
Britta - you are AMAZING! What a gift. And iGot to share it all y'all. iSpeachless and iOverwhelmed.
Thanks again for such an incredible end of the Best Birthday Ever!
I am so fortunate!
Ruth
Sent from my (non-edible) iPhone
(I'm working on hacking the edible one.)
HAHAHAHAHAHAHAHA! :D I really want a photo of Ruth taking a bite of her Edible iPhone, but she is still too busy showing it off to everyone at work & whoever will sit still enough to see it, so I'm not sure when I'll actually get that photo!
Everyone have a great weekend!