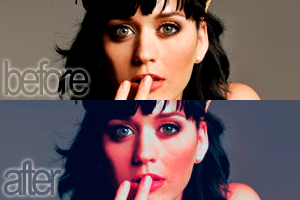
Coloring #3

Program: Photoshop 7
Steps: 7
Has selective coloring, channel mixer, and color fills.
STEP 1.
Prepare your base. Mine is of Katy Perry.

STEP 2.
Add a SELECTIVE COLORING layer with the settings of:
RED: -100; 0; 0; +100
WHITE: +100; -100; -16; -72
NEUTRAL: +37; +15; +1; -7
BLACK: +5;-6;-12;+2
This makes the reds stand out just a tad more.

STEP 3.
Add a FILL layer with the color #DF7A3D. Set it to COLOR BURN at 10% opacity.
This makes her skin a bit more fleshier and orange.

STEP 4.
Add a CHANNEL MIXER level with the settings of:
RED: +103; -5; -10
GREEN: +4; +102; -12
BLUE: +5; +4; +96
This mutes the orange a bit, but still lets the red flourish.

STEP 5.
Add another SELECTIVE COLORING layer with the settings of:
RED: 0; 0; -27; 0
WHITE: +65; +31; -36; -12
I'm not really sure why I put this here, but it makes the yellows turn a tag blue.

STEP 6.
Add a FILL layer with the color #0F0F29. Set it to EXCULSION at 50% opacity.

STEP 7.
Add a SELECTIVE COLORING level with the settings of:
RED: -50; 0; 0; +0
And you're done!

Other examples:


Please comment if you take the PSD! Which you can find {here}!