Eh.. I forgot the brush.
HOW TO MAKE STROKE
1, copy and paste the image you want to graphic on, merge it with the background layer, thus making one layer for the entire document.
2, duplicate the background layer.
[ Short cut > CTRL+J }
3, select the new layer and Layer Style it.
In the layer bar inself, there's a strip that has tiny tabs, for example you'll see a tiny tab of a garbage bin? You should click the "Fx" and from there click Stroke.
You find it manually too.
[ Layer > Layer Style... > Stroke... }
4, the Layer Style box will pop, change the setting to suit your icon style.
Make sure the position is Inside.
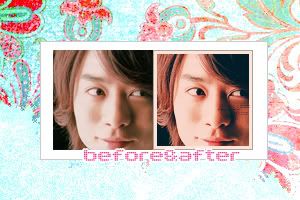
HOW TO MAKE STROKE II
[ the one in the preview picture }
1, First of all.. Sorry there's no display preview to show you the process, I forgot...
(I was doing this during class and totally forgot that we had a quiz and had to clear my mind a tad)
2, Copy, paste, duplicate and Soft Light.
3, Sharpen the layer and duplicate.
[ Filter > Sharpen > Sharpen }
4, Fill a new layer with #000aof and set to Exclusion, duplicate twice.
5. Time to merge. (Don't merge the filled colored layers!!)
Merge the first image to the bakcground, then the second, then third.
Do this accordingly, don't start from the top picture.
Once the image picture is all merged, duplicate it.
6. Put stroke. I already explained how, but this time, set the size up to 3. I have it white, but feel free to choose what you want. If you're wondering why it's creamy in mine, it's the filled colored layers fault.
7. Merge this newly duplicated stroked layer with the background and duplicate once more. Add stroke, and lessen the size to 1.
{ NOTE| To apply that tiny text texture. Use your brush. Leave the pointer at 1px and click randomly upon your design desire. Lower the opacity if you'd like. }

cant think of a proper title xD
COLOR CHANGE
1, copy and paste the image wanted.
2, duplicate and set to Soft Light or Hard Light.
[ Short cut > Ctrl+J }
3, Duplicate that layer and change the setting to Screen.
4, Create a new layer and filled with #160101, set it to Exclusion and duplicate it.
[ Short cut > Shift+Ctrl+N }
5. Go under these two layers and put Selective Colors and Hue/Saturation.
First, proceed to Hue/Saturation.
[ Layer > New Adjustment Layer > Hue/Saturation }
//MY-SETTING>
Saturation: 19
When you're done with changing the saturation, do it.
[ Layer > New Adjustment Layer > Selective Color }
//MY-SETTING>
{ NOTE| If your image doesn't have the colors of red for instance, don't use change the settings in Colos: Reds, but instead choose a color your image might
have. }
+ Reds+
Cyan: -39
Magenta: -54
Yellow: -99
Black: -22
+ Cyans+
Black: -57
+ Blues+
Black: -35
+ Whites+
Black: 41
+ Blacks+
Yellow: -15
Black 18