For Jane
I was going to a DJ exhibition that was happening tonight BUT it was canceled so instead I made a quick and dirty smocking tutorial for aznenchantress.
What is smocking? It's a method of gathering fabric that provides stretch to an area. Dressmakers used it before the invention of elastic for areas such as necklines and cuffs. Why quick and dirty? There are two main types of smocking, English and North American. English smocking involves gathering pleated fabric. And pleating fabric takes time...and I'm lazy. North American smocking does not involve pleats.
With English and North American there are many different pattern types available. In this tutorial I'll be introducing the Lattice Pattern because it's pretty.

1) For the sample you'll need the following tools:
A piece of fabric -I'm using muslin but you can use whatever you feel comfortable with as long as it's not too thick. Make sure the fabric is ironed. It also helps if the fabric is plain - no patterns or whatever.
A ruler - a transparent 2-inch wide ruler is ideal but any ruler will do.
Marking tools - In the tutorial I use a variety of marking tools including a Sharpie, fabric pencils and a ball-point pen but you really only need one.
Needle and thread - For the sample you might want to use a contrasting color thread but that's up to you.

2) Using your ruler and marker make nine columns of eight dots. Each dot should be an equal distance away from each other. In this sample the dots are all an inch away from each other.

3) This step is optional but you'll probably want to do it for your first sample. Once you get your dots mapped out start numbering them. Starting at the second dot of the second column number the dots using odd numbers. Then use your ruler to start mapping the lattice pattern. Draw a line from the Dot 1 to the first dot in the first column. Mark this dot 2. Then draw a line from Dot 3 to the second dot in the third column. Mark this dot 4. Keep labeling the dots in this fashion until you get to the end of the row.

If you want - create another lattice pattern starting in column 4 and continue to do so for the rest of the dots. Sorry for the image, I started playing with the curves tool in Photoshop :)

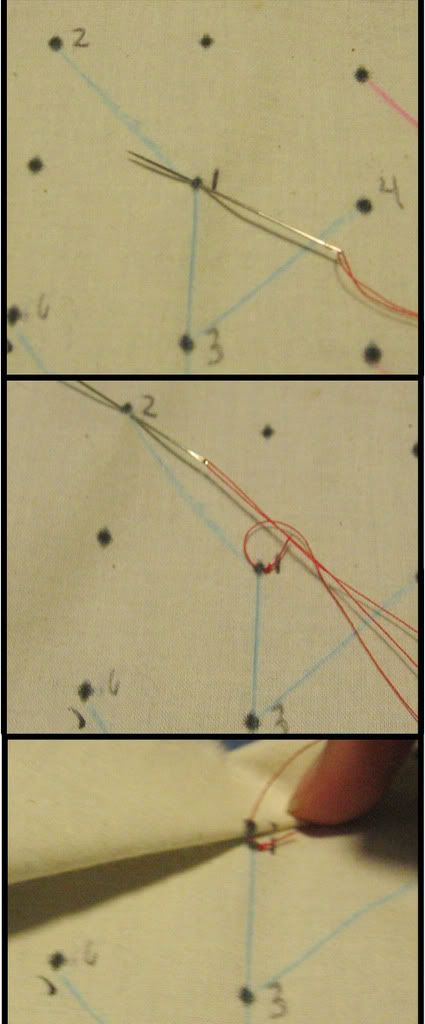
4) Thread your needle and knot the end of your thread, then make a small stitch at Dot 1. Following the lattice pattern make a stitch at Dot 2. Pull the thread tight so the dots are touching.

Then make a stitch at Dot 3 but instead of pulling the thread tight so all three dots are touching make sure there is a 1/2" or more of thread separating Dot 1&2 from Dot 3. If you don't want your smocking to be so quick and dirty (and more secure), you can tie a knot at knot 1&2 then start over at knot 3&4. (I really hope that makes sense...)
So anyway, using the pattern continue to group the even numbered dots with the odd numbered dots. Here is what your fabric should look like once you're done with your first row.

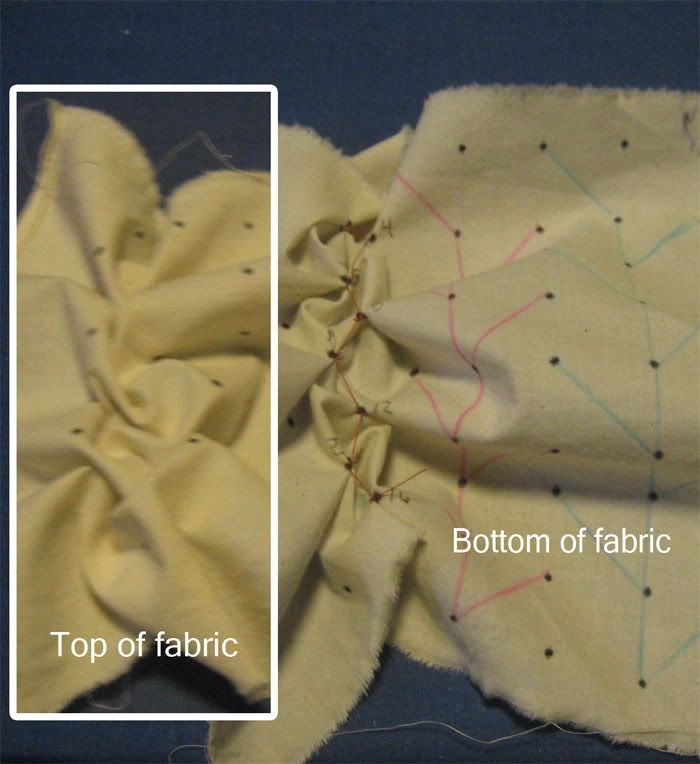
5) Obviously that doesn't look like much but keep following the lattice patterns until you finish all nine rows. At which point your fabric should look something like the picture below. Some things to point out, the ugly little dips in the muslin sample is cause by pulling the thread too tightly. The polyester satin, however, is so slippery that it's more forgiving when it comes to tight pulls. This is probably the only time polyester satin is good. Only. Ever.

What is smocking? It's a method of gathering fabric that provides stretch to an area. Dressmakers used it before the invention of elastic for areas such as necklines and cuffs. Why quick and dirty? There are two main types of smocking, English and North American. English smocking involves gathering pleated fabric. And pleating fabric takes time...and I'm lazy. North American smocking does not involve pleats.
With English and North American there are many different pattern types available. In this tutorial I'll be introducing the Lattice Pattern because it's pretty.

1) For the sample you'll need the following tools:
A piece of fabric -I'm using muslin but you can use whatever you feel comfortable with as long as it's not too thick. Make sure the fabric is ironed. It also helps if the fabric is plain - no patterns or whatever.
A ruler - a transparent 2-inch wide ruler is ideal but any ruler will do.
Marking tools - In the tutorial I use a variety of marking tools including a Sharpie, fabric pencils and a ball-point pen but you really only need one.
Needle and thread - For the sample you might want to use a contrasting color thread but that's up to you.

2) Using your ruler and marker make nine columns of eight dots. Each dot should be an equal distance away from each other. In this sample the dots are all an inch away from each other.

3) This step is optional but you'll probably want to do it for your first sample. Once you get your dots mapped out start numbering them. Starting at the second dot of the second column number the dots using odd numbers. Then use your ruler to start mapping the lattice pattern. Draw a line from the Dot 1 to the first dot in the first column. Mark this dot 2. Then draw a line from Dot 3 to the second dot in the third column. Mark this dot 4. Keep labeling the dots in this fashion until you get to the end of the row.

If you want - create another lattice pattern starting in column 4 and continue to do so for the rest of the dots. Sorry for the image, I started playing with the curves tool in Photoshop :)

4) Thread your needle and knot the end of your thread, then make a small stitch at Dot 1. Following the lattice pattern make a stitch at Dot 2. Pull the thread tight so the dots are touching.

Then make a stitch at Dot 3 but instead of pulling the thread tight so all three dots are touching make sure there is a 1/2" or more of thread separating Dot 1&2 from Dot 3. If you don't want your smocking to be so quick and dirty (and more secure), you can tie a knot at knot 1&2 then start over at knot 3&4. (I really hope that makes sense...)
So anyway, using the pattern continue to group the even numbered dots with the odd numbered dots. Here is what your fabric should look like once you're done with your first row.

5) Obviously that doesn't look like much but keep following the lattice patterns until you finish all nine rows. At which point your fabric should look something like the picture below. Some things to point out, the ugly little dips in the muslin sample is cause by pulling the thread too tightly. The polyester satin, however, is so slippery that it's more forgiving when it comes to tight pulls. This is probably the only time polyester satin is good. Only. Ever.
