(GIMP) Icon Tutorial // Nicki Minaj
From this to 
Using strictly curves and an optional screen layer.
This is a easy tutorial (I think) and starts as an introduction into GIMP's curve feature. Your end result should have a minimum of two layers: the base and the optional screen layer.

You start with a regular image. (In this example, I grabbed a screencap of Nicki Minaj.) Crop and resize the image. I like to use the scale tool (shift+t) because I think it gives the image a smoother finish than just resizing.
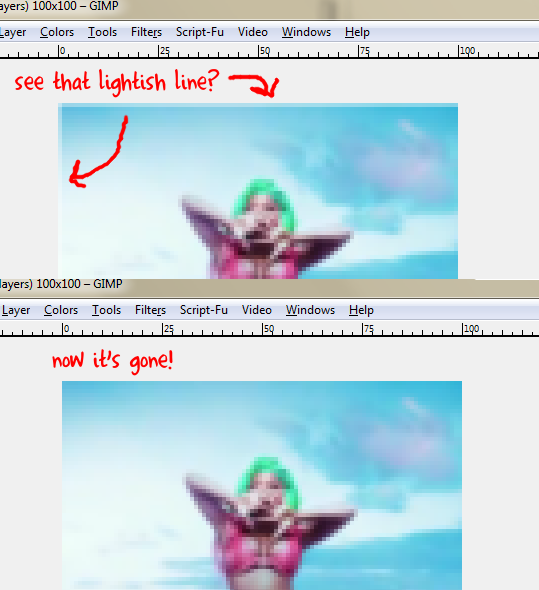
If you do use the scale tool, you will need to duplicate (ctrl+shift+d) your image a couple of times and then flatten it. I usually duplicate it around six times. This darkens the border so you don't have a weird, light line around it.
Go to Colors > Curves. Now it's time to experiment! The awesome thing about curves is that just a little tweaking can go a long way. I ended up with these settings:

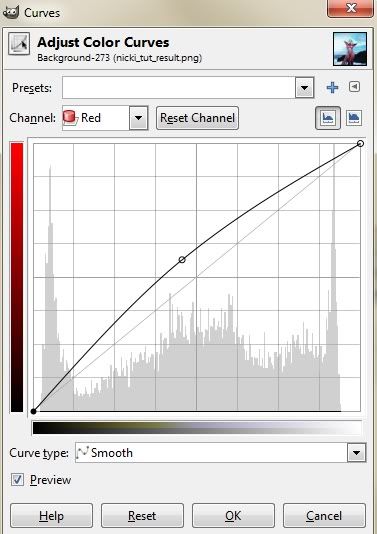
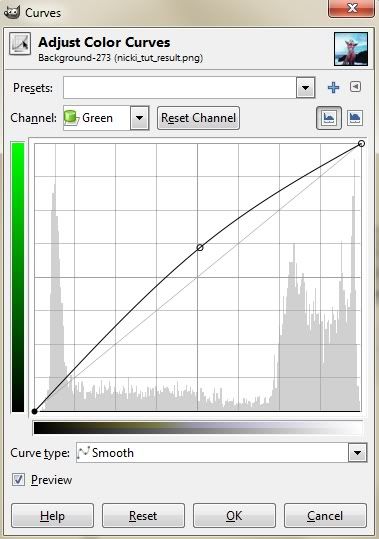
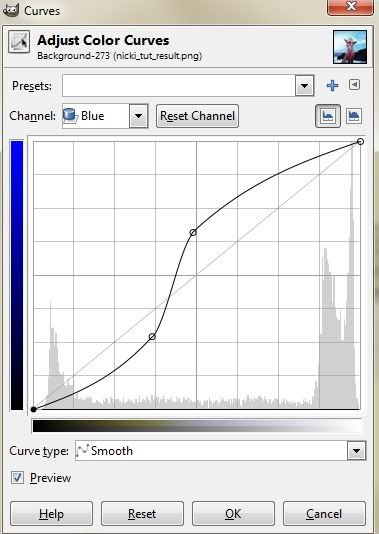
Click "OK". Your icon should look something like this now:

Now you can take the time to sharpen the image and add some textures if you want. I used Selective Gaussian Blur with a max. delta of 10 (Filters > Blur > Selective Gaussian Blur). This gives the icon a softer edge. Next, I used the sharpen tool (Filters > Enhance > Sharpen) to bring Nicki into focus.

OPTIONAL. I wanted a little more 'umph' in my icon so I decided to create a new layer (Layer > New Layer). I filled it with #220606 and set it to screen. Viola! You're done.


Using strictly curves and an optional screen layer.
This is a easy tutorial (I think) and starts as an introduction into GIMP's curve feature. Your end result should have a minimum of two layers: the base and the optional screen layer.
You start with a regular image. (In this example, I grabbed a screencap of Nicki Minaj.) Crop and resize the image. I like to use the scale tool (shift+t) because I think it gives the image a smoother finish than just resizing.
If you do use the scale tool, you will need to duplicate (ctrl+shift+d) your image a couple of times and then flatten it. I usually duplicate it around six times. This darkens the border so you don't have a weird, light line around it.

Go to Colors > Curves. Now it's time to experiment! The awesome thing about curves is that just a little tweaking can go a long way. I ended up with these settings:


Click "OK". Your icon should look something like this now:

Now you can take the time to sharpen the image and add some textures if you want. I used Selective Gaussian Blur with a max. delta of 10 (Filters > Blur > Selective Gaussian Blur). This gives the icon a softer edge. Next, I used the sharpen tool (Filters > Enhance > Sharpen) to bring Nicki into focus.

OPTIONAL. I wanted a little more 'umph' in my icon so I decided to create a new layer (Layer > New Layer). I filled it with #220606 and set it to screen. Viola! You're done.
