The cap of St. Birgitta
I've been spending the last three weeks sewing the cap of St. Birgitta, as pictured in in the article by Camilla Luise Dahl and Isis in Medieval Clothing and Textiles 4. Earlier, the cap of St. Birgitta was considered to be alike with the men's coifs, but Dahl and Sturtewagen argue quite strongly, that the cap is actually similar to women's headwear seen often in period artwork from 13th to 14th centuries for example in Maciejowski Bible and Tacuinum Sanitatis. This was very exiting, especially since I've seen only one interpretation of this model before, and it differs quite a lot with the cap attributed to St. Birgitta. Personally I like Camilla's and Isis' interpretation more, the other one just doesn't feel medieval to me.
Anyway, I really loved the article and got very exited about the cap, especially once I had a change to talk with Camilla at NESAT X. Luckily, I was able to sew that cap at work, so I didn't have to spend my free time on it. I still counted I used over 70 hours for this project ( I did have to redo some parts though). Here's me sewing the cap at the sunny Seurasaari (I just can't resist).

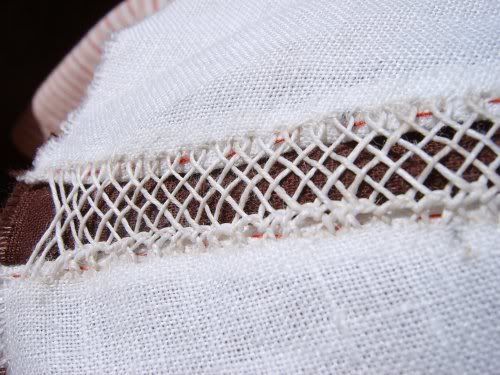
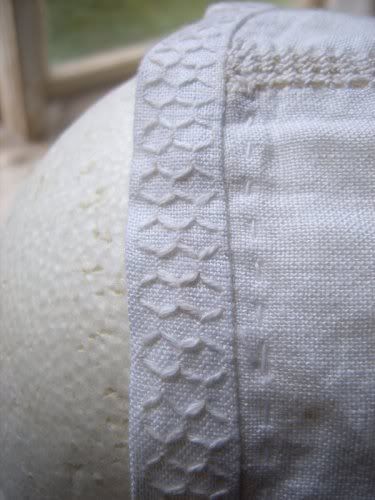
The cap has a very simple construction, it's based on two rectangles with the upper corner of both pieces cut to the shape of the head. The pieces are joined together by using interlaced herringbone stitches with a separate weaving thread intertwining with the stitches and forming an embroidered midsection. The lower edge is then gathered to small pleats and stitched to the front side edge in order to get the pleats lie horizontally. The cap is then edged with an decorative border which also forms the band that is used to tie the cap in place.
The Birgitta cap is made of z-spun linen with the thread count of 32/cm, where as my linen had only 16 threads per centimetre. I used basic linen thread by Gutterman for the seams, and 35/3 linen thread for the embroidery. Silk thread was used to them the the curved edges.
The authors think the cap was originally used by a woman with a head circumference of about 51 cm. Since my head is 3 cm wider, I added 3 centimetres to the measurements, hoping to achieve the correct fit. However, the carrying around and three weeks of construction took their toll, and I had to cut the frayed edges off, resulting that the cap ended up being only a little bigger than the original, and hence a little too small for me.
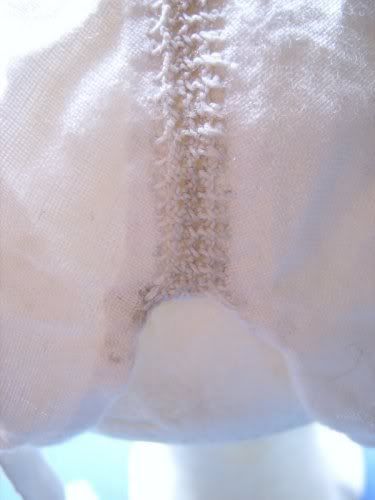
The embroidered midsection took the longest time to work, and I actually had to redo it completely, when I noticed that I just couldn't get a even result without attaching some kind of interfacing to the halves. Even after doing this, I noticed that I sometimes pulled the threads too tight, and my midsection ended up being only 0,5 cm wide, when in the original the gap between the halves was from 0,8 cm to 1,2 cm.
The other tricky part on the embroidered middle section were the beginning and the ending of the section, where the network of herringbone stitches were incomplete. In the upper end the problem was solved by placing the border on top of the uneven embroidery, but on the lover edge I had to stitch the extra thread on the wrong side. To do this, one can not darn in the threads used in the herringbone stitch, before the whole embroidery is complete.
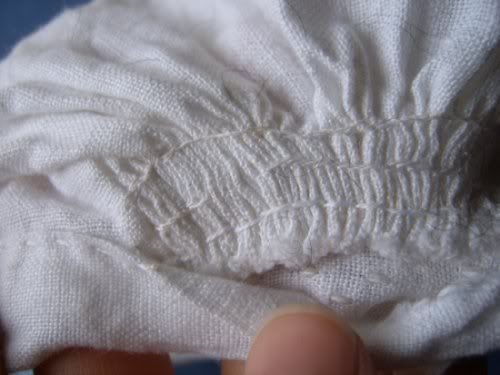
I secured the pleating from the inside with two rows of back stitch. The lower row was hidden under the decorative border, and I unpicked the second row after the attaching the border.
The only thing I did differently was the attaching of the decorative border. Instead of fastening it with hemming stitches from the right side, I used back stitch on the inside. I figured this would create a bit more neat result, and in case i ever wanted, I could still add the hemming.
The decorative border also came out little differently than the original, because of the different thread count. The original border is only 1 cm wide, where as mine is 1,3 cm wide. The embroidery was 24 threads wide, and in the original, it fitted well into one centimetre (32/cm), but my fabric (16/cm) needed a little more space. In the original, the decorative border and the band are both 1 cm wide fro the most part, so I decided to make my band a 1,3 cm wide to match the border.
Here are some pictures of the completed cap.
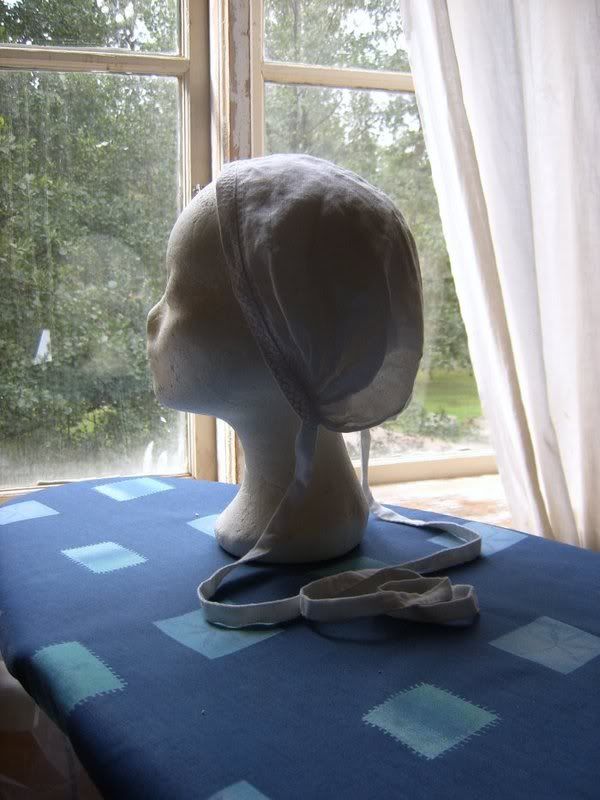

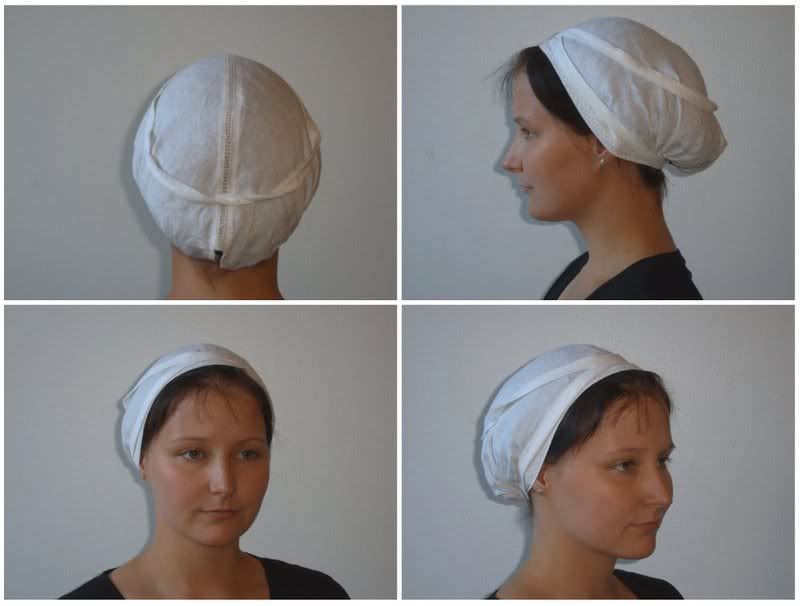
And here is the cap on me.
Anyway, I really loved the article and got very exited about the cap, especially once I had a change to talk with Camilla at NESAT X. Luckily, I was able to sew that cap at work, so I didn't have to spend my free time on it. I still counted I used over 70 hours for this project ( I did have to redo some parts though). Here's me sewing the cap at the sunny Seurasaari (I just can't resist).

The cap has a very simple construction, it's based on two rectangles with the upper corner of both pieces cut to the shape of the head. The pieces are joined together by using interlaced herringbone stitches with a separate weaving thread intertwining with the stitches and forming an embroidered midsection. The lower edge is then gathered to small pleats and stitched to the front side edge in order to get the pleats lie horizontally. The cap is then edged with an decorative border which also forms the band that is used to tie the cap in place.
The Birgitta cap is made of z-spun linen with the thread count of 32/cm, where as my linen had only 16 threads per centimetre. I used basic linen thread by Gutterman for the seams, and 35/3 linen thread for the embroidery. Silk thread was used to them the the curved edges.
The authors think the cap was originally used by a woman with a head circumference of about 51 cm. Since my head is 3 cm wider, I added 3 centimetres to the measurements, hoping to achieve the correct fit. However, the carrying around and three weeks of construction took their toll, and I had to cut the frayed edges off, resulting that the cap ended up being only a little bigger than the original, and hence a little too small for me.
The embroidered midsection took the longest time to work, and I actually had to redo it completely, when I noticed that I just couldn't get a even result without attaching some kind of interfacing to the halves. Even after doing this, I noticed that I sometimes pulled the threads too tight, and my midsection ended up being only 0,5 cm wide, when in the original the gap between the halves was from 0,8 cm to 1,2 cm.
The other tricky part on the embroidered middle section were the beginning and the ending of the section, where the network of herringbone stitches were incomplete. In the upper end the problem was solved by placing the border on top of the uneven embroidery, but on the lover edge I had to stitch the extra thread on the wrong side. To do this, one can not darn in the threads used in the herringbone stitch, before the whole embroidery is complete.


I secured the pleating from the inside with two rows of back stitch. The lower row was hidden under the decorative border, and I unpicked the second row after the attaching the border.
The only thing I did differently was the attaching of the decorative border. Instead of fastening it with hemming stitches from the right side, I used back stitch on the inside. I figured this would create a bit more neat result, and in case i ever wanted, I could still add the hemming.
The decorative border also came out little differently than the original, because of the different thread count. The original border is only 1 cm wide, where as mine is 1,3 cm wide. The embroidery was 24 threads wide, and in the original, it fitted well into one centimetre (32/cm), but my fabric (16/cm) needed a little more space. In the original, the decorative border and the band are both 1 cm wide fro the most part, so I decided to make my band a 1,3 cm wide to match the border.
Here are some pictures of the completed cap.


And here is the cap on me.
