COMEBACK POST - new tutorial!
I know I haven't updated in a zillion years, but it's never too late, so I present you a new tutorial this time! (A quite simple one, I must add.)
We're starting from
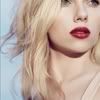
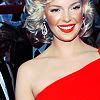
and will get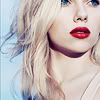
Created in: PS CS3
Good for: photographs with bright red colours
Difficulty: easy
Not translatable.
1. Crop your base, as usual.
2. Duplicate this base layer, and set the second one's blending to Soft Light, 100% (the percentage depends on the image, of course, so you can adjust it freely)
3. Go back to our base, and make it a bit sharper. (Filters -> Sharpen -> Sharpen.)

4. Now we're going to add this fresh icy tone by creating a new cold blue fill layer. New layer -> New Fill Layer -> Blending: Soft Light. The colour I used was #8fa7be.

5. Time to emphasize the red lips and parts and also give our icon an even breezier feeling. Now we're selective colouring.
New Adjustment Layer -> Selective Color.
VALUES:
reds -100, -37, +53, +70
yellows +45, 0, -83, 0
neutrals +39, 0, -25, 0

I know the differences are not so spectacular, but believe me, smaller steps improve the final outcome as well!
6. The last step: we're adding a Curves layer, which is a bit tricky to explain, but I'll try my best. So:
New Adjustment Layer -> Curves.
1st point: O: 225, I: 232
2nd point: O: 217, I: 214
3rd point: O:131, I: 138.
And, there you got it!
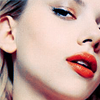
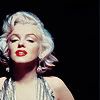
Other examples:
EDIT: you can get the PSD file here, as requested.
We're starting from
and will get
Created in: PS CS3
Good for: photographs with bright red colours
Difficulty: easy
Not translatable.
1. Crop your base, as usual.
2. Duplicate this base layer, and set the second one's blending to Soft Light, 100% (the percentage depends on the image, of course, so you can adjust it freely)
3. Go back to our base, and make it a bit sharper. (Filters -> Sharpen -> Sharpen.)
4. Now we're going to add this fresh icy tone by creating a new cold blue fill layer. New layer -> New Fill Layer -> Blending: Soft Light. The colour I used was #8fa7be.
5. Time to emphasize the red lips and parts and also give our icon an even breezier feeling. Now we're selective colouring.
New Adjustment Layer -> Selective Color.
VALUES:
reds -100, -37, +53, +70
yellows +45, 0, -83, 0
neutrals +39, 0, -25, 0
I know the differences are not so spectacular, but believe me, smaller steps improve the final outcome as well!
6. The last step: we're adding a Curves layer, which is a bit tricky to explain, but I'll try my best. So:
New Adjustment Layer -> Curves.
1st point: O: 225, I: 232
2nd point: O: 217, I: 214
3rd point: O:131, I: 138.
And, there you got it!
Other examples:
EDIT: you can get the PSD file here, as requested.