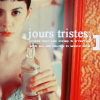
Amelie tutorial - vibrant reds & oranges
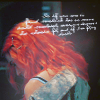
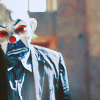
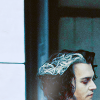
We're starting from and will get:

>>>
MADE IN Photoshop CS3
DIFFICULTY IS easy
GOOD FOR screencaps or photos with a soft yellow shade // with brighter elemens but I guess it suits any kind of picture, you just have to change the settings depending on the one you're using
TRANSLATABLE? not.
1. Crop your base, as usual.
2. Duplicate it TWICE, set the 1st' blending to screen, 100%, the 2nds to soft light. I preferably wouldn't give you any percentage here, because this totally depends on your image, you might omit this soft light layer if the outcome is too harsh, you decide!
3. Back to the screen layer: this also depends on your case, but here I duplicated it, set a quite low opacity (20-30%) AND merged it with the first screen layer. (Ctrl+E) Then sharpened this middle layer. (Filters->Sharpen->Sharpen)

4. Selective colouring! This time we will have two sc. layers, here are the values of the first, to eliminate / balance the yellowness:
reds -100, +10, +41, +45
yellows 0, -77, -100, 0
neutrals +33, 0, -28, 0

5. Second SC layer: (we're emphasizing the red parts)
reds -100, -41, 0, 100
neutrals +27, 0, 0, 0

6. Last step! To soften our icon a bit, we're adding an exclusion layer. (Layer->New Fill Layer->Solid Color) Blending mode: Exclusion, 100%. I used the colour #191202.
ADDITIONAL STEPS:
You can either add tiny text or a lightened part by using a soft round brush at a low opacity. Depends on your taste.
And we're done!
Other examples:
PSD IS HERE!
>>>
MADE IN Photoshop CS3
DIFFICULTY IS easy
GOOD FOR screencaps or photos with a soft yellow shade // with brighter elemens but I guess it suits any kind of picture, you just have to change the settings depending on the one you're using
TRANSLATABLE? not.
1. Crop your base, as usual.
2. Duplicate it TWICE, set the 1st' blending to screen, 100%, the 2nds to soft light. I preferably wouldn't give you any percentage here, because this totally depends on your image, you might omit this soft light layer if the outcome is too harsh, you decide!
3. Back to the screen layer: this also depends on your case, but here I duplicated it, set a quite low opacity (20-30%) AND merged it with the first screen layer. (Ctrl+E) Then sharpened this middle layer. (Filters->Sharpen->Sharpen)
4. Selective colouring! This time we will have two sc. layers, here are the values of the first, to eliminate / balance the yellowness:
reds -100, +10, +41, +45
yellows 0, -77, -100, 0
neutrals +33, 0, -28, 0
5. Second SC layer: (we're emphasizing the red parts)
reds -100, -41, 0, 100
neutrals +27, 0, 0, 0
6. Last step! To soften our icon a bit, we're adding an exclusion layer. (Layer->New Fill Layer->Solid Color) Blending mode: Exclusion, 100%. I used the colour #191202.
ADDITIONAL STEPS:
You can either add tiny text or a lightened part by using a soft round brush at a low opacity. Depends on your taste.
And we're done!
Other examples:
PSD IS HERE!