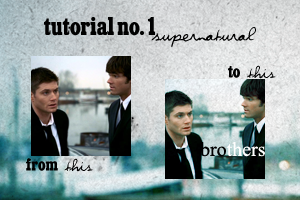
Tutorial #01 - Supernatural
So this afternoon I was bored and I decided to make a tutorial ;) Actually, this is my first tutorial... I hope this will help you !

/!\ With Selective Coloring
Tutorial #01 - Supernatural
Step one: Crop your image and size it to 100x100px. Mine is here from Screencap Paradise.

to
Step two: Duplicate your base and set it to screen 75%. The percentage depends on the darkness of your image.

to
Step three: Open a Curves new adjustement layer. Here are the settings :
RGB : I: 106 O: 134
Red : I: 129 O: 146
Green : I: 118 O: 140
Blue : I: 115 O: 150
Set this layer to 15% opacity.

to
Step four: Open a Selective Color new adjustement layer. The settings :
Reds : 0, +10, +20, 0
Yellows : 0, 0, -75, 0
Neutrals : +30, 0, +15, 0

to
Step five: Open a Solid Color new fill layer and fill it with #3184a5. Then, set it to Soft Light 50%.

to
to
Step six: Open a Selective Color new adjustement layer. The settings :
Reds : -100, 0, +50, 0
Yellows : -100, 0, +50, +20

to
This brings a few colors on the faces.
Step seven: Put this texture by
_excentric_and set it to Multiply. Erase the parts on the faces.

to
Step eight: (Optional) Add some text (mine is Time New Roman, 20pt, strong).

to
Of course, you have to play with the settings to fit your image ^^
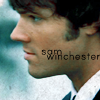
Others icons made with this tutorial :


I'd love to see your results ;)

/!\ With Selective Coloring
Tutorial #01 - Supernatural
Step one: Crop your image and size it to 100x100px. Mine is here from Screencap Paradise.

to

Step two: Duplicate your base and set it to screen 75%. The percentage depends on the darkness of your image.

to

Step three: Open a Curves new adjustement layer. Here are the settings :
RGB : I: 106 O: 134
Red : I: 129 O: 146
Green : I: 118 O: 140
Blue : I: 115 O: 150
Set this layer to 15% opacity.

to

Step four: Open a Selective Color new adjustement layer. The settings :
Reds : 0, +10, +20, 0
Yellows : 0, 0, -75, 0
Neutrals : +30, 0, +15, 0

to

Step five: Open a Solid Color new fill layer and fill it with #3184a5. Then, set it to Soft Light 50%.

to

to

Step six: Open a Selective Color new adjustement layer. The settings :
Reds : -100, 0, +50, 0
Yellows : -100, 0, +50, +20

to

This brings a few colors on the faces.
Step seven: Put this texture by
_excentric_and set it to Multiply. Erase the parts on the faces.

to

Step eight: (Optional) Add some text (mine is Time New Roman, 20pt, strong).

to

Of course, you have to play with the settings to fit your image ^^
Others icons made with this tutorial :


I'd love to see your results ;)