Tutorial 3: Brandon Flowers Framed Icon
How to get this --> 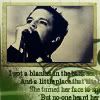
By request of curledfries, here is the tutorial she requested for...
Made from PS7, and does require basic knowledge.
STEP 1: Lets start with our base image.
We will be using this awesome base by gender -->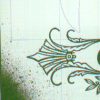
The colour is too light for what I have in mind so insert a new layer on the top and fill with this colour: #F0E9D2
Set to Multiply and you should get a slight aged look
STEP 2: Time to prepare our frame.
Take this base image from iconista and resize it to a smaller frame on it’s own (meaning don’t paste it on top your base yet).

Personally, I resized it to 94x65.
If you want, you can try to erase the white colour around the frame so that it fits better with the icon.
What you need to do now, is try to get it look kind of yellow and old, so here’s what you do:
Duplicate the frame 4 times:
Layer 1: Color Burn
Layer 2: Darken
Layer 3: Multiply
Layer 4: Multiply
Merge them and place it onto your icon image. Set it to Multiply again and your image should look something like this.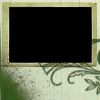
See how the base image of the motiff sort of goes over the frame? Yeah, that’s intentional.
Cool, eh? All right then, on to the next bit.
STEP 3: Flowers in the Frame
(This was actually part of a bigger image, but I just cut to the part I used to save time)
Use this image of Brandon and cut and crop to your preference.

Be sure to do the regular stuff you do with your other images like Sharpening, Contrast, etc, etc. This part I leave to your own discretion.
Ulitmately, the size of this picture, should be smaller than the frame, so resize it to somewhere around 87x57.
After that, place it nicely over the black area of the frame.
The image itself looks too stark and clear, so duplicate that and change the blending layer to Color Burn at 53% and you should get something like this:
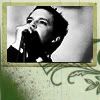
This still looks too stark, so here’s what you do:
Use your Rectangular Marquee Tool and select the area around Brandon.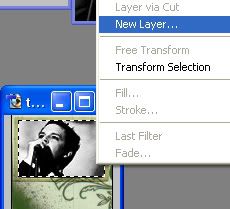
Then right click and select New Layer.
Repeat once more, so that you get 2 layers.
For the first one, fill the layer with this color: #141E57
Set to Exclusion at 62%
For the second one, fill the layer with this color: # B8C0B5
Set to Multiply at 65%
Duplicate the Brandon pic and place it on top of these layers.
Set it to Soft Light at 52%.
So, you should get this: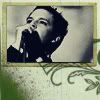
STEP 4: Wax Lyrical
Now to put in the lyrics:
I used Midnight Show and placed it staggered with font Black Widow, set at size 8 and Crisp.
STEP 5: Icing on the Icon:
Now for some depth, what’s an icon without a gradient and light, eh?
So, place a new layer and insert this gradient:
Set at 90 degrees
Blend as Soft Light, 80%
Then insert this light texture by colorfilter

Blend as Screen, 48% Opacity and Fill: 73%
And there it is. Your icon - all nice and spiffy.
I know this is a little bit hard to follow so if there’s anything you don’t get, let me know.
Comments, love, hate and all is muchos welcomed. :)
Good luck and have fun!
By request of curledfries, here is the tutorial she requested for...
Made from PS7, and does require basic knowledge.
STEP 1: Lets start with our base image.
We will be using this awesome base by gender -->
The colour is too light for what I have in mind so insert a new layer on the top and fill with this colour: #F0E9D2
Set to Multiply and you should get a slight aged look
STEP 2: Time to prepare our frame.
Take this base image from iconista and resize it to a smaller frame on it’s own (meaning don’t paste it on top your base yet).
Personally, I resized it to 94x65.
If you want, you can try to erase the white colour around the frame so that it fits better with the icon.
What you need to do now, is try to get it look kind of yellow and old, so here’s what you do:
Duplicate the frame 4 times:
Layer 1: Color Burn
Layer 2: Darken
Layer 3: Multiply
Layer 4: Multiply
Merge them and place it onto your icon image. Set it to Multiply again and your image should look something like this.
See how the base image of the motiff sort of goes over the frame? Yeah, that’s intentional.
Cool, eh? All right then, on to the next bit.
STEP 3: Flowers in the Frame
(This was actually part of a bigger image, but I just cut to the part I used to save time)
Use this image of Brandon and cut and crop to your preference.
Be sure to do the regular stuff you do with your other images like Sharpening, Contrast, etc, etc. This part I leave to your own discretion.
Ulitmately, the size of this picture, should be smaller than the frame, so resize it to somewhere around 87x57.
After that, place it nicely over the black area of the frame.
The image itself looks too stark and clear, so duplicate that and change the blending layer to Color Burn at 53% and you should get something like this:
This still looks too stark, so here’s what you do:
Use your Rectangular Marquee Tool and select the area around Brandon.
Then right click and select New Layer.
Repeat once more, so that you get 2 layers.
For the first one, fill the layer with this color: #141E57
Set to Exclusion at 62%
For the second one, fill the layer with this color: # B8C0B5
Set to Multiply at 65%
Duplicate the Brandon pic and place it on top of these layers.
Set it to Soft Light at 52%.
So, you should get this:
STEP 4: Wax Lyrical
Now to put in the lyrics:
I used Midnight Show and placed it staggered with font Black Widow, set at size 8 and Crisp.
STEP 5: Icing on the Icon:
Now for some depth, what’s an icon without a gradient and light, eh?
So, place a new layer and insert this gradient:
Set at 90 degrees
Blend as Soft Light, 80%
Then insert this light texture by colorfilter
Blend as Screen, 48% Opacity and Fill: 73%
And there it is. Your icon - all nice and spiffy.
I know this is a little bit hard to follow so if there’s anything you don’t get, let me know.
Comments, love, hate and all is muchos welcomed. :)
Good luck and have fun!