Roxas wig tutorial: Er? What happened?
I just went to check how many photos I had listed in total on my Roxas wig tutorial piece of shit on c.com (since I cut my hair and they kinda shaved my neck fuzz since the cut's so short, so I'm styling the neck fluff on Roxas now too, so gonna put up pics and shit to round off the tutorial) and I noticed that though it worked before when I first posted it, the photos don't show anymore. I figure that if they needed to be turned to URL, maybe they were leaching too much bandwidth (though the pics are hosted on photobucket, but I don't know if it was a c.com thing, or if it was a photobucket thing, or if it's just too late at night for my brain to function), but I really dislike looking at anything w/ a list of urls, so I figure other people are the same.
Thus....
Okay, I suck at tutorials, so this is more of a guide with pictures and crappy commentaries. Please don't comment with "that's not how *so and so* said to do it" cause this tutorial is written to how I style my wigs, and I wasn't exactly taught by anyone.
If this tutorial is well received and people actually find it useful, I may post tutorials for other wigs I'm making later.
And anyone who's seen the wigs I've done before know that if it's not rock hard and/or full of spikes, I'm totally useless at styling it. Emo kid (Roxas) is a good balance of both, and I think my 2nd one is a great improvement from my 1st Roxas wig though still not ideal or perfect, but I don't think I have enough patience to ever style a 3rd Roxas wig (inside and outside of commissions), so this will have to do.
Wig Stats:
Brand: Forever Young
Style: Eva (huge overkill considering how much shorter it got cut from it's original length), the new naming scheme has it under "hautness", but a shorter wig would work too.
Colour: 24 (not available after they renamed the line, but there's plenty of similar shades of blonde out there)
The colour really doesn't matter much. Choose what you think is a good colour and the style...if it wasn't that I got it on sale, I wouldn't have used such a long wig to cut down to chin length in no time flat. For spikes the important thing is to make sure the wig has enough hair on it. For that reason, I seriously recommend against buying from most China/Hong Kong sellers on eBay cause while most of them sell decent wigs, they're usually rather thin and don't have nearly enough hair on them to spike properly.
Styling products: Got2b Glued Blasting Freeze Spray
Assistants: Campbell's Chunky New England Clam Chowder (super yum) caringly donated by Infini.
This wig took me about 30 hours to finish. Mind you, about 2/3 of that time was just sitting around waiting for individual spikes to dry before I could move on. A hair dryer helping in the process would have made it go much faster, but I ain't got one, so gotta make do by letting it eat away 2 days of my life.
Do NOT post my words or my photos anywhere else without my permission and so far, the only one who has my permission is ZiggyB. If you try stealing my photos or my words, I'll come and harrass you so bad til you take it down (and trust me, I've done so before and won't hesitate to do it again). If you want to share, please share a LINK to the tutorial instead of copying and pasting my hard work.
Make sure to pin the wig to the wig head before you start!
Spike count: 0
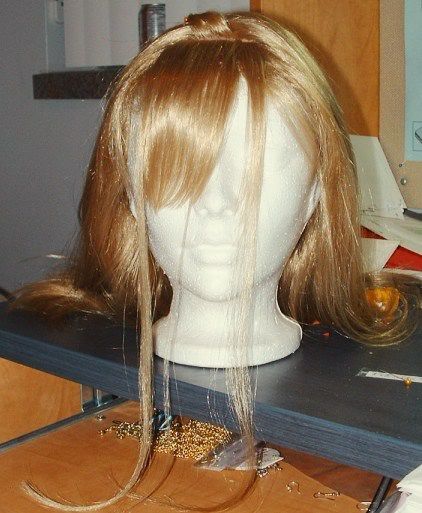
Start off pinning back hair you're not using as of yet. Lots easier to keep hairspray off hair if it's not in it in the first place. Make sure whatever you've sectioned off to spike does not show any netting underneath. Also make sure you've left enough hair elsewhere to style the rest of the wig. Won't do to put all the fiber into a couple of spikes and realize too late that you've run out of hair to style the rest of the wig with.
Spike count: 2
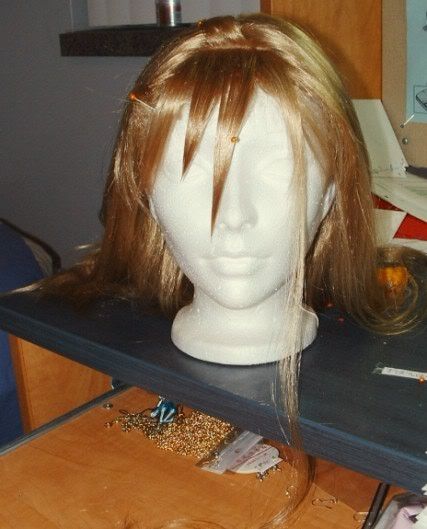
Trim the unstyled hair down to the length you would like the finished spike to end at. For a nice tapered spike, don't do a straight cut across. I usualy just zigzag my scissors across the bottom inch of the spike as I cut across. Razors do the job too, but I cut myself too easily to risk it...(and even if I get my hands on a razor, Infini'll probably have a heart attack before letting me use it considering how badly I managed to stab myself with her exacto blade). *not emo, just accident prone and bleeds lots*
Spike count: 4
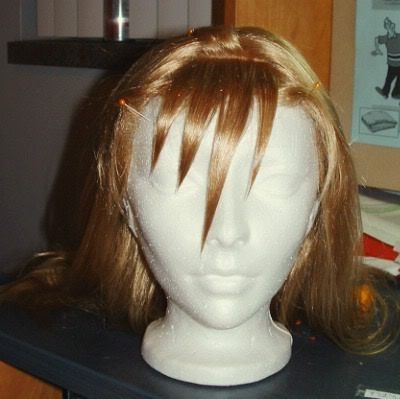
If one of the spikes *points to longest one* is too long, not a problem. Better to leave it too long than to cut it too short. Just give it a while to dry fully and then you can crack the hairspray right out of it and cut it shorter and restyle. Cutting it while it's wet will lead to uneven chunky spikes most of the time.
Spike count: 6
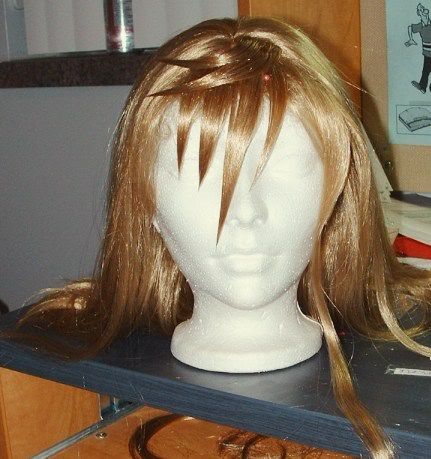
Most spikes can be held in place until they're dry enough to retain the shape themselves, bit if you don't feel like it, a strategically placed pin does the job just as well much of the time.
Spike count: 9
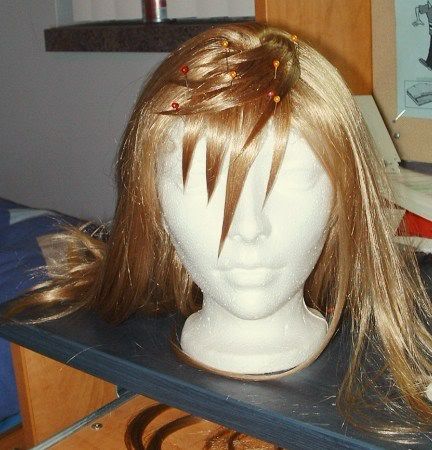
If one pin doesn't do the trick, several dozen will. >_>;;
Spike count: 10
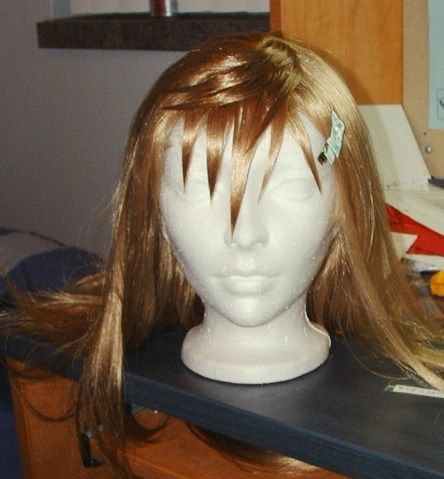
Make sure to continue clipping hair away to the side before attacking new areas. Hairspray's not permanent, but it still sucks having to wait to fix areas that accidentally got hit before their time.
Spike count: 15
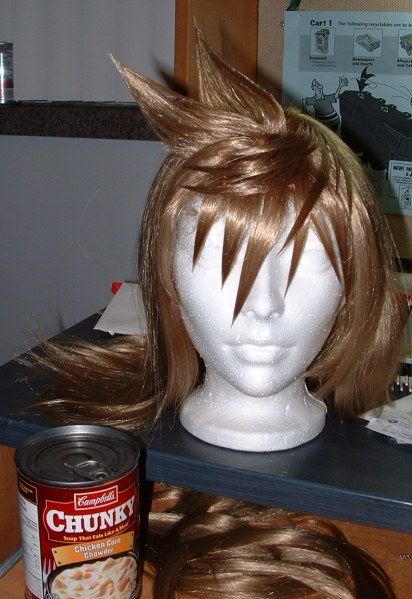
Larger and free standing spikes work best if you allow them to dry with someting holding them in place cause their own weight will pull them out of shape until they're relatively dry. Even if you hold the wig head so that gravity helps to pull the spikes in the right direction, you don't want your new spike pulled out of shape. I have weak girly muscles, so a soup can or something else to hold my arm at the right level makes a hell of a difference if I have to hold it up for 5-10 minutes without moving before it's dry enough to let go.
Spike count: 22
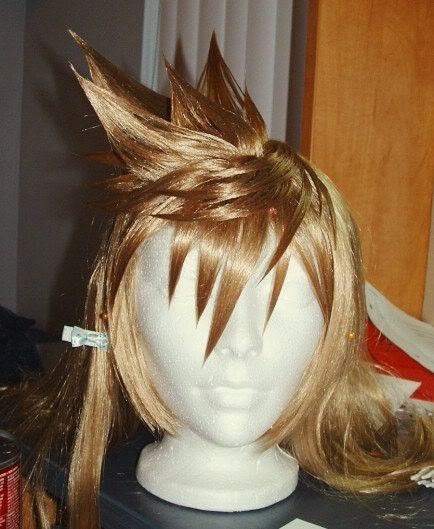
Work your way from the front to the back. I've come to realize that it's much easier to do it that way cause guess which side you usually show to the camera?
Spike count: 29
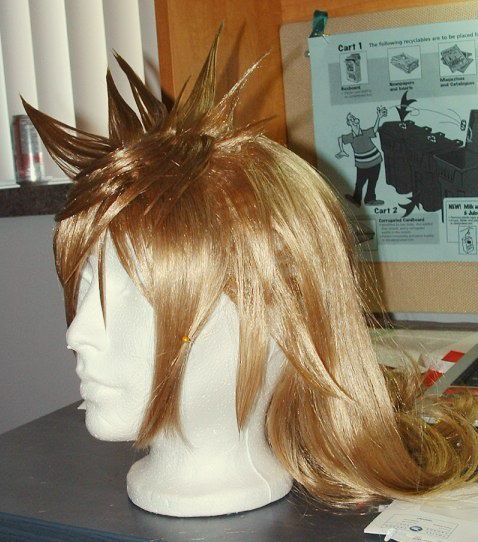
Take the side view into consideration too. If you have long side burns that are a stark contrast to the wig colour, might need to have enough hair on the side of the wig to cover that up (and guess what I forgot about on my first Roxas wig?)
Spike count: 39
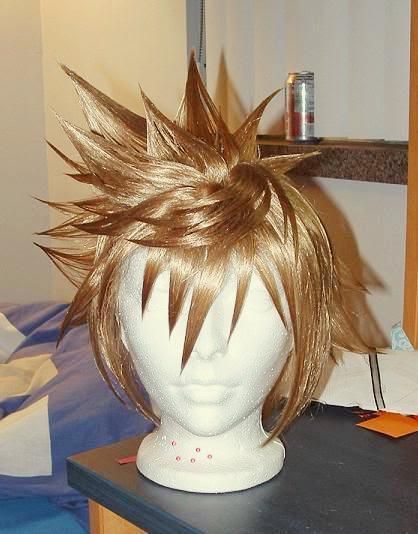
At this point, for those who don't care about the back view, you're pretty much done. The wig's styled enough to wear. For those who are anal about being thorough (haha, that sounded sexually suggestive)...
Spike count: 54
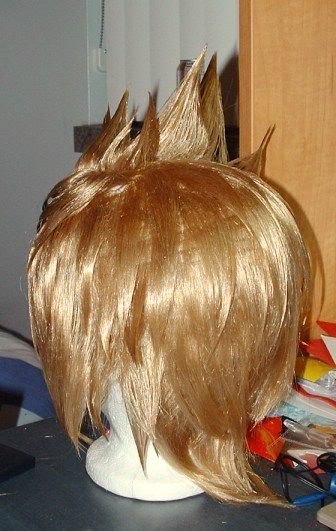
Spike the remaining hair. Much less hairspray is needed. You don't want them rock hard, just enough spray to keep them in locks (ie. Mist from 10-15cm away and only do 1-2 layers). The length of each lock will depend on the amount of fiber you have left. Longer locks = more coverage per lock...good if you're running short on fiber or if the wig's going to need to stretch a lot when worn (for those with large heads, or lots of hair to shove under there).
Spike count: 60
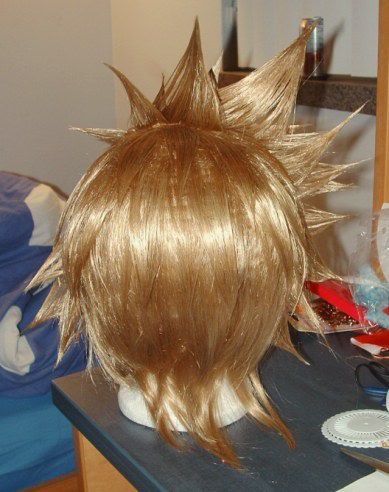
Keep going. I like going top to bottom so you can see where the hair needs to be distributed as you go.
Spike count: 68
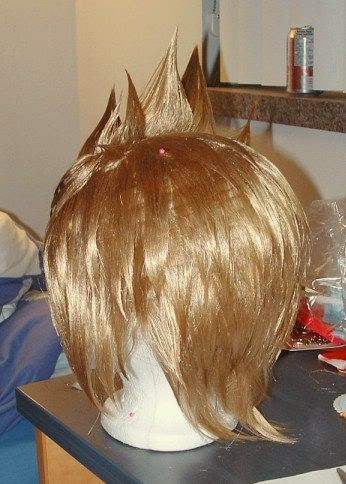
And going...
To compensate for the wig head being smaller than actual human heads, shift the wig forward with the base still pinned in the back. This'll stretch out the netting as your style, so that you won't pull the spikes out of shape when you put it on and stretch out the elastics. I try to over-stretch a bit just to make sure. Don't worry if you can see a bit of netting at this point. When the wig isn't stretched so much, the spikes'll be closer together and make better coverage.
Spike count: 74
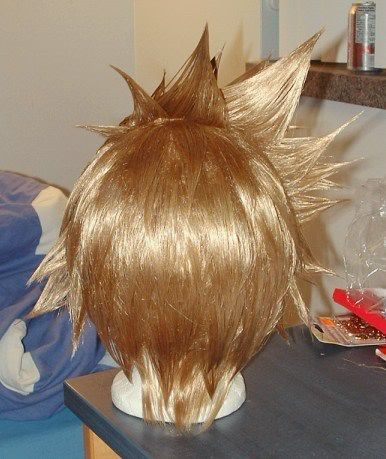
And going...
You can call it quits whenever you run out of hair to spike, or until you reach a point that you don't want to keep going. I have a lot of random hair fluff at the base of my neck, so I like keeping a bit of hair non-spiked to camoflauge my neck fluff (though this won't apply if your hair is similar in colour to the wig).
Final spike count: 78

And you're done...for real.
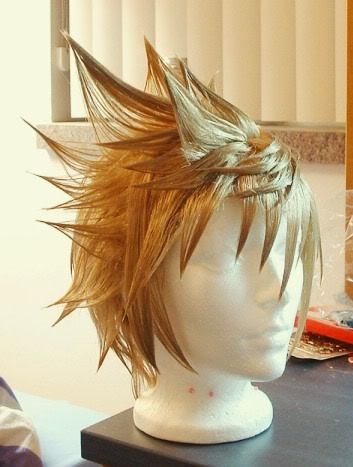
Take a look from all angles and see if there are any spikes that need fixing up or resetting.
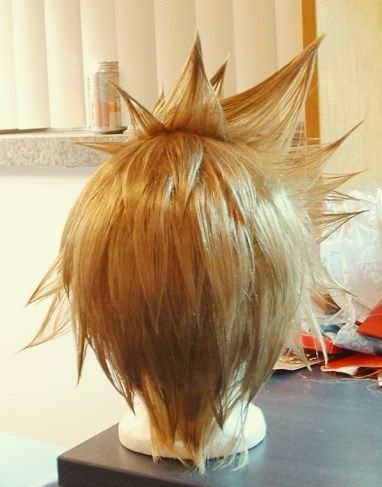
See, I told you the netting'll disappear once you stop over-stretching the wig.
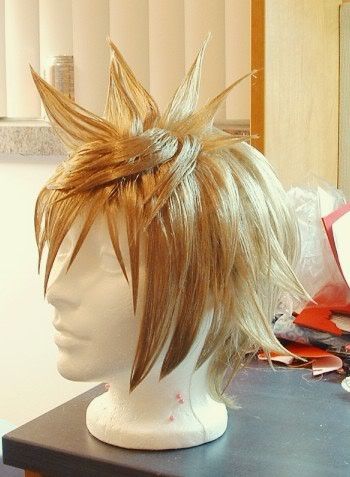
I usually find that the wig will look better from certain angles and try to remember to make an effort to pose for pictures in those directions (though it usualy gets forgotten, but at least I try to try).
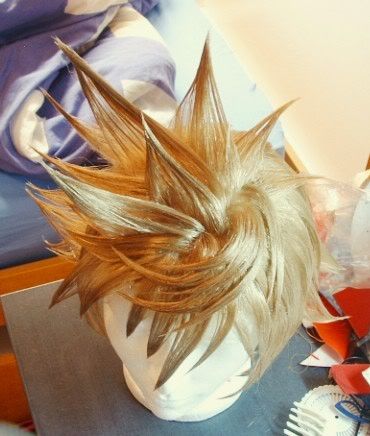
Sadly, I think this particular wig's best angle is top down...so much for capturing my better side. XD
Thanks to anyone who read thru this tutorial. Hopefully someone can make some use of this. ^^;;
Edit: Sooo...before I got around to spiking the rest of the bits that cover my neck fluff, I decided to grow my hair back out a wee bit, so neck-fluff is back. I guess I'll never get those last few spikes spiked...not unless my hair suddenly turns blonde one day.
Thus....
Okay, I suck at tutorials, so this is more of a guide with pictures and crappy commentaries. Please don't comment with "that's not how *so and so* said to do it" cause this tutorial is written to how I style my wigs, and I wasn't exactly taught by anyone.
If this tutorial is well received and people actually find it useful, I may post tutorials for other wigs I'm making later.
And anyone who's seen the wigs I've done before know that if it's not rock hard and/or full of spikes, I'm totally useless at styling it. Emo kid (Roxas) is a good balance of both, and I think my 2nd one is a great improvement from my 1st Roxas wig though still not ideal or perfect, but I don't think I have enough patience to ever style a 3rd Roxas wig (inside and outside of commissions), so this will have to do.
Wig Stats:
Brand: Forever Young
Style: Eva (huge overkill considering how much shorter it got cut from it's original length), the new naming scheme has it under "hautness", but a shorter wig would work too.
Colour: 24 (not available after they renamed the line, but there's plenty of similar shades of blonde out there)
The colour really doesn't matter much. Choose what you think is a good colour and the style...if it wasn't that I got it on sale, I wouldn't have used such a long wig to cut down to chin length in no time flat. For spikes the important thing is to make sure the wig has enough hair on it. For that reason, I seriously recommend against buying from most China/Hong Kong sellers on eBay cause while most of them sell decent wigs, they're usually rather thin and don't have nearly enough hair on them to spike properly.
Styling products: Got2b Glued Blasting Freeze Spray
Assistants: Campbell's Chunky New England Clam Chowder (super yum) caringly donated by Infini.
This wig took me about 30 hours to finish. Mind you, about 2/3 of that time was just sitting around waiting for individual spikes to dry before I could move on. A hair dryer helping in the process would have made it go much faster, but I ain't got one, so gotta make do by letting it eat away 2 days of my life.
Do NOT post my words or my photos anywhere else without my permission and so far, the only one who has my permission is ZiggyB. If you try stealing my photos or my words, I'll come and harrass you so bad til you take it down (and trust me, I've done so before and won't hesitate to do it again). If you want to share, please share a LINK to the tutorial instead of copying and pasting my hard work.
Make sure to pin the wig to the wig head before you start!
Spike count: 0

Start off pinning back hair you're not using as of yet. Lots easier to keep hairspray off hair if it's not in it in the first place. Make sure whatever you've sectioned off to spike does not show any netting underneath. Also make sure you've left enough hair elsewhere to style the rest of the wig. Won't do to put all the fiber into a couple of spikes and realize too late that you've run out of hair to style the rest of the wig with.
Spike count: 2

Trim the unstyled hair down to the length you would like the finished spike to end at. For a nice tapered spike, don't do a straight cut across. I usualy just zigzag my scissors across the bottom inch of the spike as I cut across. Razors do the job too, but I cut myself too easily to risk it...(and even if I get my hands on a razor, Infini'll probably have a heart attack before letting me use it considering how badly I managed to stab myself with her exacto blade). *not emo, just accident prone and bleeds lots*
Spike count: 4

If one of the spikes *points to longest one* is too long, not a problem. Better to leave it too long than to cut it too short. Just give it a while to dry fully and then you can crack the hairspray right out of it and cut it shorter and restyle. Cutting it while it's wet will lead to uneven chunky spikes most of the time.
Spike count: 6

Most spikes can be held in place until they're dry enough to retain the shape themselves, bit if you don't feel like it, a strategically placed pin does the job just as well much of the time.
Spike count: 9

If one pin doesn't do the trick, several dozen will. >_>;;
Spike count: 10

Make sure to continue clipping hair away to the side before attacking new areas. Hairspray's not permanent, but it still sucks having to wait to fix areas that accidentally got hit before their time.
Spike count: 15

Larger and free standing spikes work best if you allow them to dry with someting holding them in place cause their own weight will pull them out of shape until they're relatively dry. Even if you hold the wig head so that gravity helps to pull the spikes in the right direction, you don't want your new spike pulled out of shape. I have weak girly muscles, so a soup can or something else to hold my arm at the right level makes a hell of a difference if I have to hold it up for 5-10 minutes without moving before it's dry enough to let go.
Spike count: 22

Work your way from the front to the back. I've come to realize that it's much easier to do it that way cause guess which side you usually show to the camera?
Spike count: 29

Take the side view into consideration too. If you have long side burns that are a stark contrast to the wig colour, might need to have enough hair on the side of the wig to cover that up (and guess what I forgot about on my first Roxas wig?)
Spike count: 39

At this point, for those who don't care about the back view, you're pretty much done. The wig's styled enough to wear. For those who are anal about being thorough (haha, that sounded sexually suggestive)...
Spike count: 54

Spike the remaining hair. Much less hairspray is needed. You don't want them rock hard, just enough spray to keep them in locks (ie. Mist from 10-15cm away and only do 1-2 layers). The length of each lock will depend on the amount of fiber you have left. Longer locks = more coverage per lock...good if you're running short on fiber or if the wig's going to need to stretch a lot when worn (for those with large heads, or lots of hair to shove under there).
Spike count: 60

Keep going. I like going top to bottom so you can see where the hair needs to be distributed as you go.
Spike count: 68

And going...
To compensate for the wig head being smaller than actual human heads, shift the wig forward with the base still pinned in the back. This'll stretch out the netting as your style, so that you won't pull the spikes out of shape when you put it on and stretch out the elastics. I try to over-stretch a bit just to make sure. Don't worry if you can see a bit of netting at this point. When the wig isn't stretched so much, the spikes'll be closer together and make better coverage.
Spike count: 74

And going...
You can call it quits whenever you run out of hair to spike, or until you reach a point that you don't want to keep going. I have a lot of random hair fluff at the base of my neck, so I like keeping a bit of hair non-spiked to camoflauge my neck fluff (though this won't apply if your hair is similar in colour to the wig).
Final spike count: 78

And you're done...for real.

Take a look from all angles and see if there are any spikes that need fixing up or resetting.

See, I told you the netting'll disappear once you stop over-stretching the wig.

I usually find that the wig will look better from certain angles and try to remember to make an effort to pose for pictures in those directions (though it usualy gets forgotten, but at least I try to try).

Sadly, I think this particular wig's best angle is top down...so much for capturing my better side. XD
Thanks to anyone who read thru this tutorial. Hopefully someone can make some use of this. ^^;;
Edit: Sooo...before I got around to spiking the rest of the bits that cover my neck fluff, I decided to grow my hair back out a wee bit, so neck-fluff is back. I guess I'll never get those last few spikes spiked...not unless my hair suddenly turns blonde one day.