024
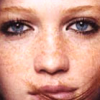
TUTORIAL #1 - Eyes, Lips, Makeup
to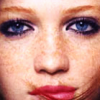
1. Crop your image
2. Resize image to 100 by 100 pixels
3. Layers >> New Raster Layer: set this layer to soft light, with an opacity of 100%
4. zoom in to about 300% and use a round, 5 px brush in a royal blue shade to color the eyes and the area around them (if you find this difficult, use a smaller brush);
5. zoom out to 100% and lower the opacity until the eyes look vibrant, but not overly done
6. Layers >> New Raster Layer: soft light, opacity 100%
7. zoom in to about 300% and use a round 5 px brush in a pinkish-red shade to color the lips; use a 1 or 2 px brush for the edges (this is a bit more difficult than the eyes)
8. zoom out to 100% and lower the opacity until the lips appear vibrant, but not overly done
9. repeat this process for the brows, hair, cheeks, and/or any other physical feature (colors and brush hardness will vary)
10. Layers >> Merge >> Merge All (Flatten)
11. Layers >> Duplicate: duplicate the icon and set the new layer to soft light, with an opacity of 25 to 30% (depending on how bright/solid you want it)
12. Layers >> Merge >> Merge All (Flatten)
13. adjust Brightness/Contrast and Sharpness/Softness as needed
This tutorial was created using PSP 10, but can be translated to other programs. Please provide credit to
allthepeople if you rewrite or repost this tutorial.
This is the first tutorial I've written. It's not very detailed, but I think it's easy enough to follow. Comments and constructive criticism are welcome!
EDITED: brush sizes