Tutorial #3: Allie/Noah
How to go from: 
to:
(as requested by killesbergbaby)
This icon was made using Photoshop Elements. I'm not sure how well it translates to other programs because I've never used any others, but feel free to ask questions and I'll try to answer to the best of my ability. :) Also, please do not copy this tutorial exactly. Use your own base and experiment with different steps :)
Now onto the tutorial...
1. Start out with your base. I’m using this one:

2. Duplicate your base twice. Set the one closer to the bottom on screen, 80% opacity. Set the top one on soft light, 100%. The opacities and number of layers will vary depending on your base. It should now look something like this:

3. Add a pale blue color (#C6EDFB) to a new layer and set it on color burn 100%. Duplicate the layer and keep it at 100%

+
>>>
4. Add a pale pink color (#FFAEE2) to a new layer and set it on color burn, 30%.

>>>
5. Duplicate the pink layer (#FFAEE2) but set the new layer on soft light, 100%.

>>>
6. I wanted the background to stand out a little bit more, so I added a pale greenish color (#D0FDDF) on a new layer and set it to color burn, 100%. I erased the color around their bodies so that it only hit the background.

>>>
7. Add a gradient made by ??? (please let me know who made this if you know) and set it to soft light, 60%

>>>
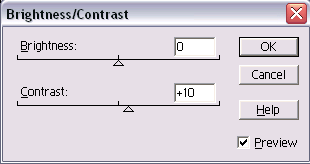
8. I wanted a little more contrast, so I went to Layer>New Adjustment Layer>Brightness/Contrast and changed the contrast to +10. It doesn’t make a huge difference but I like it.

>>>
And that’s pretty much it! It's not exactly like the original (found in this post), but I think its pretty close :)
Other icons made using a similar technique (I left out steps 6 and 7 for most of these):


If you have any questions, feel free to ask! I'd love to see what you come up with ♥

to:

(as requested by killesbergbaby)
This icon was made using Photoshop Elements. I'm not sure how well it translates to other programs because I've never used any others, but feel free to ask questions and I'll try to answer to the best of my ability. :) Also, please do not copy this tutorial exactly. Use your own base and experiment with different steps :)
Now onto the tutorial...
1. Start out with your base. I’m using this one:

2. Duplicate your base twice. Set the one closer to the bottom on screen, 80% opacity. Set the top one on soft light, 100%. The opacities and number of layers will vary depending on your base. It should now look something like this:

3. Add a pale blue color (#C6EDFB) to a new layer and set it on color burn 100%. Duplicate the layer and keep it at 100%

+

>>>

4. Add a pale pink color (#FFAEE2) to a new layer and set it on color burn, 30%.

>>>

5. Duplicate the pink layer (#FFAEE2) but set the new layer on soft light, 100%.

>>>

6. I wanted the background to stand out a little bit more, so I added a pale greenish color (#D0FDDF) on a new layer and set it to color burn, 100%. I erased the color around their bodies so that it only hit the background.

>>>

7. Add a gradient made by ??? (please let me know who made this if you know) and set it to soft light, 60%

>>>

8. I wanted a little more contrast, so I went to Layer>New Adjustment Layer>Brightness/Contrast and changed the contrast to +10. It doesn’t make a huge difference but I like it.

>>>

And that’s pretty much it! It's not exactly like the original (found in this post), but I think its pretty close :)
Other icons made using a similar technique (I left out steps 6 and 7 for most of these):


If you have any questions, feel free to ask! I'd love to see what you come up with ♥