Tutorial #8: Tony Almeida
How to go from

to

in Photoshop Elements, as requested by fogg8
1. Start out with your base. This tut usually works best with bases that are sort of blue-ish, but anything should work. Mine is of the wonderful Tony Almeida from 24.
2. Duplicate your base twice. Set the first layer (the one closest to the bottom) on screen and the top one on soft light, both 100% opacity. Merge everything together.
>>

3. Duplicate the newly merged base and set it on screen, 70% (though this opacity can vary depending on the picture)
>>

4. Create a new layer and fill it with a light blue color (#C6EDFB). Set it on color burn, 100%.

>>

5. Create another new layer and fill it with a light pink color (#FFD2D8). Set it on color burn, 100%.

>>

6. Duplicate the pink layer but change the blend mode to soft light. It doesn’t look great now, but keep the opacity at 100%.
>>

7. Create another new layer and fill it with a tan color (#DABE77). Set it on multiply, 100%.

>>

8. Create a new layer and fill it with a blue-ish color (#9EFFFF). Set it on color burn, 50%. Almost done now!

>>

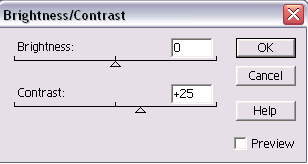
9. Finally, add a brightness/contrast layer by going to Layer>New Adjustment Layer>Brightness/Contrast. Leave the brightness on 0, but change contrast to +25. Again, though, this can vary depending on the icon.
>>
And that’s it, you’re done! Hopefully that wasn’t too confusing…If you have any questions, feel free to ask. I’d love to see what you come up with if you use this tutorial :D
Resources