icon tutorial
we are going to use this beautiful picture of carrie underwood:

now we are going to duplicate the base layer---go to layers-->duplicate.
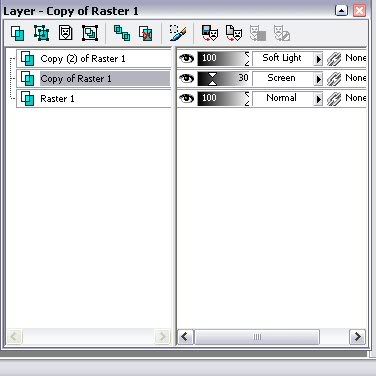
then set that layer to screen at 30%
then go to layers-->duplicate again and set that layer to soft light
this is what your palette should look like---
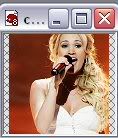
and this is what your icon should look like:
ok now lets add some color...add this light blue color...#B8E5F4(
)
now go to layers-->new raster layer (make sure this layer is on top of both your copies of the background layer)
then using the flood fill tool fill in your icon w/ the blue color and set that layer to burn.
this is your icon so far:

now lets make another new raster layer...and this time lets fill it with a dark blue...#0F0927...(
)
set this layer to exclusion and your icon should now look like this:

add yet another new raster and fill it with this color #947A67 (
)
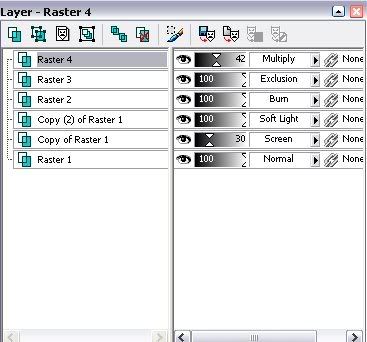
set this layer to multipy at 42%.
this is what your icon and layer palette should look like:

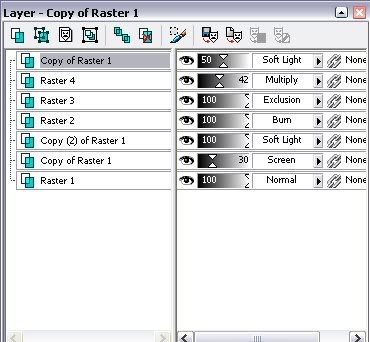
now we are going to go to our palette and we are going to click on raster 1 (or background layer) and you are going to go to layers--duplicate. when you have it duplicated highlight that layer (if not already) and click on it and drag it on the top of all the other layers. now set this layer to soft light at 50%. this is what your palette will look like...and your icon

now go to layers--- merge---merge all.
and if you like you can add text but i dont like to...so here is the finished product!!

<3,
me

now we are going to duplicate the base layer---go to layers-->duplicate.
then set that layer to screen at 30%
then go to layers-->duplicate again and set that layer to soft light
this is what your palette should look like---

and this is what your icon should look like:

ok now lets add some color...add this light blue color...#B8E5F4(

)
now go to layers-->new raster layer (make sure this layer is on top of both your copies of the background layer)
then using the flood fill tool fill in your icon w/ the blue color and set that layer to burn.
this is your icon so far:

now lets make another new raster layer...and this time lets fill it with a dark blue...#0F0927...(

)
set this layer to exclusion and your icon should now look like this:

add yet another new raster and fill it with this color #947A67 (

)
set this layer to multipy at 42%.
this is what your icon and layer palette should look like:


now we are going to go to our palette and we are going to click on raster 1 (or background layer) and you are going to go to layers--duplicate. when you have it duplicated highlight that layer (if not already) and click on it and drag it on the top of all the other layers. now set this layer to soft light at 50%. this is what your palette will look like...and your icon


now go to layers--- merge---merge all.
and if you like you can add text but i dont like to...so here is the finished product!!

<3,
me