Aqi's Crash Course Tutorial - Colouring stuff in
Aqi's Crash-Course Tutorial - Colouring stuff in
IMAGE HEAVY TO THE EXTREME
Downloadable word document version: coming soon.
I really like writing tutorials - if you like my stuff and want a tutorial on something else in particular, do ask XD. But all I really do is colour and vector xD A lot of it is common sense and experimentation. I might post this to my community and pimp it out if I get a good reaction xD.
God it's hard to screencap everything you do.
Tutorial stats:
Level: I'd say easy-medium level. But you at least should know most of photoshop's functions.
Time taken: Ignoring all the time to screencap and write the tutorial out, maybe an hour or two.
Okay, some stuff before we begin.
---------------------------------------------
1. I'm using photoshop cs3 for this tutorial. I'm sure there are ways you can adapt this to other programs but yeah. It helps to have the program. You can also use a tablet, but I'm too lazy and it hurts my fingers xD.
2. I'm a self-taught person who always does things MY way. I have no clue whether that's good or bad or if it will affect anything. I still consider myself an amateur at this.
3. It's great to follow the tutorial exactly, but make sure you don't use my style for everything xD. It's way cooler to have your own style. Besides, you don't want to colour like me xDDDD. It's all about your own preferences too, for example, I like the redder hues for skin tones and emphasize certain places more than others. But that's me :D
4. I'm using pre-cleaned lineart. If I had a penny for every lineart tutorial out there, I'd be able to fly to Japan. Okay, maybe not, but you get my point. I might make one later, but I honestly never really use manga panels unless I vector the outlines xD It's too much effort to clean.
5. REMEMBER TO SAVE!!!! I know I'm a freak who saves every 20 seconds but I've never lost progress on a file AND YOU ALL KNOW HOW MUCH IT SUCKSSSSSSS.
6. I'm under the assumption you at least know how to make a new layer and know where most of the tools and functions are.
7. Practise makes perfect! Like, seriously. Obviously your first go ain't gonna look too fabulous, but practise and hone in on your own style.
---------------------------------------------
Okie dokie! Let's roll!
0. For this tutorial, our model is Tsuna from Reborn! I cleaned it a little and got rid of the screentone on his earphones. I also redrew a little bit here and there.
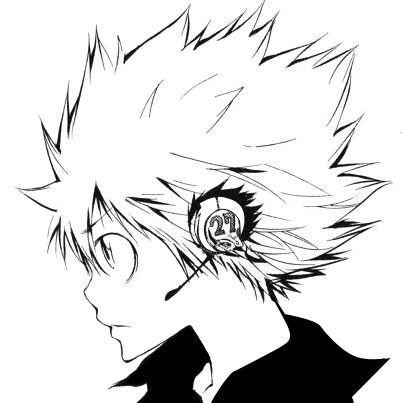
[NOTE: Some manga images have a LOT of screentones on them. They are such a pain to clean, I'd recommend vectoring the outlines if you're impatient and/or can vector. If you're patient and can't vector... feel free to clean it xD. HQ raws are brilliant things!]
----------------------------------------------
1. Open your image in photoshop. Make sure if you open up an image, to go to layer >> new >> layer from background if your image is being treated as a background layer. Because then it just screws everything up D=. Now make a background layer.

----------------------------------------------
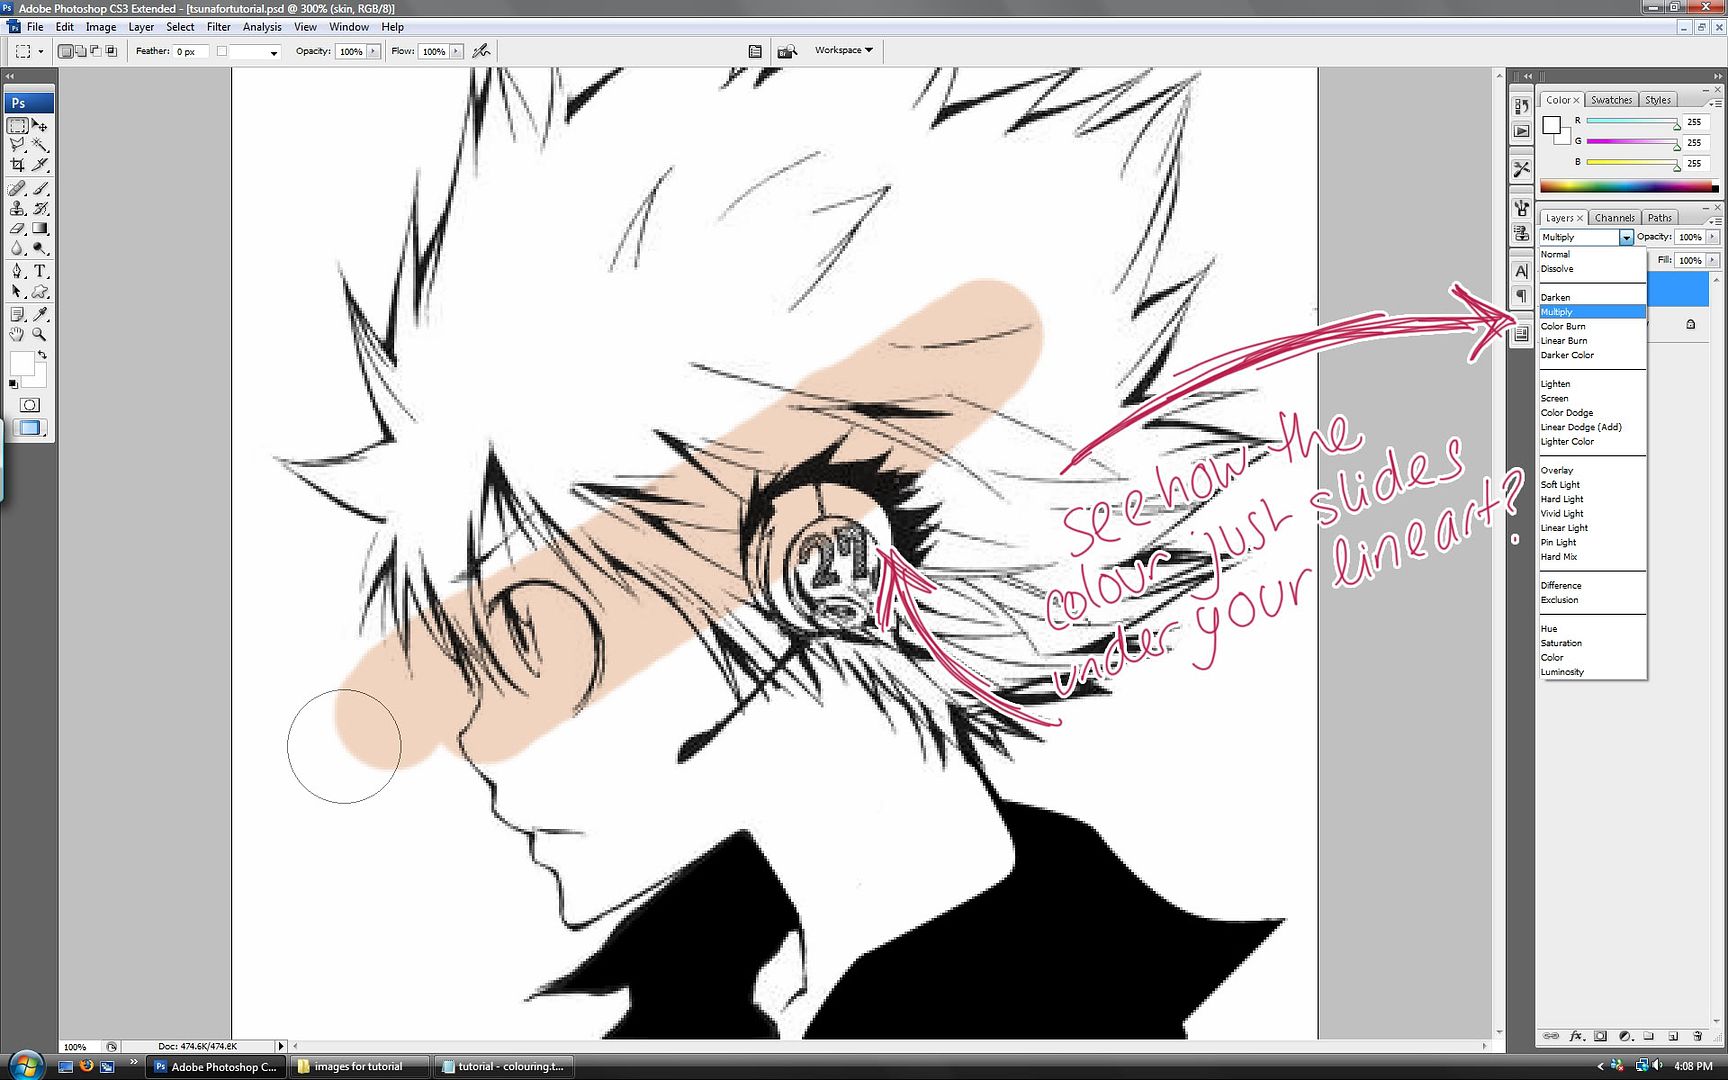
2. I usually don't do it this method since I have some secret weapons, but for this tutorial, set the image to multiply. It makes the image transparent and you can paint under it! Yay!
----------------------------------------------
3. Okay, so now you've got your nice clean lineart set to multiply, and a background layer so you should have two layers. I find that using the paint bucket tool to fill the background in helps you see where you're colouring and you don't leave any white gaps. Make sure it's a colour you're not likely to use. I used pink! Well, I might use it later on, but you can always change it.
Now make a layer under your image. I called mine "skin", because that's what I'm going to be colouring first.
Use the pen tool, polygonal lassoo tool or manually fill in the area where his skin is :D I prefer the pen tool because it's very precise, but for beginners it's a little difficult. You can let it bleed into the area where his hair might be, because the hair layer will be on top of this (xDDDDD). I used the colour #fce2d9.

----------------------------------------------
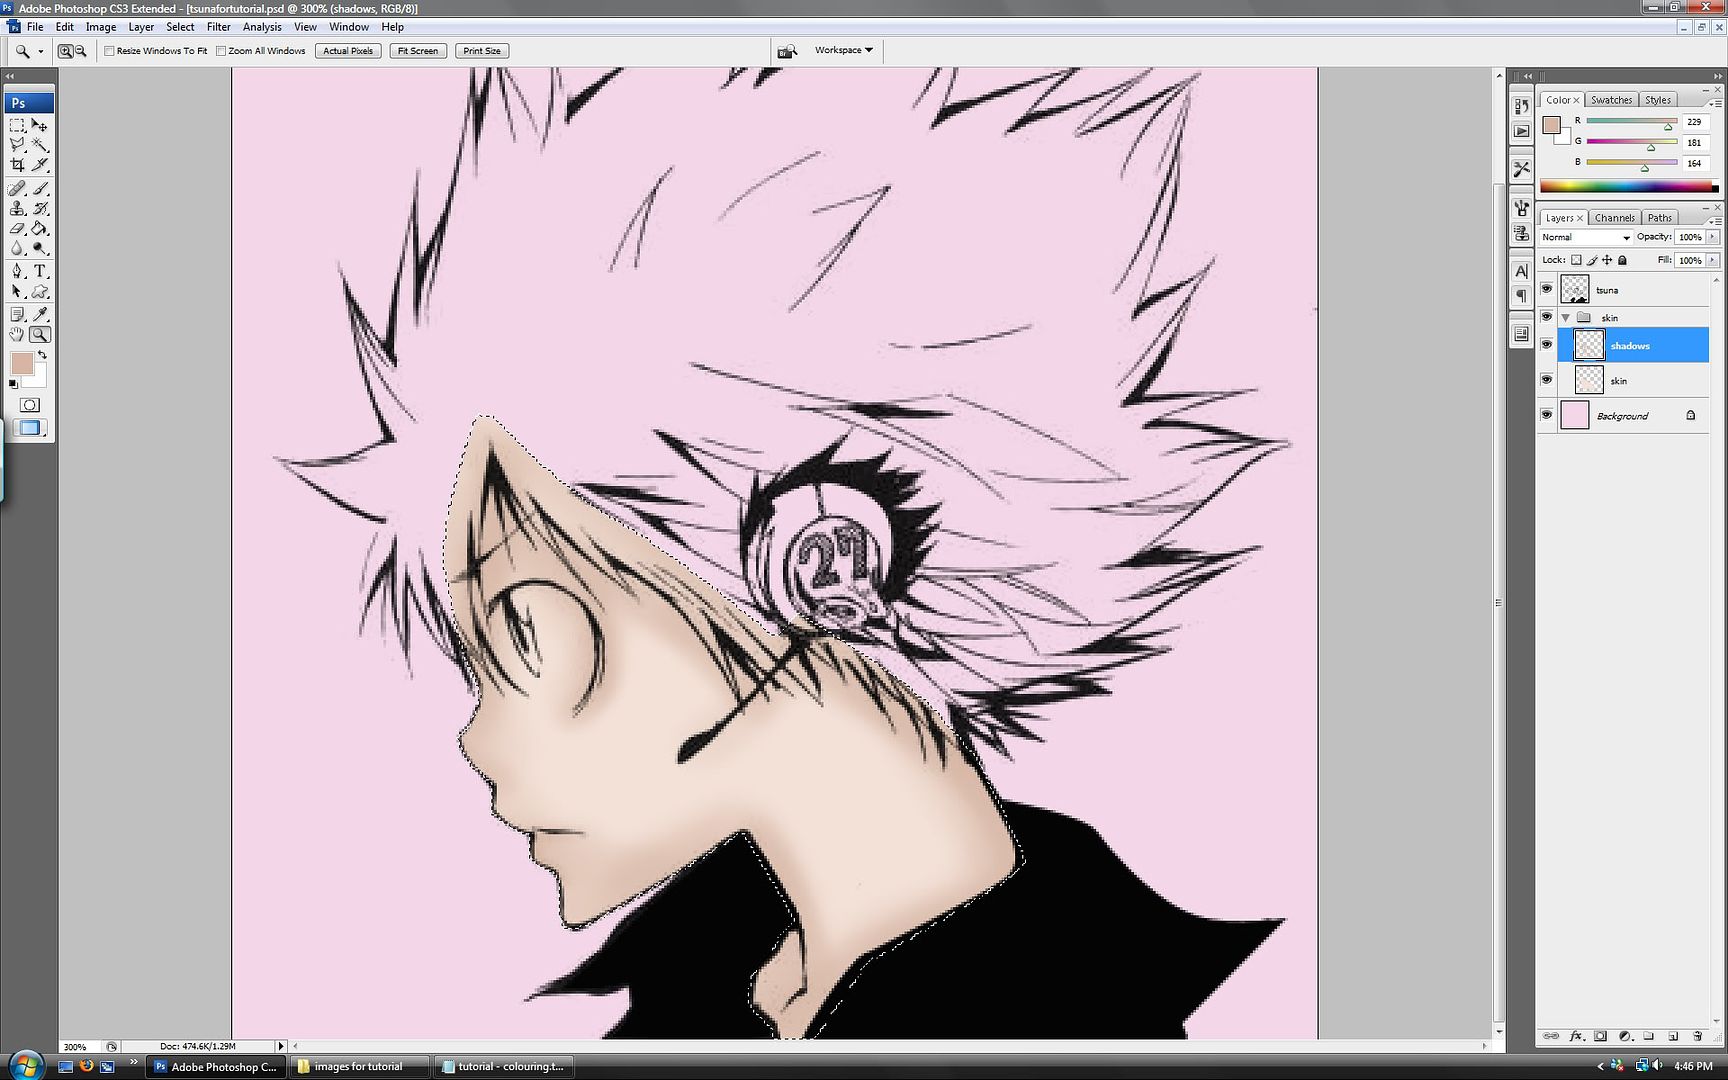
4. Shading time!!~ Use the magic wand tool to select the base skin layer. You do this so that the colour won't go everywhere when you add shadows and highlights.
[Optional: You can also lock the transparency of the layer or use a clipping mask if you know how to work with that. I don't usually do those methods though.]

Now create a new layer (you don't have to, but it's easier to undo things like this). This layer will be for the shadows on the skin. You can name it "skin shadows" or whatever (I just called it "shadows" because I use layer groups).
Zoom in a bit, and choose a slightly darker tone than the skin tone. I'm using #e1b6a7. Now get a big, soft brush. One of those default round ones. I adjusted the settings like so...
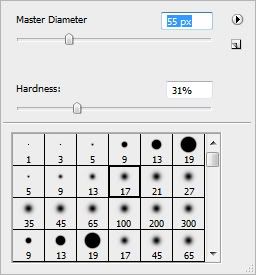
Size: I use a larger brush for the lighter-toned shadows.
Hardness: I like to use a soft brush first, because this is just the simple shadows.
And also like this at the top...

The opacity is how opaque the brush is, and the flow is how much of it comes out at once and the spacing and stuff like that. I'd recommend around 20%-40% for both settings, it depends how fast you want to work and stuff like that.
Now add some shadows. Decrease the brush size as neccessary to get into the smaller areas. You can go over some parts to strengthen the shadows.
----------------------------------------------
5. Okay, now choose a slightly darker tone than your current shadows, adjust the brush hardness to around 50%. Make the brush smaller and get in there and emphasize the shadows. You can repeat this step and make the brush smaller and smaller and it harder and harder. I wouldn't reccomend going over 85% in hardness though, unless you want a cel-shaded look.
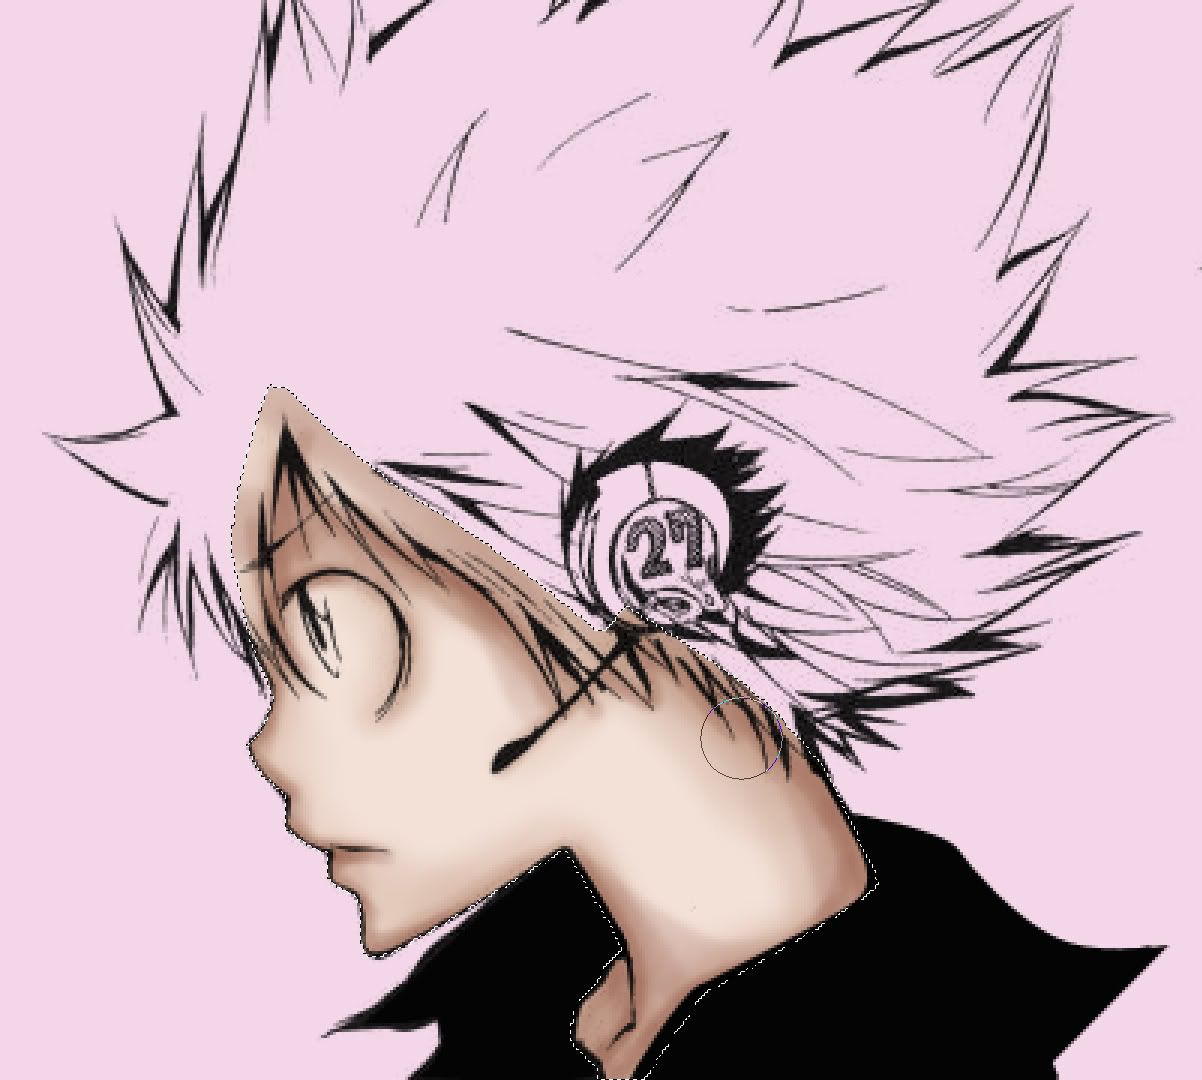
It should look a bit more realistic and cool now! Adjust the colours with hue/saturation as neccessary, 'cause my Tsuna's starting to look like he's been in the sun for too long.
-----------------------------------------------
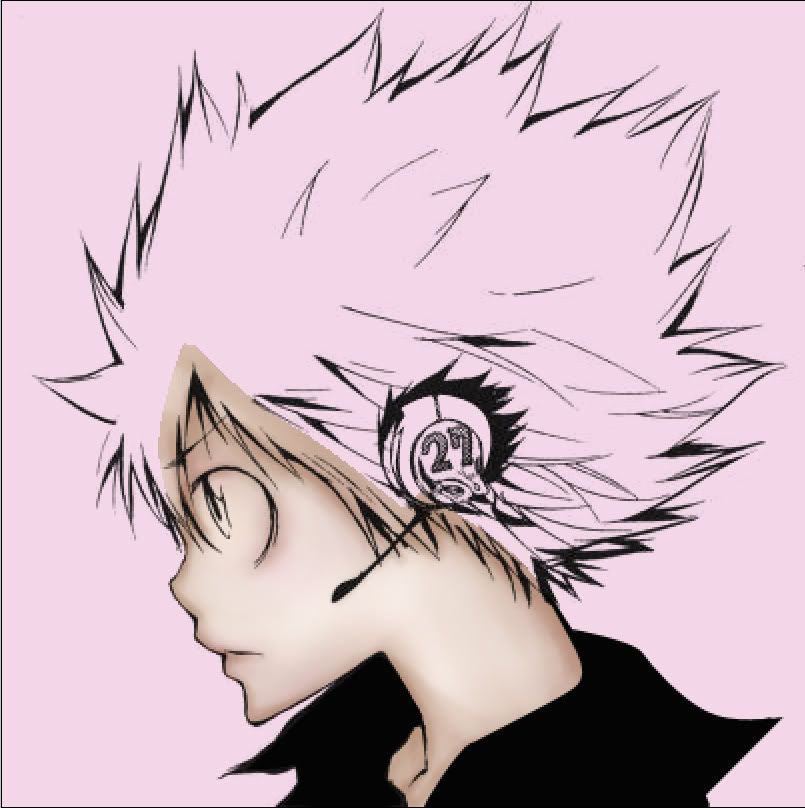
6. Make a new layer for the highlights. Repeat steps 5-6 for the highlights, but instead of going darker, get lighter. Smooth out the skin.
I also added a bit of blush, but that's optional~
So basically, the operation goes like this: paint the lighter shade of shadows (or darker highlights, whatever), then adjust brush size and hardness, paint the slightly more darker shadows, adjust brush size and hardness, then paint detailed shadows. Yup.
Now my Tsunafish looks like this:
------------------------------------------------
7. Hair tiiiime! Fill in the area with whatever colour the hair is, make sure the layer is above the skin layer. Pretty much the same as steps 5-7, but I try to make my brush strokes more visible, because it's hair, and hair is hairy! =D
(If I should go into any more detail at this stage, let me know. But it shouldn't be too hard to work out now xD. Make a layer for the base colour, the shadows, and the highlights. Use magic wand tool to select the base layer to make it easier to colour.)

Okay, shadows all look good.
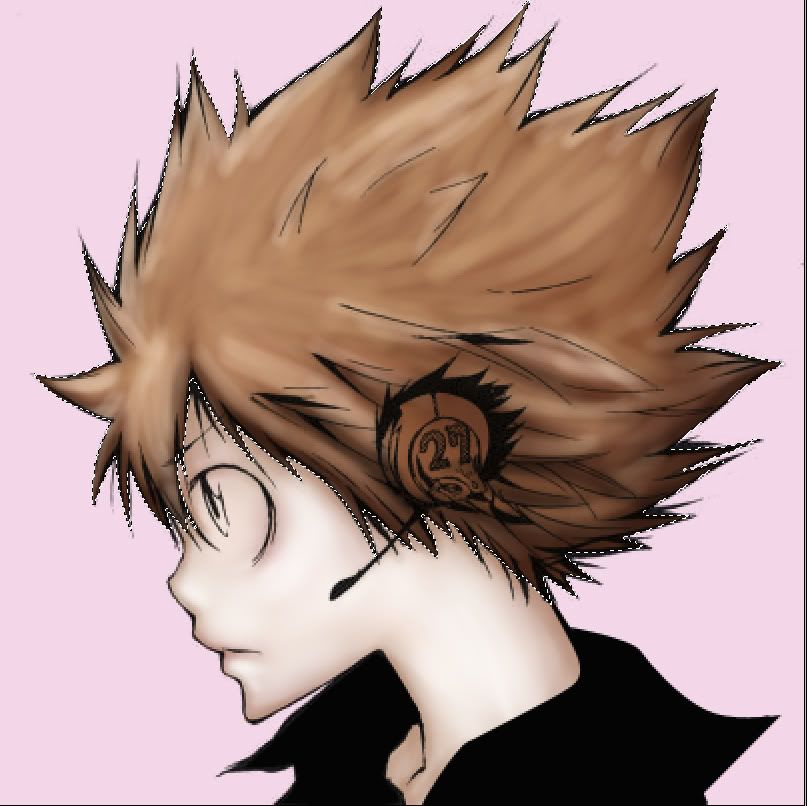
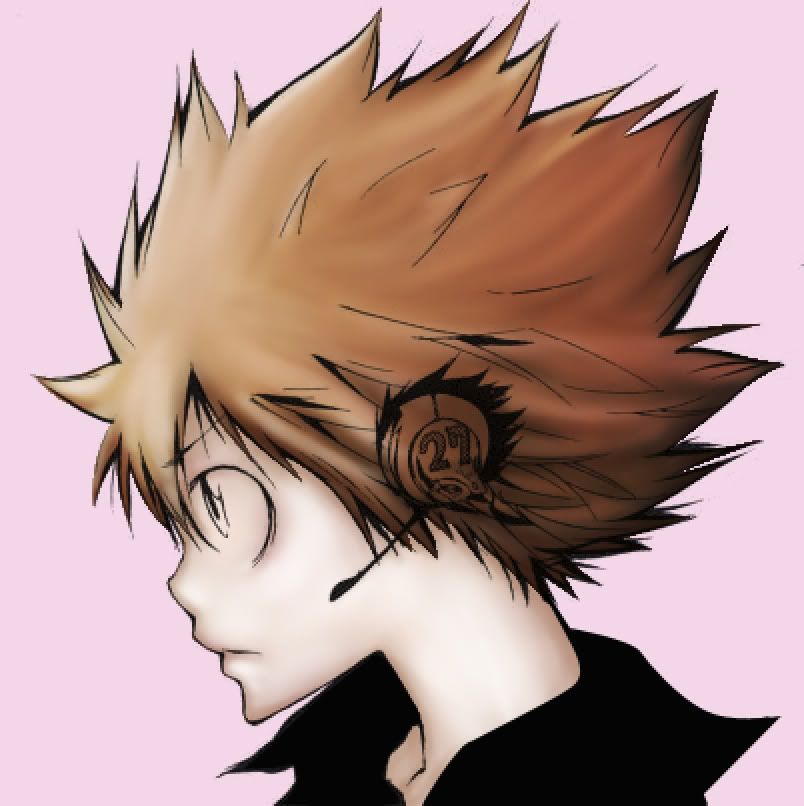
Highlights... Ewww. They look disgusting. I've edited them a bit by creating several more layers and filling it out with gradient effects and smudging, I'll only go into detail with that if anyone needs it xD. Yours should look fine, 'cause my colour choosing skills are crap.
Here's my final result for the hair:
------------------------------------------------
8. Colouring clothes or accessories - same deal as before. I only need to colour the earmuff and I sort of edited his shirt. I did all the shading on the same layer since it's so small.
------------------------------------------------
9. One of my favourite parts. The eye. Make a new layer, and fill in the "whites" of the eye (I dunno what the proper scientific term is xD). Tsuna's got some adoreable shota-boy eyes!.
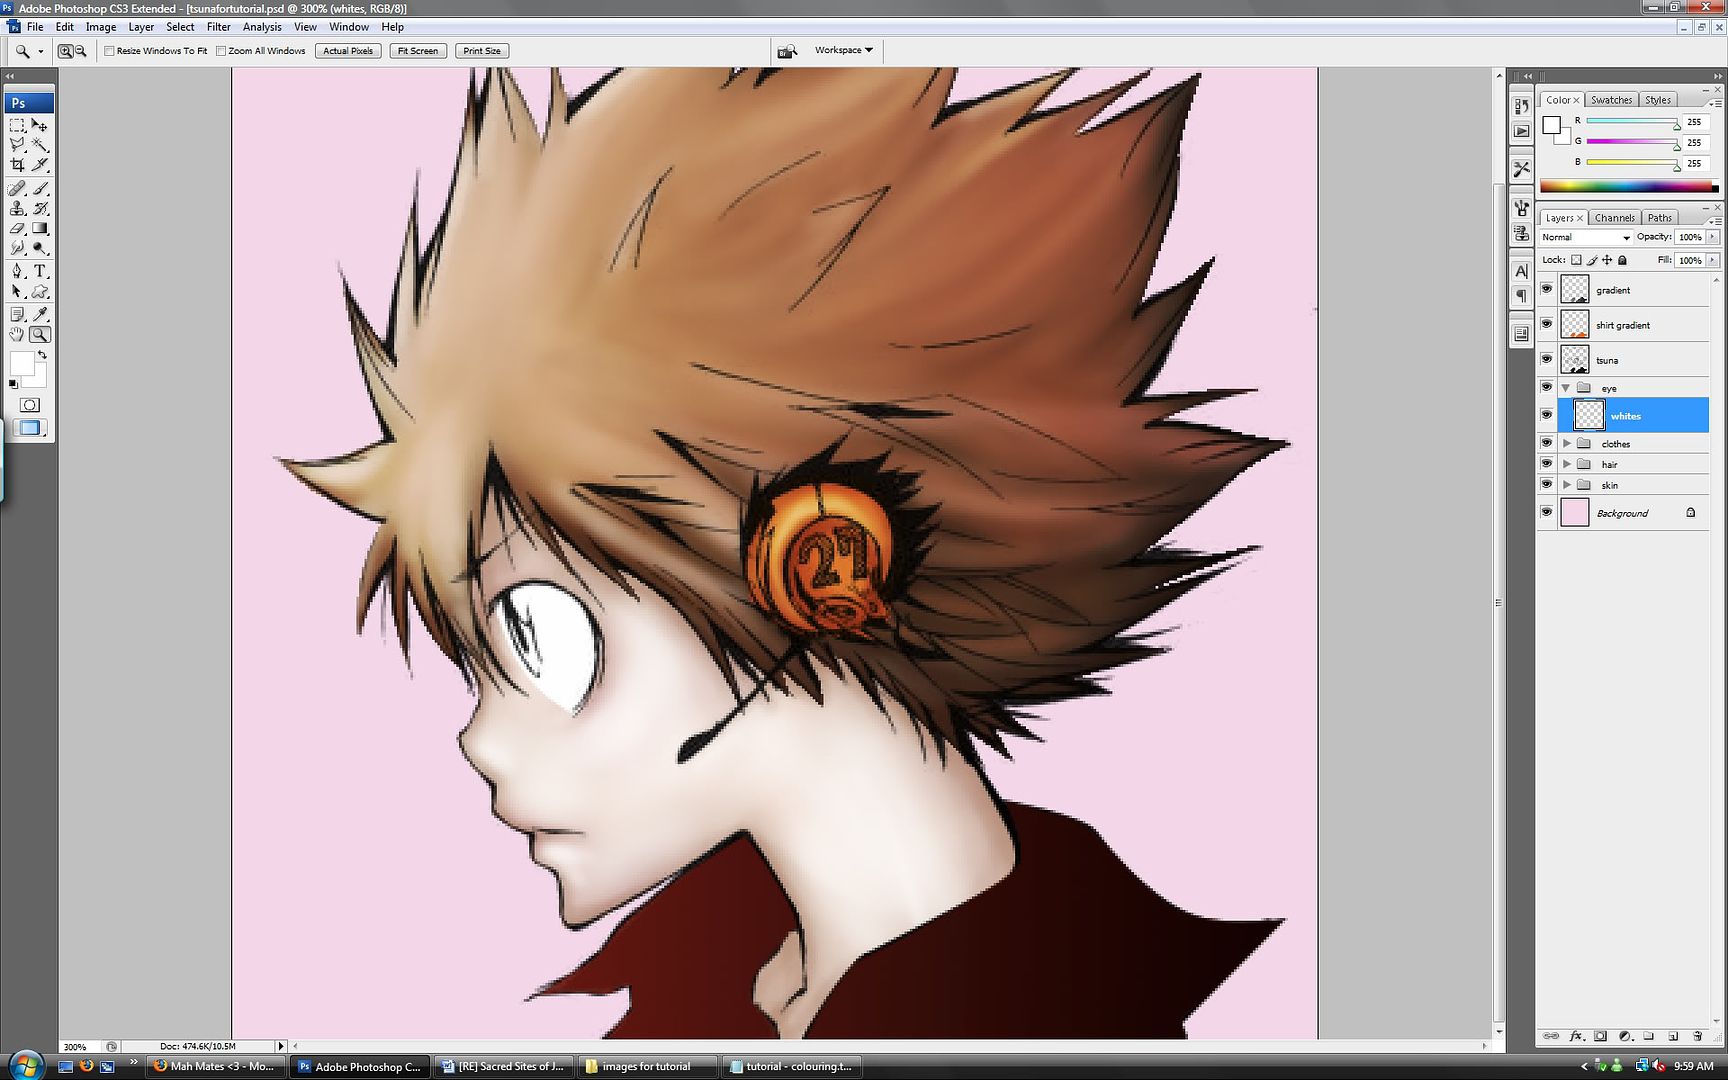
Then you fill in the iris. Use the burn and dodge tool to add highlights and shadows to the eye on the "iris" layer. I find that at the top and bottom of anime eyes, you add the shadows there, and in the largest part you add a highlight. You'll need a REALLY SMALL brush. This is a really hard image to use for this since Tsuna's facing sideways here.

10. I think we're done! WOOHOO! My final result is this:
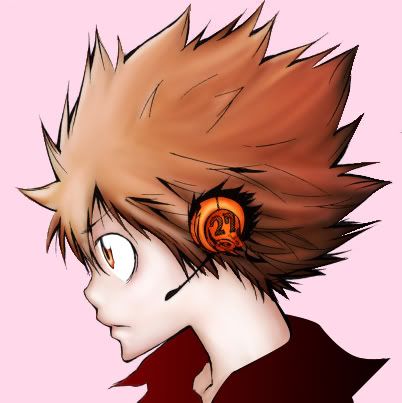
Now I saved the file as a transparent .png, and icon'd it.
Maybe I should make an icon tutorial someday... anyway.
------------------------------------------------
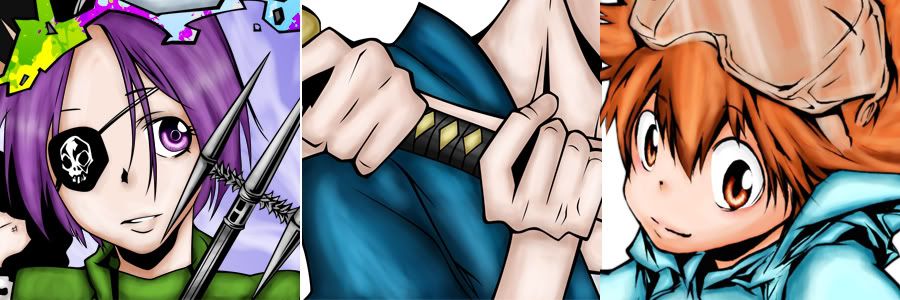
Here are some other examples where I've used the same method. See see, it varies from picture to picture!
------------------------------------------------
Thank you for following this tutorial! Do feel free to share the results with me :D If any bits are unclear or too confusing, do ask! This is my first tutorial xD I;m pretty sure I stuffed a link up somewhere - let me know xD I got lazier towards the end xDDDDD.
Entry is public for the time being.
IMAGE HEAVY TO THE EXTREME
Downloadable word document version: coming soon.
I really like writing tutorials - if you like my stuff and want a tutorial on something else in particular, do ask XD. But all I really do is colour and vector xD A lot of it is common sense and experimentation. I might post this to my community and pimp it out if I get a good reaction xD.
God it's hard to screencap everything you do.
Tutorial stats:
Level: I'd say easy-medium level. But you at least should know most of photoshop's functions.
Time taken: Ignoring all the time to screencap and write the tutorial out, maybe an hour or two.
Okay, some stuff before we begin.
---------------------------------------------
1. I'm using photoshop cs3 for this tutorial. I'm sure there are ways you can adapt this to other programs but yeah. It helps to have the program. You can also use a tablet, but I'm too lazy and it hurts my fingers xD.
2. I'm a self-taught person who always does things MY way. I have no clue whether that's good or bad or if it will affect anything. I still consider myself an amateur at this.
3. It's great to follow the tutorial exactly, but make sure you don't use my style for everything xD. It's way cooler to have your own style. Besides, you don't want to colour like me xDDDD. It's all about your own preferences too, for example, I like the redder hues for skin tones and emphasize certain places more than others. But that's me :D
4. I'm using pre-cleaned lineart. If I had a penny for every lineart tutorial out there, I'd be able to fly to Japan. Okay, maybe not, but you get my point. I might make one later, but I honestly never really use manga panels unless I vector the outlines xD It's too much effort to clean.
5. REMEMBER TO SAVE!!!! I know I'm a freak who saves every 20 seconds but I've never lost progress on a file AND YOU ALL KNOW HOW MUCH IT SUCKSSSSSSS.
6. I'm under the assumption you at least know how to make a new layer and know where most of the tools and functions are.
7. Practise makes perfect! Like, seriously. Obviously your first go ain't gonna look too fabulous, but practise and hone in on your own style.
---------------------------------------------
Okie dokie! Let's roll!
0. For this tutorial, our model is Tsuna from Reborn! I cleaned it a little and got rid of the screentone on his earphones. I also redrew a little bit here and there.

[NOTE: Some manga images have a LOT of screentones on them. They are such a pain to clean, I'd recommend vectoring the outlines if you're impatient and/or can vector. If you're patient and can't vector... feel free to clean it xD. HQ raws are brilliant things!]
----------------------------------------------
1. Open your image in photoshop. Make sure if you open up an image, to go to layer >> new >> layer from background if your image is being treated as a background layer. Because then it just screws everything up D=. Now make a background layer.

----------------------------------------------
2. I usually don't do it this method since I have some secret weapons, but for this tutorial, set the image to multiply. It makes the image transparent and you can paint under it! Yay!

----------------------------------------------
3. Okay, so now you've got your nice clean lineart set to multiply, and a background layer so you should have two layers. I find that using the paint bucket tool to fill the background in helps you see where you're colouring and you don't leave any white gaps. Make sure it's a colour you're not likely to use. I used pink! Well, I might use it later on, but you can always change it.
Now make a layer under your image. I called mine "skin", because that's what I'm going to be colouring first.
Use the pen tool, polygonal lassoo tool or manually fill in the area where his skin is :D I prefer the pen tool because it's very precise, but for beginners it's a little difficult. You can let it bleed into the area where his hair might be, because the hair layer will be on top of this (xDDDDD). I used the colour #fce2d9.

----------------------------------------------
4. Shading time!!~ Use the magic wand tool to select the base skin layer. You do this so that the colour won't go everywhere when you add shadows and highlights.
[Optional: You can also lock the transparency of the layer or use a clipping mask if you know how to work with that. I don't usually do those methods though.]

Now create a new layer (you don't have to, but it's easier to undo things like this). This layer will be for the shadows on the skin. You can name it "skin shadows" or whatever (I just called it "shadows" because I use layer groups).
Zoom in a bit, and choose a slightly darker tone than the skin tone. I'm using #e1b6a7. Now get a big, soft brush. One of those default round ones. I adjusted the settings like so...

Size: I use a larger brush for the lighter-toned shadows.
Hardness: I like to use a soft brush first, because this is just the simple shadows.
And also like this at the top...

The opacity is how opaque the brush is, and the flow is how much of it comes out at once and the spacing and stuff like that. I'd recommend around 20%-40% for both settings, it depends how fast you want to work and stuff like that.
Now add some shadows. Decrease the brush size as neccessary to get into the smaller areas. You can go over some parts to strengthen the shadows.

----------------------------------------------
5. Okay, now choose a slightly darker tone than your current shadows, adjust the brush hardness to around 50%. Make the brush smaller and get in there and emphasize the shadows. You can repeat this step and make the brush smaller and smaller and it harder and harder. I wouldn't reccomend going over 85% in hardness though, unless you want a cel-shaded look.

It should look a bit more realistic and cool now! Adjust the colours with hue/saturation as neccessary, 'cause my Tsuna's starting to look like he's been in the sun for too long.
-----------------------------------------------
6. Make a new layer for the highlights. Repeat steps 5-6 for the highlights, but instead of going darker, get lighter. Smooth out the skin.
I also added a bit of blush, but that's optional~
So basically, the operation goes like this: paint the lighter shade of shadows (or darker highlights, whatever), then adjust brush size and hardness, paint the slightly more darker shadows, adjust brush size and hardness, then paint detailed shadows. Yup.
Now my Tsunafish looks like this:

------------------------------------------------
7. Hair tiiiime! Fill in the area with whatever colour the hair is, make sure the layer is above the skin layer. Pretty much the same as steps 5-7, but I try to make my brush strokes more visible, because it's hair, and hair is hairy! =D
(If I should go into any more detail at this stage, let me know. But it shouldn't be too hard to work out now xD. Make a layer for the base colour, the shadows, and the highlights. Use magic wand tool to select the base layer to make it easier to colour.)

Okay, shadows all look good.

Highlights... Ewww. They look disgusting. I've edited them a bit by creating several more layers and filling it out with gradient effects and smudging, I'll only go into detail with that if anyone needs it xD. Yours should look fine, 'cause my colour choosing skills are crap.
Here's my final result for the hair:

------------------------------------------------
8. Colouring clothes or accessories - same deal as before. I only need to colour the earmuff and I sort of edited his shirt. I did all the shading on the same layer since it's so small.
------------------------------------------------
9. One of my favourite parts. The eye. Make a new layer, and fill in the "whites" of the eye (I dunno what the proper scientific term is xD). Tsuna's got some adoreable shota-boy eyes!.

Then you fill in the iris. Use the burn and dodge tool to add highlights and shadows to the eye on the "iris" layer. I find that at the top and bottom of anime eyes, you add the shadows there, and in the largest part you add a highlight. You'll need a REALLY SMALL brush. This is a really hard image to use for this since Tsuna's facing sideways here.

10. I think we're done! WOOHOO! My final result is this:

Now I saved the file as a transparent .png, and icon'd it.

Maybe I should make an icon tutorial someday... anyway.
------------------------------------------------
Here are some other examples where I've used the same method. See see, it varies from picture to picture!

------------------------------------------------
Thank you for following this tutorial! Do feel free to share the results with me :D If any bits are unclear or too confusing, do ask! This is my first tutorial xD I;m pretty sure I stuffed a link up somewhere - let me know xD I got lazier towards the end xDDDDD.
Entry is public for the time being.