tutorial #15. (hipster girl)
make this: 
from this.
using ps7. (no selective colour)
• make your 100 x100 base.
• duplicate your base and set it to screen. leave it as 100% for now (you may need to change it once the colouring is finished; depends on what image you're using)
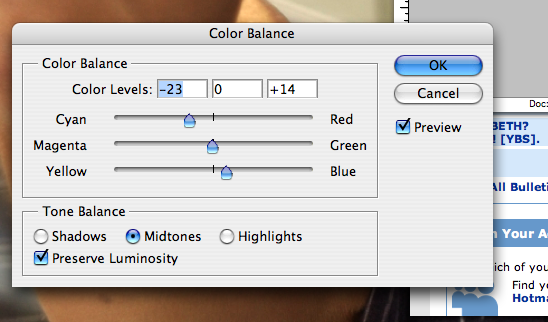
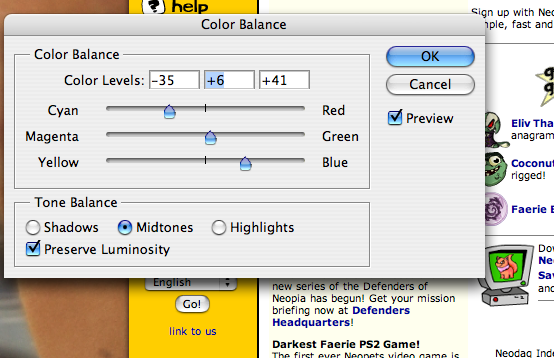
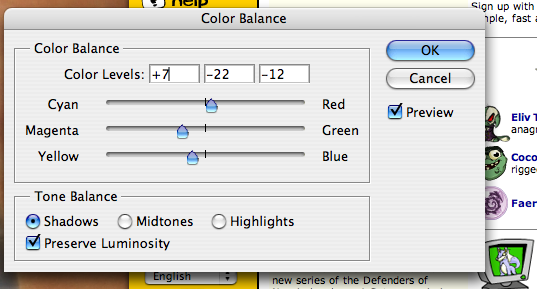
• layer > new adjustment layer > colour balance.
• layer > new adjustment layer > hue/saturation.
• increase the saturation to something in the 40s (it'll look better, trust me). i chose 44.
• layer > new adjustment layer > colour balance. make sure you have the right tone balance picked when you do each one (shadows, midtones).
• make a new layer. fill with #ffbada. set it to saturation 52% (change it around, it may make your icon look funny). erase any parts that aren't really looking that great.
• make a new layer and fill it with the same colour. set that to colour 18%.
• duplicate your base and drag it to the top. set to soft light 44%.
• make a new layer. fill with #dafeff. set to colour burn.
• after you do that you could go to layer > new adjustment layer > colour balance and play with the settings. i did do that, but i didn't want to make that much of a difference since i liked the way it looked.
okay, now onto the decorative part.
• choose a colour that you think would look well with the icons colour scheme.
• make a new layer. take the rectangle tool and make a coloured area.
• take a texture and paste it onto your icon. set it to screen (whatever opacity you want). i used one i made.
• then take the magic wand tool. make sure you're on the coloured space layer and not the texture. select the part that is not the colour. switch to the texture layer. press delete. now you have the texture just on the coloured rectangle.
• paste this dotted line by me (or whatever one you want). set it to screen. position where you want.
• make some coloured 8 x8 sized squares and place them on your icon where you'd like.
i hope that made sense. :]
i'd love to see what you think and what you get. :]
and remember: change the opacities. it won't work step by step with every image.
wanna see more tutorials and/or icons by me? join this community!
♥
from this.
using ps7. (no selective colour)
• make your 100 x100 base.
• duplicate your base and set it to screen. leave it as 100% for now (you may need to change it once the colouring is finished; depends on what image you're using)
• layer > new adjustment layer > colour balance.
• layer > new adjustment layer > hue/saturation.
• increase the saturation to something in the 40s (it'll look better, trust me). i chose 44.
• layer > new adjustment layer > colour balance. make sure you have the right tone balance picked when you do each one (shadows, midtones).
• make a new layer. fill with #ffbada. set it to saturation 52% (change it around, it may make your icon look funny). erase any parts that aren't really looking that great.
• make a new layer and fill it with the same colour. set that to colour 18%.
• duplicate your base and drag it to the top. set to soft light 44%.
• make a new layer. fill with #dafeff. set to colour burn.
• after you do that you could go to layer > new adjustment layer > colour balance and play with the settings. i did do that, but i didn't want to make that much of a difference since i liked the way it looked.
okay, now onto the decorative part.
• choose a colour that you think would look well with the icons colour scheme.
• make a new layer. take the rectangle tool and make a coloured area.
• take a texture and paste it onto your icon. set it to screen (whatever opacity you want). i used one i made.
• then take the magic wand tool. make sure you're on the coloured space layer and not the texture. select the part that is not the colour. switch to the texture layer. press delete. now you have the texture just on the coloured rectangle.
• paste this dotted line by me (or whatever one you want). set it to screen. position where you want.
• make some coloured 8 x8 sized squares and place them on your icon where you'd like.
i hope that made sense. :]
i'd love to see what you think and what you get. :]
and remember: change the opacities. it won't work step by step with every image.
wanna see more tutorials and/or icons by me? join this community!
♥