Silhouette Tutorial
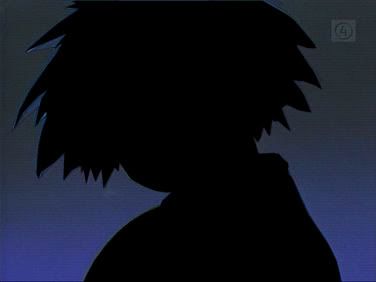
I thought I would treat you to something while my next iconpost is still in the works. :) This is a tutorial on how to make those cool iPod silhouette icons, like this:

COOL, HUH? (PS. If you take this icon please credit me LOL. Gosh, I'm greedy. =P)
Haha, anyway, here you go (PPS. Not dial-up friendly, sorry)--
Silhouette Tutorial by __ichigo and rebelschosen
This tutorial shows how to make icons like this:

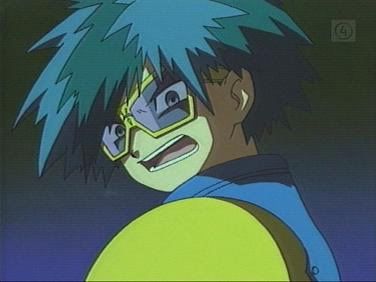
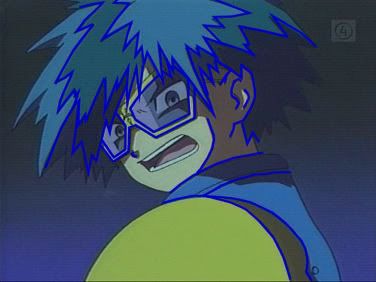
Step 1. Okay, so first you need an image:
Step 2. Next, create a new raster layer over your image & fill it with the colour of your choice. Remember though that it should be light enough to tell it from the black. Lower the opacity of this layer so that you can clearly see the picture underneath. This is the coloured layer for this tutorial:

Step 3. Now, we need to outline the figure in black, so make a new raster layer at a low opacity (so you can still see image underneath) and fill it in with black. Choose the lasso tool from your toolbar and use the dropdown box on your tool palatte to select Point to Point. Make sure the antialias is on. Using Point to Point, select around the outside of the figure and delete it.

.
.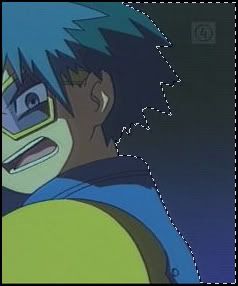
After you finish deleting, raise the layer's opacity back up to 100%. It should look something like this:
If it looks similar to that, good! If not, then... I don't know, lol. Anyway, after you're finished outlining & deleting, lower this layer's opacity so that you can once again see the image underneath.
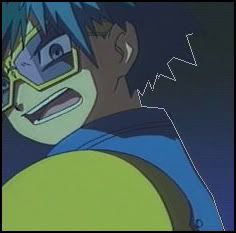
Step 4. Now it is time to outline the lines inside the figure. If you don't know what I'm talking about, look at the picture that goes along with this step. Make another raster layer at 100% opacity. Using a small, round brush (probably sizes 4-6 would work best), choose the same colour from Step 2 and outline the lines inside the figure. But remember not to outline the outside of the figure (gosh, this is confusing, sorry LOL). Outline whatever you feel looks good, but we came to the conclusion that they usually look better without mouths. *shrug* (There's probably an easier way to outline, like using the Point to Point selection under the Draw tool, but all of my lines in PSP7 have some stupid arrow things at the ends.. *rolls eyes*) Anyway, it should look something like this:
Step 5. You're almost done, I swear. Okay, now go back and raise all of your layers' opacities back to 100%. Cool, huh?
Make a new raster layer, 100% opacity. Now, using either the Preset Shapes button (on your toolbar), or a small, round brush, draw the earpiece in white. For this icon, a small, vertical ellipse was drawn next to a fatter, vertical ellipse. After you have drawn the earpiece, it's time for the cords. Still using white, click on the Draw button (on your toolbar) and use the dropdown box to select Bezier Curve. Start the line where you want the cord to come out of the earpiece. Then, pull the line to how you want it to be curved (it will only let you pull it twice). Do the same for the cord coming from the other side of the head.
After you finish the headphones, merge all your layers. It should look something like this:
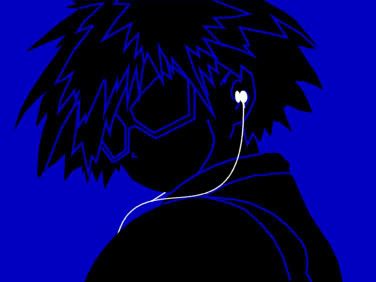
Step 6. Crop & resize to 100 x 100. Finish off with a simple, black line border. Voila!:
I really hope yours looks like that, or I did a mega bad job writing this thing. ^__^;; If yours does, show us the finished product! If it doesn't, feel free to ask questions. Feedback, darlings!
Credits:
Written by: __ichigo
Layers created and provided by: rebelschosen
COOL, HUH? (PS. If you take this icon please credit me LOL. Gosh, I'm greedy. =P)
Haha, anyway, here you go (PPS. Not dial-up friendly, sorry)--
Silhouette Tutorial by __ichigo and rebelschosen
This tutorial shows how to make icons like this:
Step 1. Okay, so first you need an image:
Step 2. Next, create a new raster layer over your image & fill it with the colour of your choice. Remember though that it should be light enough to tell it from the black. Lower the opacity of this layer so that you can clearly see the picture underneath. This is the coloured layer for this tutorial:
Step 3. Now, we need to outline the figure in black, so make a new raster layer at a low opacity (so you can still see image underneath) and fill it in with black. Choose the lasso tool from your toolbar and use the dropdown box on your tool palatte to select Point to Point. Make sure the antialias is on. Using Point to Point, select around the outside of the figure and delete it.
.
.
After you finish deleting, raise the layer's opacity back up to 100%. It should look something like this:
If it looks similar to that, good! If not, then... I don't know, lol. Anyway, after you're finished outlining & deleting, lower this layer's opacity so that you can once again see the image underneath.
Step 4. Now it is time to outline the lines inside the figure. If you don't know what I'm talking about, look at the picture that goes along with this step. Make another raster layer at 100% opacity. Using a small, round brush (probably sizes 4-6 would work best), choose the same colour from Step 2 and outline the lines inside the figure. But remember not to outline the outside of the figure (gosh, this is confusing, sorry LOL). Outline whatever you feel looks good, but we came to the conclusion that they usually look better without mouths. *shrug* (There's probably an easier way to outline, like using the Point to Point selection under the Draw tool, but all of my lines in PSP7 have some stupid arrow things at the ends.. *rolls eyes*) Anyway, it should look something like this:
Step 5. You're almost done, I swear. Okay, now go back and raise all of your layers' opacities back to 100%. Cool, huh?
Make a new raster layer, 100% opacity. Now, using either the Preset Shapes button (on your toolbar), or a small, round brush, draw the earpiece in white. For this icon, a small, vertical ellipse was drawn next to a fatter, vertical ellipse. After you have drawn the earpiece, it's time for the cords. Still using white, click on the Draw button (on your toolbar) and use the dropdown box to select Bezier Curve. Start the line where you want the cord to come out of the earpiece. Then, pull the line to how you want it to be curved (it will only let you pull it twice). Do the same for the cord coming from the other side of the head.
After you finish the headphones, merge all your layers. It should look something like this:
Step 6. Crop & resize to 100 x 100. Finish off with a simple, black line border. Voila!:
I really hope yours looks like that, or I did a mega bad job writing this thing. ^__^;; If yours does, show us the finished product! If it doesn't, feel free to ask questions. Feedback, darlings!
Credits:
Written by: __ichigo
Layers created and provided by: rebelschosen